TIBCO Hawk® is a tool for monitoring and managing distributed applications and systems that use TIBCO Rendezvous® or TIBCO Enterprise Message Service™ as transports. It exposes metrics to a variety of infrastructure data (i.e.: SNMP, CPU utilization and network statistics), as well as providing information about other TIBCO® middleware such as TIBCO BusinessWorks™.
RTView for TIBCO Hawk® is primarily used to create applications that monitor application and infrastructure health. These applications can provide:
§ Drill-down capability to detailed agent and microagent information
§ Side-by-side comparisons of information from multiple agents
§ Health and status visualization of AMI instrumented applications
§ Summarized views of application status and alerts
§ TIBCO Hawk® commands to manage applications (i.e.: restart an application)
RTView ships with a standard set of TIBCO Hawk® monitoring displays that can be used as-is or as a starting point for a more sophisticated application.
This section includes:
§ “TIBCO Hawk - System Requirements and Setup” on page 721
§ “Attach to TIBCO Hawk Data” on page 722
§ “Define TIBCO Hawk Command” on page 731
§ “TIBCO Hawk Data Source Substitutions” on page 735
§ “Application Options - TIBCO Hawk” on page 735
§ “TIBCO Hawk Agent and Microagent Groups Tab” on page 741
§ “RTView Deployment - TIBCO Hawk” on page 745
§ “TIBCO Hawk Demos” on page 748
§ “Quick Start Tutorial - TIBCO Hawk” on page 750
§ “Sample TIBCO Hawk Microagent” on page 754
§ “TIBCO Hawk - Command Line Options” on page 757
TIBCO Hawk - System Requirements and Setup
In addition to basic “System Requirements”, the TIBCO Hawk data source requires TIBCO Rendezvous and TIBCO Hawk. See the README_sysreq.txt file in your installation’s home directory for the current version(s) supported.
By default, all RTView applications connect to TIBCO Hawk using the TIBCO Rendezvous Daemon (rvd) transport.
“Rich Client Browser with Direct Data Connection”
The Display Viewer Applet cannot communicate with TIBCO Hawk using rvd. Due to TIBCO Hawk requirements, the Display Viewer Applet must either use the TIBCO Rendezvous Agent Process (rva) transport or a TIBCO EMS transport to directly connect to TIBCO Hawk data. You can specify the type of transport you would like to use in the Application Options dialog. See “Application Options - TIBCO Hawk” for more information.
TIBCO Rendezvous Agent Process (rva) transport
The rva transport requires TIBCO Rendezvous 6.x and TIBCO Hawk 4.2+. You must be running rva in order for the Display Viewer Applet to send and receive TIBCO Hawk data. If you have not run rva before, you must also configure rva to use the correct rvd settings. See “Communicating with TIBCO Hawk” for information on how to configure and run rva.
TIBCO EMS transport
To use an EMS transport you may need to modify your Java security settings to include the following permissions:
permission java.util.PropertyPermission "sun.arch.data.model", "read";
permission java.util.PropertyPermission "tibco.tibjms.reconnect.attempts", "read";
permission java.util.PropertyPermission "tibco.tibjms.connect.attempts", "read";
Additionally when using rva or EMS, the Display Viewer Applet must be run from a web server.
Note: As an alternative to using rva or EMS, you may also redirect TIBCO Hawk data through the RTView Data Server. When you redirect data through the Data Server, the Display Viewer Applet does not need to be run from a web server. See “Rich Client Browser with Served Data” for more information.
In addition to general environment variables (see “Setup”), you must set both RV_ROOT and HAWK_ROOT and have TIBCO Rendezvous and TIBCO Hawk installed:
|
Name |
Description |
Example |
|
RV_ROOT TIBCO |
TIBCO Rendezvous installation directory. If you installed RTView using the Windows installer, this variable will already be set globally on your system. |
c:\TIBCO\TIBRV |
|
HAWK_ROOT |
TIBCO Hawk installation directory. This variable must point to a Hawk 4.x or Hawk 5.1+ installation. If you installed RTView using the Windows installer, this variable will already be set globally on your system. |
c:\TIBCO\HAWK |
|
TIBJMS_ROOT |
TIBCO EMS installation directory. This is only required if you are using an EMS transport for your TIBCO Hawk agents. If you installed RTView using the Windows installer, this variable may already be set globally on your system. |
C:\TIBCO\ems |
Note: The PATH environment variable should include the bin subdirectory for HAWK_ROOT and RV_ROOT variables (e.g.: c:\TIBCO\HAWK\bin and/or c:\TIBCO\TIBRV\bin).
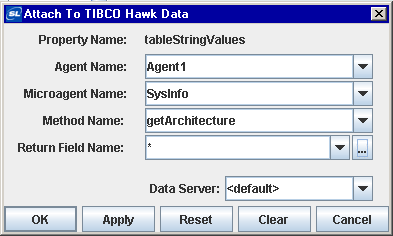
The Attach to TIBCO Hawk Data dialog, which is used to subscribe to a TIBCO Hawk Agent's microagent method, can be accessed from the Object Properties window. In the Attach to TIBCO Hawk Data dialog, you will specify which return field from the method will be used to update an object's dynamic properties. Once a property has been attached to a microagent method subscription, it receives continuous updates.
When an object property is attached to data, the Property Name and Value in the Object Properties window will be displayed in green. This indicates that editing values from the Object Properties window is no longer possible. To remove the data attachment and resume editing capabilities in the Object Properties window, right-click on the Property Name and select Detach from TIBCO Hawk Data. You will recognize that an object property has been detached from the data source when the Property Name and Value are no longer green.
Right-click on the Property Name from the Object Properties window and select Attach to Data>HAWK to display the Attach to TIBCO Hawk Data dialog. The Attach to TIBCO Hawk Data dialog provides several drop down menus that allow you to specify information regarding a method subscription.
|
Field Name |
Description |
|
Agent Name |
Name of the agent containing the microagent method to subscribe. To specify an agent on a specific connection, append the connection name enclosed in parentheses. For example: Agent1 - Agent1 on the default connection. Agent1(ConnectionA) - Agent1 on ConnectionA. Agent1(ConnectionB) - Agent1 on ConnectionB. To subscribe to all agents with the same name on all connections, append (*) to the Agent Name value. For example: Agent1(*) - Agent1 on all connections. To specify all agents for a particular connection, use the TIBCO Hawk Agent Group that is automatically created for that connection. For example: *:ConnectionB - All agents from ConnectionB. The “TIBCO Hawk Agent and Microagent Groups Tab” allows you to define Agent Groups and add them to the drop down menu in the Attach to Data dialog. See Special Values for more supported values for this field. |
|
Microagent Name |
Name of the microagent containing the method to subscribe. The “TIBCO Hawk Agent and Microagent Groups Tab” allows you to define Microagent Groups and add them to the drop down menu in the Attach to Data dialog. See “Special Values” for more supported values for this field. |
|
Method Name |
Name of the method to subscribe. |
|
Return Field Name |
Name of the field in the method return data containing the value to use to update the object. See Special Values for more supported values for this field. |
|
Method Argument(s) |
Method argument fields (e.g., Return Field Name, TimeInterval, RTVPollInterval) depend on which microagent and method are selected. |
|
Data Server |
Select to read data through your configured Data Server and not directly from the TIBCO Hawk data source. Default - Select the default Data Server you configured in Application Options>“Data Server Tab”. None - Bypass data being redirected through the specified data server(s) for this attachment and instead attach directly to the data source. |
|
|
Named Data Servers - Select a Named Data Server that you configured in Application Options>“Data Server Tab”. Multi-Server Attachment - To configure multiple data servers, enter a semicolon (;) delimited list containing two or more Named Data Servers (e.g. ds101;ds102). Each name specified must correspond with a Named Data Server that you configured in Application Options>“Data Server Tab”. It is also possible to specify __default and __none (e.g. __default;ds101;ds102). Note: The values __default and __none begin with two underscore characters. Alternatively, a value of * can be entered to specify all data servers, including __default and __none. When multiple data servers are specified, the data attachment will be directed to each data server in the list. For tabular data attachments, a column named DataServerName will be added as the first column of the table and contain the name of the server from which the data was received. A multi-server attachment will receive data independently from each of the servers it specifies, so in most cases it will be necessary to combine the tables received into a single table. This can be accomplished in two ways: 1. The multi-server attachment can be applied to a local cache that has the DataServerName column specified as an index column. The current table of that cache will contain the combination of the tables received from all servers. Note: It may also be necessary to configure cache row expiration settings to remove defunct rows. 2. The multi-server attachment can be applied as the Table argument of the RTView function named Combine Multi-Server Tables. See “Tabular Functions” for more information. |
A Method Repository file is used to populate the initial values in the drop down menus for all fields when agents and microagents are not available. This makes it easy to create displays for agents and microagents when they are not online. See “Application Options - TIBCO Hawk” for information on how to create a Method Repository file.
As new agents and microagents come online, drop down menus are automatically updated. If a drop down menu does not contain the item you require, type your selection into the field.
The method argument fields that appear depend on the microagent and method that you select. Argument fields are labeled according to the selected method's requirements. If the method is not recognized, five generic argument fields are provided.
Note: The argument RTVPollInterval is provided so that you can set a time interval for synchronous methods.
Fields in the dialog change colors according to the information entered. These colors indicate whether or not information is valid. Information entered into the dialog is validated against the contents of the Method Repository, as well as information contained in live agents and microagents.
Note: Agent, Microagent and Method values must be valid in order to create a subscription.
The following describes the significance of the Attach to TIBCO Hawk Data validation colors:
|
Blue |
Unknown |
Entry was not found in the Method Repository, nor can it be confirmed against a live agent/microagent. When a microagent is unknown, the Method, Return Field, and Argument(s) fields are also unknown. |
|
Yellow |
Offline |
Entry was either found in the Method Repository or was previously available, but is not currently online. This applies to agents and microagents. |
|
White |
Valid state |
Entry is valid and was either found in the Method Repository or could be confirmed against a live agent/microagent. |
|
Red |
Invalid state |
Entry is not valid. |
|
Gray |
Not Required |
Field does not require a value. This applies to the Return Field for methods that do not have any returns. |
Substitutions allow you to build open-ended displays in which data attachments depend on values defined at the time the display is run. Generic names for agents, such as $agent1 and $agent2, are used instead of values for specific agents. Later when the display is running, these generic values are defined by the actual names of specific agents, such as computer6 and computer11. In this way, a single display can be reused to show data from a number of different sources. For more information on creating displays using substitution values, see “Substitutions”.
Several special values can be entered for agents, microagents, and return fields.

|
Field Name |
Description |
|
|
Agent Name |
* |
When * is entered, the return fields from all specified microagents on all agents will be used to update the object property. This value is only useful for objects which display tabular data. |
|
|
Agent (Connection) |
When the connection is specified after the agent name, the agent on the specified connection will be used. Agent1 - Agent1 on the default connection. Agent1(ConnectionA) - Agent1 on ConnectionA. Agent1(ConnectionB) - Agent1 on ConnectionB. To subscribe to all agents with the same name on all connections, append (*) to the Agent Name value. For example: Agent1(*) - Agent1 on all connections. To specify all agents for a particular connection, use the TIBCO Hawk Agent Group that is automatically created for that connection. For example: *:ConnectionB - All agents from ConnectionB. |
|
|
*:groupname (*:group1) |
When *:groupname is entered, the return fields from all specified microagents on all agents in the specified Agent Group will be used to update the object property. This value is only useful for objects which display tabular data. See “Application Options - TIBCO Hawk” for more information. |
|
Microagent Name |
name (HawkSpot) name* (HawkSpot*) |
When only the name of a microagent is listed, the first microagent found on the specified agent is the one that will be used to update the object property. You can also use a wildcard character at the end of the Microagent Name. Data attachments will use the first instance found for all microagents that start with the specified name. If multiple microagents are found for a data attachment, the data for each will be returned. |
|
|
name:index (HawkSpot:1) name*:index (HawkSpot*:1) |
When an index is specified after the microagent name, the microagent instance for that index will be used to update the object property. You can also use a wildcard character at the end of the Microagent Name. Data attachments will use the instance for the specified index for all microagents that start with the specified name. If multiple microagents are found for a data attachment, the data for each will be returned. |
|
|
name:* (HawkSpot:*) name*:* (HawkSpot*:*) |
When * is entered as an index, all instances of the specified microagent will be used to update the object property. This is only useful for objects which display tabular data. You can also use a wildcard character at the end of the Microagent Name. Data attachments will use all active instances for all microagents that start with the specified name. If multiple microagents are found for a data attachment, the data for each will be returned. |
|
|
*:groupname (*:group1) |
When *:groupname is entered, Method Name, Return Field Name and Argument fields will validate and populate against the first microagent in the Microagent Group. This value is only useful for objects which display tabular data. See “Application Options - TIBCO Hawk” for more information. |
|
Return Field |
* |
When * is entered, values from all return fields will be used to update the object property. This is only allowed for objects which display tabular data. |
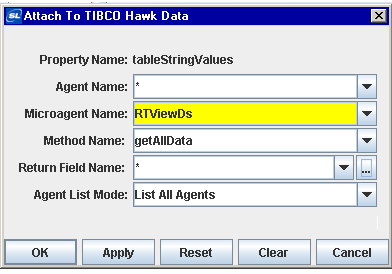
RTViewDs is a simulated microagent that allows you to call the following methods from RTView to get information that is not available via a microagent method regarding an agent. RTViewDs methods take one argument, Agent List Mode, which indicates whether to return information regarding agents that are offline.
The following describes RTViewDs methods:
|
getName |
Returns name of specified agent or the value UNKNOWN if agent is inactive. This method has only one return field: Name. |
|
getStatus |
Returns status of specified agent (values: 1=agent is active, 0=agent is inactive). This method has only one return field: Status |
|
getCluster |
Returns cluster name of specified agent or the value UNKNOWN if agent is inactive. This method has only one return field: Cluster |
|
getConnectionName |
Returns the name of the connection for this agent or the value UNKNOWN if the agent is inactive. This method has only one return field: Connection. See “Application Options - TIBCO Hawk” for more information. |
|
getDsName |
Returns name of specified agent including the connection name if it is not on the default connection, or the value UNKNOWN if agent is inactive. This method has only one return field: DsName |
|
getAlert |
Returns highest alert (values: 1,2,3,4=correspond to TIBCO Hawk Console API, 0=agent is inactive). This method has only one return field: Alert |
|
getAlertString |
Returns highest alert according to TIBCO Hawk Console API or the value UNKNOWN if agent is inactive. This method has only one return field: AlertString |
|
getAlertData |
Returns information about an alert when the alert is posted. By default, this method does not retrieve alerts posted prior to the data attachment or before the view is displayed. For information on displaying existing alerts, see Application Options. Return fields to choose from: Agent - Name of the agent that posted the alert AlertID - ID of the alert AlertState - Rulebase state of the alert (values: 1,2,3,4= correspond to the TIBCO Hawk Console API). AlertString - Rulebase state of the alert (values: ALERT-LOW, ALERT-MEDIUM, ALERT-HIGH correspond to the TIBCO Hawk Console API). RuleBase - Rulebase that posted the alert Cleared - Returns false if alert is active, returns true if alert is cleared Time - Date and time alert was generated AlertText - Alert text See “Application Options - TIBCO Hawk” for more information. |
|
getPlatform |
Returns the platform the agent is running on or the value UNKNOWN if the agent is inactive. Return fields to choose from: Agent - Name of the agent Architecture - Platform architecture Name - Name of the platform Version - Version of the platform If no return field is selected, the method will return the platform as follows: Architecture:Name:Version |
|
getIPAddress |
Returns the IP address for the agent or UNKNOWN if the agent is inactive. This method has only one return field: IPAddress |
|
getAllData |
Returns all RTViewDs data. Return fields correspond to the methods listed above. Return fields to choose from: Alert AlertString Cluster Connection Name DsName IPAddress Name Platform Status |
|
getGroupData |
Returns group information about a particular Agent. This is useful when caches are used to store data for applications that organize or aggregate Hawk Agent information using groups. Return fields to choose from: Agent - Name of the agent GroupName - Name of the group containing the agent ConnectionName - Name of the connection for this agent DSName - Name of the agent including the connection name if it is not on the default connection Note: Since an Agent may be in more than one group, a single Agent may show up multiple times (once for each group that contains it). |
|
getAgentStatus |
Used only for the purpose of debugging agent and subscription problems. Note: Returns the following columns containing information about the subscription: Display Name - Display name of the agent. Status - Alive indicates RTView received an onAgentAlive event for this agent that is currently active; Expired indicates RTView received an onAgentExpired event and has not yet received another onAgentAlive event; Not Discovered indicates RTView is configured for this agent but has not yet received an onAgentAlive event. onAgentAlive Time - Timestamp of the most recent onAgentAlive event for this agent. onAgentExpired Time - Timestamp of the most recent onAgentExpired event for this agent. onAgentExpired Count - Number of onAgentExpired events RTView has received for this agent since startup. Data Received Time - Last time RTView received data from this agent. This may be subscription data or alert data. To see values over time (rather than just the latest value) attach the method to a cache, set the indexColumnNames on the cache to Display Name and deselect the allowDuplicatesInHistoryFlag on the cache. This method ignores the Disable Data Caching application option and caches all of the data regardless of how that flag is configured. |
|
getSubscriptionStatus |
Used only for the purpose of debugging agent and subscription problems. Note: Because this method can cause performance issues, it must not be used in standard user displays, nor should a cache containing this information be deployed in a production environment. Returns the following columns containing information about the subscription: Agent - Display name of the agent. Key - Key used internally to track this subscription, containing the agent, microagent, method and listener information. Status - Pending indicates RTView queued but not yet processed the subscription request; Active indicates RTView processed the subscription; Cancelled indicates RTView cancelled the subscription. Request Time - Time this subscription was requested. Create Time - Time this subscription was created. Create Length - Amount of time, in milliseconds, it took the Hawk agent to respond to the subscription request. |
|
|
Queue Length - Amount of time, in milliseconds, this subscription waited in the queue before RTView requested it from the agent. Data Received Time - Last time RTView received data for this subscription. Cancel Time - Time this subscription was cancelled. Cancel Reason - Reason this subscription was cancelled. No Listeners indicates there are no more listeners for this subscription; Microagent Removed indicates the microagent is no longer available; Agent Connection indicates RTView received an onAgentExpired event for the agent. |
|
|
onData Length - Amount of time, in milliseconds, that the last onData call took to process the subscription data To see values over time (rather than just the latest value) attach the method to a cache, set the indexColumnNames on the cache to Key and deselect the allowDuplicatesInHistoryFlag on the cache. This method ignores the Disable Data Caching application option and caches all of the data regardless of how that flag is configured. |
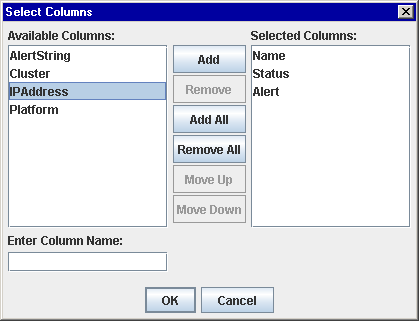
From the Attach to TIBCO Hawk Data dialog you can specify which method return columns to display in a table and in what order they will appear. To populate the listing of available method return columns, you must first select a valid microagent and a method.
To display the Select Columns dialog, click on the ellipsis button in the Return Field Name field (or right-click in the Return Field Name field and choose Select Columns). The dialog should contain a list of Available Columns that you can add to your table.
To add a column, select an item from the Available Columns list and click on the Add button. If the item you require is not listed, type your selection into the Enter Column Name field. Click the Remove button to delete an item previously added to the Selected Columns list. You can control the order of columns in a table by arranging the items in the Selected Columns list with the Move Up and Move Down buttons.
Validation colors indicate whether selected method return columns are valid. However if even one selected column is invalid, the Return Field Name field in the Attach to TIBCO Hawk Data dialog will register as an invalid entry.
Note: Agent, Microagent, and Method values must be valid in order to create a subscription.
If no data is available for a table row within a selected column, then the table cell will display one the following values: N/A, false, 0, or 0.0.
The following describes Attach to TIBCO Hawk Data dialog commands:
|
Command |
Description |
|
OK |
Applies values and closes the dialog. |
|
Apply |
Applies values without closing the dialog. |
|
Reset |
Resets all fields to last values applied. |
|
Clear |
Clears all fields. Detaches object from data source (once Apply or OK is selected). |
|
Cancel |
Closes the dialog with last values applied. |
Note: The TIBCO Hawk data source may not be licensed in your RTView installation.
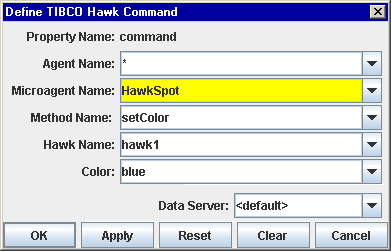
You can access the Define TIBCO Hawk Command dialog from the Object Properties window. This dialog is used to assign a TIBCO Hawk Agent's microagent method to an object's command property, thus giving you the ability to invoke methods from within a display. If you execute a TIBCO Hawk command from a Thin Client with Direct Data Connection or any Served Data deployment, the command will execute on the server.
Right-click on the appropriate command property in the Object Properties window and select Define Command>HAWK to display the Define TIBCO Hawk Command dialog. The Define TIBCO Hawk Command dialog provides several drop down menus to specify information regarding assigning a method to an object. The information supplied assigns a microagent method as a command. See the “Define/Execute Command” section for information on how to execute a command.
|
Field Name |
Description |
|
Agent Name |
Name of the agent containing the microagent method to invoke. To specify an agent on a specific connection, append the connection name enclosed in parentheses. For example: Agent1 - Agent1 on the default connection. Agent1(ConnectionA) - Agent1 on ConnectionA. Agent1(ConnectionB) - Agent1 on ConnectionB. To invoke a method on all agents with the same name on all connections, append (*) to the Agent Name value. For example: Agent1(*) - Agent1 on all connections. To specify all agents for a particular connection, use the TIBCO Hawk Agent Group that is automatically created for that connection. For example: *:ConnectionB - All agents from ConnectionB. The “TIBCO Hawk Agent and Microagent Groups Tab” allows you to define Agent Groups and add them to the drop down menu in the Define Command dialog. |
|
|
See “Special Values” for more supported values for this field. |
|
Microagent Name |
Name of the microagent containing the method to invoke. The “TIBCO Hawk Agent and Microagent Groups Tab” allows you to define Microagent Groups and add them to the drop down menu in the Define Command dialog. See “Special Values” for more supported values for this field. |
|
Method Name |
Name of the method to invoke. |
|
Method Argument(s) |
Method argument fields (e.g. Color) depend on which microagent and method are selected. To attach a method argument to data, right-click and choose Attach to Data or double-click in the field. |
|
Data Server |
Select to read data through your configured Data Server and not directly from the TIBCO Hawk data source. Default - Select the default Data Server you configured in Application Options>“Data Server Tab”. None - Bypass data being redirected through the specified data server(s) for this attachment and instead attach directly to the data source. Named Data Servers - Select a Named Data Server that you configured in Application Options>“Data Server Tab”. Multi-Server Command - When multiple data servers are specified, the command will be executed on each data server in the list. To configure multiple data servers, enter a semicolon (;) delimited list containing two or more Named Data Servers (e.g. ds101;ds102). Each name specified must correspond with a Named Data Server that you configured in Application Options>“Data Server Tab”. It is also possible to specify __default and __none (e.g. __default;ds101;ds102). The values __default and __none begin with two underscore characters. Alternatively, a value of * can be entered to specify all data servers, including __default and __none. |
A Method Repository file is used to populate the initial values in the drop down menus for all fields when agents and microagents are not available. This makes it easy to create displays for agents and microagents when they are not online. See “Application Options - TIBCO Hawk” for information on how to create a Method Repository file.
As new agents and microagents come online, drop down menus are automatically updated. If a drop down menu does not contain the item you require, type your selection into the field.
The method argument fields that appear depend on the microagent and method that you select. Argument fields are labeled according to the selected method's requirements. If the method is not recognized, five generic argument fields are provided.
Fields in the dialog change colors according to the information entered. These colors indicate whether or not information is valid. Information entered into the dialog is validated against the contents of the Method Repository, as well as information contained in live agents and microagents. Only methods that are not asynchronous and have an impact value equal to IMPACT_ACTION or IMPACT_ACTION_INFO are considered to be valid.
Note: The assigned method will be invoked only if all entries are valid.
The following describes the significance of the Define TIBCO Hawk Command dialog validation colors:
|
Blue |
Unknown |
Entry was not found in the Method Repository, nor can it be confirmed against a live agent/microagent. When a microagent is unknown, the Method and Argument(s) fields are all also unknown. |
|
Yellow |
Offline |
Entry was either found in the Method Repository or was previously available, but is not currently online. This applies to agents and microagents. |
|
White |
Valid state |
Entry is valid and was either found in the Method Repository or can be confirmed against a live agent/microagent. For the Method Name field, this indicates entry is not asynchronous and has an impact value equal to IMPACT_ACTION or IMPACT_ACTION_INFO. |
|
Red |
Invalid state |
Entry is not valid. For the Method Name field, this indicates entry is asynchronous and does not have an impact value equal to IMPACT_ACTION or IMPACT_ACTION_INFO. |
|
Gray |
Not Required |
Field does not require a value. |
Substitutions allow you to build open-ended displays in which commands depend on values defined at the time the display is run. Generic names for agents, such as $agent1 and $agent2, are used instead of values for specific agents. Later when the display is running, these generic values are defined by the actual names of specific agents, such as computer6 and computer11. In this way, a single display can be reused to execute commands for a number of different sources. For more information on creating displays using substitution values, see “Substitutions”.
|
Agent Name |
* |
This indicates that the method of the specified microagent will be executed on all agents. |
|
Agent(Connection) |
When the connection is specified after the agent name, the agent on the specified connection will be used. Agent1 - Agent1 on the default connection. Agent1(ConnectionA) - Agent1 on ConnectionA. Agent1(ConnectionB) - Agent1 on ConnectionB. To invoke a method on all agents with the same name on all connections, append (*) to the Agent Name value. For example: Agent1(*) - Agent1 on all connections. To specify all agents for a particular connection, use the TIBCO Hawk Agent Group that is automatically created for that connection. For example: *:ConnectionB - All agents from ConnectionB |
|
|
*:groupname (*:group1) |
When *:groupname is entered, the return fields from all specified microagents on all agents in the specified Agent Group will be used to update the object property. This value is only useful for objects which display tabular data. See “Application Options - TIBCO Hawk” for more information. |
|
|
Microagent Name |
Name (HawkSpot) name* (HawkSpot*) |
When only the name of a microagent is listed, the first microagent found on the specified agent is the one on which the method will execute. You can also use a wildcard character at the end of the Microagent Name. Commands will use the first instance found for all microagents that start with the specified name. If multiple microagents are found for a command, the command will execute on each microagent. |
|
name:index (HawkSpot:1) |
When :index is added after the microagent name, the microagent with the index indicated is the one on which the method will execute. You can also use a wildcard character at the end of the Microagent Name. Commands will use the instance for the the specified index for all microagents that start with the specified name. If multiple microagents are found for a command, the command will execute on each microagent. |
|
|
name:* (HawkSpot:*) |
When * is used as the index for a microagent, the method will be executed on all instances of the specified microagent. You can also use a wildcard character at the end of the Microagent Name. Commands will use all active instances for all microagents that start with the specified name. If multiple microagents are found for a command, the command will execute on each microagent. |
|
|
*:groupname (*:group1) |
When *:groupname is entered, Method Name, Return Field Name, and Argument fields will validate and populate against the first microagent in the Microagent Group. This value is only useful for objects which display tabular data. See “Application Options - TIBCO Hawk” for more information. |
|
|
This value may be used in any field in the Define TIBCO Hawk Command dialog. |
$value |
When an actionCommand is executed $value is replaced with the value from the control. Note: This value may only be used for Action Commands. See “Define/Execute Command” for more information. |
The following describes Define TIBCO Hawk Command dialog commands:
|
Command |
Description |
|
OK |
Applies values and closes the dialog. |
|
Apply |
Applies values without closing the dialog. |
|
Reset |
Resets all fields to last values applied. |
|
Clear |
Clears all fields. Detaches object from assigned method (once Apply or OK is selected). |
|
Cancel |
Closes the dialog with last values applied |
TIBCO Hawk Data Source Substitutions
In addition to standard built-in substitutions (see “Substitutions”), this data source also sets the following drill down substitutions:
|
Substitution Value |
Definition |
|
$agent |
Agent from the selected row or object. |
|
$ma |
Microagent from the selected row or object. |
Application Options - TIBCO Hawk
Select Tools>Options in the Display Builder to display the Application Options dialog.
Options specified in TIBCO Hawk tabs can be saved in an initialization file (HAWKOPTIONS.ini). On startup, the initialization file is read by the Display Builder, Display Viewer, Display Server, Data Server and Historian to set initial values. If no directory has been specified for your initialization files and HAWKOPTIONS.ini is not found in the directory where you started the application, then RTView will search under lib in your installation directory. See “RTV_JAVAOPTS” for more information.
Note: Options specified using command line arguments will override values set in initialization files. See “TIBCO Hawk - Command Line Options”
There are two Application Options tabs for TIBCO Hawk: “TIBCO Hawk Communication Tab” and “TIBCO Hawk Methods and Alerts Tab”.
This tab allows you to add and remove TIBCO Hawk connections and set your default connection. RTView supports multiple connections to TIBCO Hawk.
If you are using only one connection, select default in the Connection list, edit it, and click Add. If you are using more than one connection, type in the configurations including a unique connection name, then click Add. The new connection appears in the Conection list. To edit a connection, select it in the Connection list, edit it, and click Add. To remove a connection, select it in the Connection list and click Remove. Apply, OK, and Save applies all changes. Select Cancel to not save all the recently made connections. If RTView is unable to make a connection, an error message will appear on the console when you click Apply.
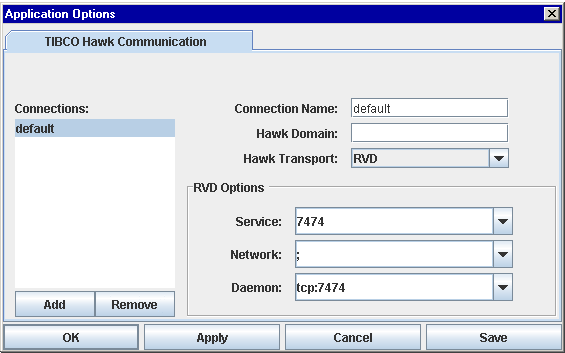
A unique name must be specified for each connection. This name is used to create an Agent Group by the same name containing all agents on that connection. A default connection is automatically created that can be modified but not removed. By default, TIBCO Hawk uses rvd. Different configurations apply to rva and EMS, as described below. See “TIBCO Hawk Agent and Microagent Groups Tab” for more information.
Note: Connections should have unique parameters or some agents may not be added to the appropriate group.
See “Communicating with TIBCO Hawk” for a detailed explanation of rva and rvd.
TIBCO Hawk Communication Settings
The following settings apply to rvd, rva, and EMS.
|
Field |
Description |
|
Connection Name |
Unique name for the connection. |
|
Hawk Domain |
TIBCO Hawk Domain. The default is null. |
|
Hawk Transport |
The transport to use when connecting to TIBCO Hawk. The default is rvd. |
RVD
When using rvd (the default), the Service, Network, and Daemon settings apply.
|
Field Name |
Description |
|
Service |
TIBCO Rendezvous Session Service. The default is 7474. |
|
Network |
TIBCO Rendezvous Session Network. The default is ;. |
|
Daemon |
TIBCO Rendezvous Session Daemon. The default is tcp:7474. |
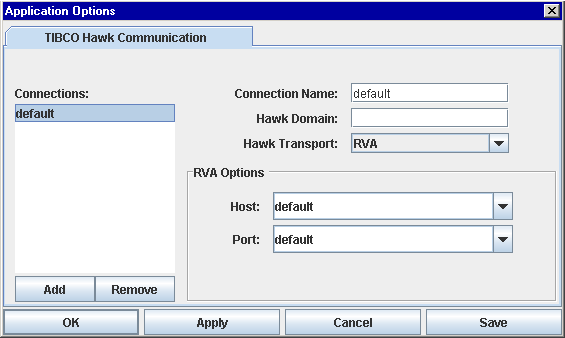
RVA
When using rva, Host and Port parameters apply. If the Host is set to default, the local host will be used. If the Port is set to default, the TIBCO Rendezvous default port will be used.
|
Field Name |
Description |
|
Host |
Host running rva. The default is the local host. This option is only used if running in rva mode. |
|
Port |
Port on which rva is running. The default is the rva default. This option is only used if running in rva mode. |
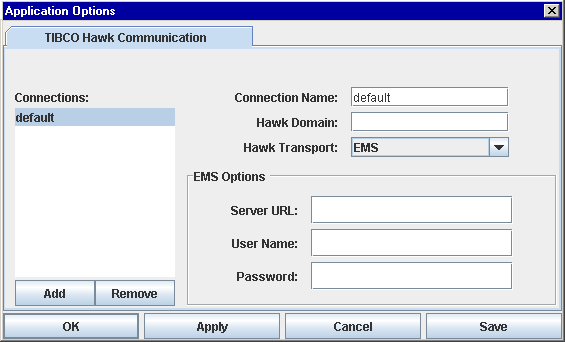
When using EMS, Server URL, User Name, and Password settings apply.
|
Field Name |
Description |
|
Server URL |
The complete URL for your EMS server. This must match the settings on the Transport tab of the TIBCO Hawk Configuration Utility. If nothing is specified, use the default: tcp://localhost:7222. |
|
User Name |
The user name for your EMS server. This must match the settings on the Transport tab of the TIBCO Hawk Configuration Utility. |
|
Password |
The password. This must match the settings on the Transport tab of the TIBCO Hawk Configuration Utility. If you need to provide an encrypted password (rather than expose server password names in a clear text file, use the encode_string command line option with the following syntax: encode_string type mypassword where type is the key for the data source and mypassword is your plain text password. Note: The type argument is only required when you encrypt a string for a data source. For example, enter the following in an initialized command window (see “Initializing a Command Prompt or Terminal Window”): encode_string hawk mypassword and you will receive an encrypted password: encrypted value: 013430135501346013310134901353013450134801334 Copy the encrypted value, paste it into the password field and click Save to save this value to the initialization (*.ini) file. Or, if necessary, manually edit the (*.ini) file to include the encrypted value. Note: If you need to manually edit a configuration (*.ini) file, contact SL Technical Support at support@sl.com for information about supported syntax. |
Note: Additional setup is required if you are using SSL with EMS Transport. See “TIBCO Hawk SSL Parameters” for more information.
TIBCO Hawk Methods and Alerts Tab
The TIBCO Hawk Methods and Alerts tab allows you to select the Store Method List Mode, save a Method Repository file and set the Rate to Remove Cleared Alerts, or Display Existing Alerts.
Note: Options selected on the TIBCO Hawk Methods and Alerts tab are not applied to the current session of RTView. Click the Save button to record all TIBCO Hawk application options to the HAWKOPTIONS.ini initialization file and restart RTView to apply these changes.

|
Field Name |
Description |
|
Store Method List Mode |
The Store Method List Mode option allows you to control how method information is stored in RTView. When you change the Store Method List Mode, click the Save button to record this change in the initialization file. Because settings on this tab cannot be applied to the current session of RTView, you must restart in order to enable the selected method list mode and then save a corresponding method repository file. |
|
|
Store Common Method Lists - Stores a single method list for multiple microagents running on the same platform and version of Hawk. This option is memory efficient and the best choice for most users. |
|
|
Store All Method Lists - Stores a method list for each microagent running. This options uses more memory, but enables data attachments to multiple microagents (on a single platform) that contain different method definitions for the same method name. |
|
|
Note: RTView will output an error message in your command window to alert you that the current method repository file does not correspond to the selected method list mode. If you continue to use RTView with a method repository file that is incorrectly formatted, no method descriptions from that file will be used. |
|
Save Method Repository |
Click Save Method Repository to create a file that records the current listing of agents and microagents that are online at the time the file is saved. The information stored in this file is then used to populate the initial values of drop down menus in the Attach to Data and Define Command dialogs. This makes it possible to build displays when agents and microagents are offline. Depending on your Hawk Agent settings, it may take up to a few minutes for a complete listing of agents and microagents to come online. The saved file will be named hawkmethodrepository.xml. See “Attach to TIBCO Hawk Data” and “Define TIBCO Hawk Command” for more information. Note: If the name of the method repository file is changed, RTView will not be able to locate the file. As a result, drop down menus will remain empty until agents and microagents begin to come online. |
|
|
The format of the method repository file must correspond to the Store Method List Mode. The Display Builder must be started with the selected method list mode enabled in order for you to save a method repository file that is formatted correctly. When you save a new Store Method List Mode, you must restart RTView (in order for the change to take effect) and then save a method repository file. |
|
|
Note: RTView will output an error message in your command window to alert you that the current method repository file does not correspond to the selected method list mode. If you continue to use RTView with a method repository file that is incorrectly formatted, no method descriptions from that file will be used. |
|
|
When you click Save Method Repository, a confirmation dialog will appear to verify the directory in which you would like to save the method repository file. If you specified a directory for your initialization files, all repository files will be saved to, and read from, that directory. If you select the lib directory, the repository file will be available from any directory where you run RTView. If you do not select the lib directory, the repository file will be saved in the directory where you started the current session and will only be available when you run RTView from that particular directory. See “RTV_JAVAOPTS” for more information. See the TIBCO Hawk “Method Repository” section for information on how to edit an existing Method Repository file. 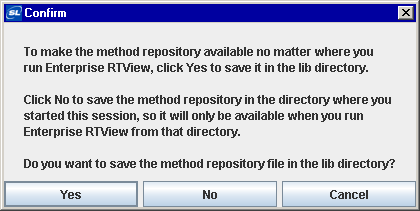
|
|
Rate to Remove Cleared Alerts |
Enter the time (in milliseconds) to control how often cleared alerts should be removed from RTView. For example, if you set the rate to 300000, then cleared alerts will be removed every 5 minutes. This setting is useful to optimize performance if you are running displays over a long period of time on a system that generates a large number of alerts. If you do not enter a rate, cleared alerts will never be removed. |
|
Display Existing Alerts |
By default, only alerts that occur after you have started RTView are visible in your displays. If you select this check box, RTView will begin to request alerts as soon as a display is opened that contains data attachments to the “RTViewDs” getAlertData method. Existing alerts will be requested, one agent at a time, for each agent referenced in these data attachments. Note: TIBCO does not immediately return alerts, so the first time a display is opened there may be a delay before existing alerts are displayed. |
|
|
Alerts are requested for one agent every 10 seconds (10000 milliseconds) until existing alerts are displayed for all agents referenced in data attachments to the “RTViewDs” getAlertData method. TIBCO documentation warns applications not to request all existing alerts at the same time as this may cause an unacceptably large number of simultaneous network messages. |
|
Rate to Request Existing Alerts |
Enter the time (in milliseconds) to control how often RTView will request alerts. The default rate is 10000 milliseconds (10 seconds). In determining the request rate, you should consider the average number of alerts outstanding on the entire network when a display is opened that contains data attachments with the “RTViewDs” getAlertData method. |
|
Enable Hawk Notifications |
Select this check box activate the display of TIBCO Hawk notification events. The AlertString for these notifications will be NO_ALERT. By default, TIBCO Hawk notifications are disabled. |
|
Disable Data Caching |
Select this check box to disable the caching of data in the TIBCO Hawk data source. When selected the initial update on data attachments to multiple agents returns a table with a row for each agent, but subsequent updates will include only the rows that have changed. This option is useful when attaching TIBCO Hawk data as input to the Cache data source or the Historian. |
|
Include Index Columns |
If selected, the following three additional columns will be available in the Return Field menu of the Attach to TIBCO Hawk Data dialog. Note that if you select the RTViewDs microagent, then these additional columns will not be available. AgentName MicroAgentName MicroAgentInstance Note: If * is entered for the Return Field value in the “Attach to TIBCO Hawk Data” dialog, then values from all available return fields will be used to update the object. |
|
Invoke Methods Before Subscribe |
If selected, RTView invokes synchronous microagent methods before subscribing to them for data attachments. This makes the data for these data attachments available immediately after the data attachment is made instead of waiting for the first update from the subscription. By default, this option is selected. You can disable this option from the TIBCO Hawk Methods and Alerts tab in the Application Options dialog, using a command line argument or using an applet parameter. The command line argument and applet parameter are: Command Line: -hawknoinvoke Applet Parameter: param = hawknoinvoke value = true Data attachments to asynchronous methods are not affected by this option. See the TIBCO Hawk documentation for your microagent method to determine whether or not it is synchronous. |
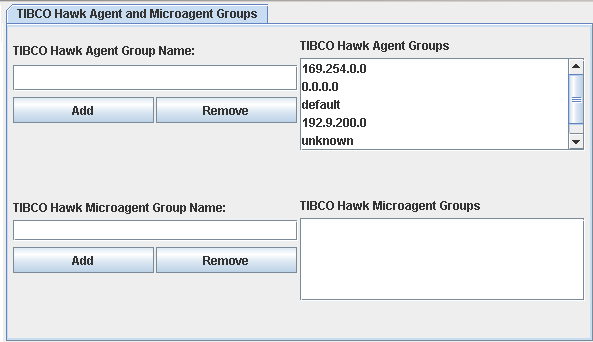
TIBCO Hawk Agent and Microagent Groups Tab
The TIBCO Hawk Agent and Microagent Groups tab allows you to define Agent and Microagent Groups and add them to the drop down menu in the Attach to Data and Define Command dialogs. As soon as this information is saved to HAWKOPTIONS.ini it will be used to populate dialog menus each time you run RTView.
TIBCO Hawk Microagent groups are useful when you want to attach to multiple microagents that have different names, but the same methods. This is often the case with TIBCO adapter microagents running on different domains.
Note: Agent Groups are automatically created for each TIBCO Hawk cluster and each Hawk Connection defined on the TIBCO Hawk Communication tab. It is not possible to modify or delete Agent Groups that are automatically created for TIBCO Hawk clusters.
|
Field Name |
Description |
|
TIBCO Hawk Agent Group Name |
Enter a name for the Agent Group Add -- Click Add to insert the Agent Group into the listing. You must click Save in order for Agent Groups you've added to be listed the next time you run RTView. Remove -- Select an Agent Group from the list and click the Remove button to delete. It is not possible to permanently remove Agent Groups that are automatically created for TIBCO Hawk clusters. |
|
|
Define TIBCO Hawk Agent Groups To select which agents to add to a group, double-click on the name of a group from the TIBCO Hawk Agent Groups listing. The Select Agents dialog should contain a list of Available Agents that you can add. Note: It is not possible to modify or permanently remove Agent Groups that are automatically created for TIBCO Hawk clusters. Note: n object. Validation colors indicate whether selected agents are valid. |
|
|
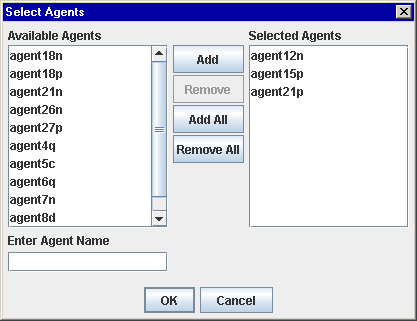
Add -- Select from the Available Agents list and click Add or click Add All. Enter Agent Name -- If the agent you require is not listed, type your selection into the Enter Agent Name field. Note: For agents that are not on the default connection, specify the connection in parentheses after the agent name. For example, to specify Agent1 on Connection1, use Agent1(Connection1). Remove -- Select from the Selected Agents list and click Remove or click Remove All. It is not possible to add or remove agents while the selected group is currently updating a |
|
TIBCO Hawk Microagent Group Name |
Enter a name for the Microagent Group Add -- Click Add to insert the Microagent Group into the listing. You must click Save in order for Microagent Groups you've added to be listed the next time you run RTView. Remove -- Select an Microagent Group from the list and click the Remove button to delete. |
|
|
Define TIBCO Hawk Microagent Groups To select which Microagents to add to a group, double-click on the name of a group from the TIBCO Hawk Microagent Groups listing. The Select Microagents dialog should contain a list of Available Microagents that you can add. Note: In order for a Microagent Group to be useful, the microagents in the group must have common methods. |
|
|
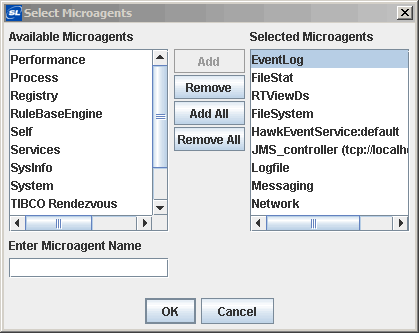
Add -- Select from the Available Microagents list and click Add or click Add All. Enter Microagent Name -- If the microagent you require is not listed, type your selection into the Enter Microagent Name field. Note: Microagent names can include *. Remove -- Select from the Selected Microagents list and click Remove or click Remove All. Note: It is not possible to add or remove microagents while the selected group is currently updating an object. Validation colors indicate whether selected microagents are valid. |
Note: This section assumes you have a working knowledge of writing, compiling and deploying Java classes.
To use SSL with EMS Transport for TIBCO Hawk (version 4.6+), you will need to create a Java class named MyHawkSSLHandler that extends the GmsRtViewHawkCustomSSLHandler class.
In MyHawkSSLHandler.java, define the following method:
public Hashtable getSSLParams ()
This method will get called to retrieve the list of SSL parameters to pass in when RTView creates the TIBCO Hawk Console. See TIBCO Hawk documentation for information on creating a Hashtable of SSL parameters suitable to pass into the TIBCO Hawk Console.
Add gmsjhawkds.jar, located in the lib directory (found in your installation directory), to your classpath when you compile MyHawkSSLHandler. The compiled MyHawkSSLHandler class must be included in the RTView classpath by adding it to the definition for the RTV_USERPATH environment variable.
The following is an example of MyHawkSSLHandler:
import java.util.Hashtable;
import com.tibco.tibjms.TibjmsSSL;
import com.sl.gmsjhawkds.GmsRtViewHawkCustomSSLHandler;
public class MyHawkSSLHandler extends GmsRtViewHawkCustomSSLHandler
{
public Hashtable getSSLParams ()
{
System.out.println("==> getSSLParams");
Hashtable sslParameters = new Hashtable();
sslParameters.put(com.tibco.tibjms.TibjmsSSL.TRACE, new Boolean(true));
sslParameters.put(com.tibco.tibjms.TibjmsSSL.DEBUG_TRACE,
new Boolean(true));
sslParameters.put(com.tibco.tibjms.TibjmsSSL.VENDOR, "j2se");
return sslParameters;
}
}
RTView Deployment - TIBCO Hawk
This section contains details about the deployment process that are specific to your data source. Please go to the Deployment section of this documentation for instructions on how to implement your RTView deployment option. Return to this section whenever you are instructed to refer to deployment information that is specific to your data source.
The TIBCO Hawk data source has additional System Requirements and Setup. See “TIBCO Hawk - System Requirements and Setup” for more information.
Data Source Configuration File
RTView saves general application settings as well as data source configuration options in initialization files that are read at startup. If no directory has been specified for your initialization files and files are not found in the directory where you started the application, then RTView will search under lib in your installation directory. See “Application Options”, “Application Options - TIBCO Hawk”, and “RTV_JAVAOPTS” for more information.
Include the following initialization file when you deploy RTView with this data source:
|
File Name |
Description |
|
HAWKOPTIONS.ini |
Contains data source options for TIBCO Hawk. |
Note: Options specified using command line and applet parameters override values set in initialization files.
Rich Client Browser Deployment Setup for Direct Data Connection
Required Applet Parameters
In addition to basic applet parameters (see “Rich Client Browser with Direct Data Connection - Manual Setup”), to host the Display Viewer Applet you must specify the following in your HTML file:
1. Include the TIBCO Hawk data source in your applet by adding the following to your ARCHIVE parameter (found under your installation directory in lib):
gmsjhawkds.jar
2. Add the following applet parameter:
name = ds
value = com.sl.gmsjhawkds.GmsRtViewHawkDs
Note: To specify multiple data sources for the value of the ds parameter, separate them with a ;.
If the TIBCO Hawk jars (talon.jar, console.jar, util.jar) and the TIBCO Rendezvous jar (tibrvj.jar) are not in the CLASSPATH, they will also need to be included in the ARCHIVE parameter. If you will be using an EMS transport to communicate with TIBCO Hawk, you must also include the TIBCO EMS jars (jms.jar, tibjms.jar, tibrvjms.jar, and tibcrypt.jar). These jars must be before the tibrvj.jar in the CLASSPATH or ARCHIVE parameter.
Optional Applet Parameters
The following options are read from the HAWKOPTIONS.ini if not included in the applet parameters of your HTML file.
|
Parameter Name |
Description |
|
enablenotifications |
Set to true to enable the display of TIBCO Hawk notification events. The AlertString for these notifications will be NO_ALERT. Default is false. |
|
displayexistingalerts |
Set rate (in milliseconds) at which existing alerts are requested by RTView. |
|
hawkalertcleartime |
Set rate (in milliseconds) at which cleared alerts are removed from RTView. |
|
hawkdomain |
Hawk Domain. Default is null. |
|
hawkemsserverurl |
The complete URL for your EMS server. This must match the settings on the Transport tab of the TIBCO Hawk Configuration Utility. |
|
hawkemsusername |
The user name for your EMS server. This must match the settings on the Transport tab of the TIBCO Hawk Configuration Utility. |
|
hawkemspassword |
The password for your EMS server. This must match the settings on the Transport tab of the TIBCO Hawk Configuration Utility. |
|
hawksecurity |
The fully qualified name of the security policy class. You must include the jar containing the security class in the ARCHIVE parameter for the Display Viewer Applet. |
|
hawktransportmode |
Set transport to use when connecting to TIBCO Hawk. Default is 0. Values: 0 = rvd 1 = rva 2 = EMS |
|
storeMethodListMode |
Control how method information is stored. Values: 1=store all method lists 0=store common method lists |
Setup Client
The Display Viewer Applet cannot communicate with TIBCO Hawk using the TIBCO Rendezvous Daemon (rvd) transport. You must either use the TIBCO Rendezvous Agent Process (rva) transport or a TIBCO EMS transport.
To use an EMS transport, you may need to modify your Java security settings to include the following permissions:
permission java.util.PropertyPermission "sun.arch.data.model", "read";
permission java.util.PropertyPermission "tibco.tibjms.reconnect.attempts", "read";
permission java.util.PropertyPermission "tibco.tibjms.connect.attempts", "read";
To use an rva transport, please refer to “TIBCO Hawk - System Requirements and Setup” before you continue.
Troubleshooting
You may encounter the following errors:
|
Problem |
Solution |
|
Console Error: Caught Console Initialization Exception while initializing the AgentMonitor: COM.TIBCO.hawk.console.hawkeye.ConsoleInitializationException: Unable to create rva transport: TibrvException[error=905,message=Could not connect to TIBCO Rendezvous Agent on hostname:7600] |
Either you are not running rva, or the rvahost or rvaport specified is not correct. |
|
Console Error: load: class com.sl.gmsjhawkds.GmsRtViewHawkDs.class not found |
The gmsjhawkds.jar is not specified in the ARCHIVE parameter or it is not in the directory containing the HTML file. If you specified a relative path for this jar in the ARCHIVE parameter, it was not found. |
|
Console Error: java.lang.NoClassDefFoundError: COM/TIBCO/hawk/talon/SubscriptionHandler |
The talon.jar is not in the CLASSPATH for your web server. Include it in the ARCHIVE parameter and copy it to the directory containing the HTML file. |
|
Console Error: java.lang.NoClassDefFoundError: COM/TIBCO/hawk/console/hawkeye/AgentMonitorListener |
The console.jar is not in the CLASSPATH for your web server. Include it in the ARCHIVE parameter and copy it to the directory containing the HTML file. |
|
Console Error: java.lang.NoClassDefFoundError: COM/TIBCO/hawk/util/serialize/Serialization |
The util.jar is not in the CLASSPATH for your web server. Include it in the ARCHIVE parameter and copy it to the directory containing the HTML file. |
|
Console Error: NoSuchMethodError at com.sl.gmsjhawkds.GmsRtViewHawkDs.n(GmsRtViewHawkDs) |
You are using an unsupported version of TIBCO Hawk. The Display Viewer Applet requires TIBCO Hawk version 4.0.3+. |
|
Console Error: java.lang.NoClassDefFoundError: com/tibco/tibrv/TibrvMsgCallback |
The tibrvj.jar is not in the CLASSPATH for your web server. Include it in the ARCHIVE parameter and copy it to the directory containing the HTML file. |
|
Console Error: com.ms.security.SecurityExceptionEx [com/sl/gmsjhawkds/GmsRtViewHawkDs.A]: cannot access "hostname" |
The Display Viewer Applet is not running in a web server. |
|
The Display Viewer Applet is running without any errors, but the objects are not updating. |
The TIBCO Rendezvous Agent Process (rva) is not properly configured for your agent settings. If objects are attached to TIBCO Hawk data, see “Communicating with TIBCO Hawk” for information on configuring rva. If objects are attached to TIBCO Rendezvous data, see “Communicating with TIBCO Rendezvous”. |
Except where noted, all demos can be run in three ways: as an application, or via a rich client or a thin client in a browser.
Start the Demo Server
Rich Client and Thin Client Demos only.
There are rich and thin client demos already installed on the “RTView Demo Server”.
In an initialized command window (see “Initializing a Command Prompt or Terminal Window”):
Type run_startup_demoserver
The Data Source Demo is designed to illustrate each data source.
Start the simulators for each data source you will be using. To run the “Sample TIBCO Hawk Microagent”:
In an initialized command window, go to the demos/dstutorial directory and:
type run_hawkspot
2. Run Demos - Application, Rich Client Browser, or Thin Client Browser
Application Demo
1. In an initialized command window (see “Initializing a Command Prompt or Terminal Window”), go to the demos/dstutorial directory.
2. To view the demo, type:
run_viewer
3. To edit the demo, type:
run_builder
Rich Client Browser Demo
“Start the Demo Server” if it is not running.
1. In an initialized command window (see “Initializing a Command Prompt or Terminal Window”), go to the demos/dstutorial directory.
2. Start the Data Server by typing:
run_dataserver -socket
3. In the Data Server dialog, select:
Start Serving Data
4. Open a browser and navigate to http://localhost:8068/dstutorial_applet.
Thin Client Browser Demo
“Start the Demo Server” if it is not running.
1. In an initialized command window (see “Initializing a Command Prompt or Terminal Window”), go to the demos/dstutorial directory.
2. Start the Display Server by typing:
run_displayserver
3. Open a browser and navigate to http://localhost:8068/dstutorial.
Displays in this demo are designed for monitoring TIBCO Hawk Agents.
1. Run Demos - Application, Rich Client Browser or Thin Client Browser
Application Demo
1. In an initialized command window (see “Initializing a Command Prompt or Terminal Window”), go to the demos/hawkmonitor directory.
2. To view the demo, type:
run_viewer
3. To edit the demo, type:
run_builder
Rich Client Browser Demo
“Start the Demo Server” if it is not running.
1. In an initialized command window (see “Initializing a Command Prompt or Terminal Window”), go to the demos/hawkmonitor directory.
2. Start the Data Server by typing:
run_dataserver -socket
3. In the Data Server dialog, select:
Start Serving Data
4. Open a browser and navigate to http://localhost:8068/hawkmonitor_applet.
Thin Client Browser Demo
“Start the Demo Server” if it is not running.
1. In an initialized command window (see “Initializing a Command Prompt or Terminal Window”), go to the demos/hawkmonitor directory.
2. Start the Display Server by typing:
run_displayserver
3. Open a browser and navigate to http://localhost:8068/hawkmonitor/panels.jsp.
To include history displays do the following:
1. In an initialized command window, go to the demos/hawkmonitor directory and:
type run_historian -sub:$agent:<your agent> where <your agent> is the agent for which you want to gather information.
This demo illustrates how to integrate the Display Server with TIBCO GI.
2. Run Demo
Thin Client Browser Demo
“Start the Demo Server” if it is not running.
1. In an initialized command window (see “Initializing a Command Prompt or Terminal Window”), go to the demos/hawkmonitor directory.
2. Start the Display Server by typing:
run_displayserver
3. In a browser, navigate to:
http://localhost:8068/gi/SLHawkMonitor.html
The source code for this demo is in your RTView installation under demos\gi. Refer to the README.txt file in demos\gi\JSXAPPS\SLHawkMonitor for information on how this demo was built.
Quick Start Tutorial - TIBCO Hawk
This Quick Start Tutorial provides you with the fundamentals on how to use RTView with a TIBCO Hawk data source. Once completed, you can swiftly apply this knowledge to building your own real-time dashboard displays for visual access to your TIBCO Hawk data.
Learn to:
§ Animate graphic objects with TIBCO Hawk data
§ Create a drill down display with TIBCO Hawk data
Note: The TIBCO Hawk data source may not be licensed in your RTView installation.
This tutorial requires the following:
§ Register for a license key. If you have not, you must do so before continuing. See “Registration” for information.
§ “Quick Start Tutorial” - This tutorial requires that you have a working knowledge of RTView. We recommend that you complete the Quick Start Tutorial before continuing.
Start the Display Builder
If you are already logged onto the Display Builder, skip this section and go to “Create a Display”.
1. In an initialized terminal window (see “Initializing a Command Prompt or Terminal Window”):
type run_builder
2. Login to the Display Builder. By default, the Display Builder does not require a login. “Login” can be enabled at setup to support “Role-based Security”. The default user name and password are:
User Name: admin
Password: admin
Note: It is possible that your system administrator may have configured another user name and password. In this case, you may also need to select a role. See “Role-based Security” for more information.
You are now ready to create a display using the TIBCO Hawk data source.
Note: You must follow this initialization process for each new terminal window you open. See the “Setup” section for more details about setting up your environment.
At this point you have:
§ Registered for a license key. See “Registration” for more information.
§ Logged on to the Display Builder
§ Completed the “Quick Start Tutorial”
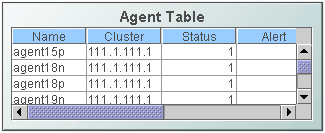
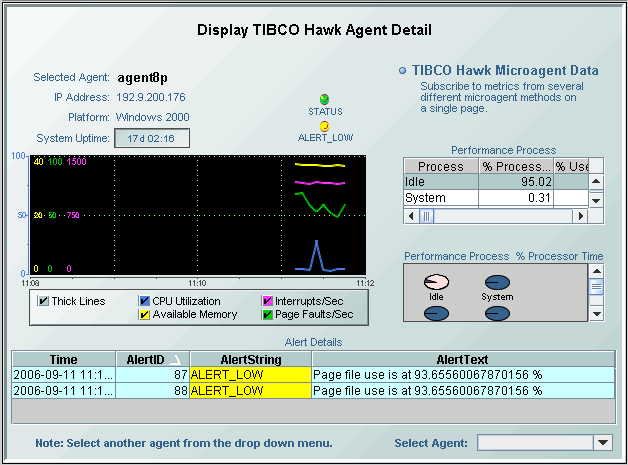
In this tutorial you create a table that displays live data for your TIBCO Hawk agents, as seen below.
As you saw in the Quick Start Tutorial, the data structure of tables and graphs (tabular data) enables RTView to automatically create several data source specific, built-in Substitutions for you. You will see these built-in Substitutions used in the target display when you create the drill down. For more information on Substitutions, see “Substitutions”.
In this exercise, you create a drill down using the previously created display, hawk_dd_qs.rtv, as the target display. First you will set the table to display data for each agent. Then you will create a drill down that will open a bar graph that shows more detailed data for each agent.

Setup TIBCO Hawk Connection
By default, RTView communicates with TIBCO Hawk using the TIBCO Rendezvous Daemon (rvd) and listens for the TIBCO Rendezvous session 7474;tcp:7474. If you will use this default setup, skip this section. If you will not use the default communication settings, do the following:
1. In the Display Builder, select Tools>Options to open the Application Options dialog. See “Application Options - TIBCO Hawk”
2. Select the TIBCO Hawk Communication tab.
3. In the TIBCO Hawk Communication dialog:
Select default from the Connection List.
Hawk Domain - Enter the Hawk domain name.
Hawk Transport - Select the Hawk transport type and fill in the remaining fields that apply.
Click Add when you are finished.
4. Click OK to close the TIBCO Hawk Communication dialog.
Display Data in a Table
In this exercise you add a table and then display data in the table by attaching it to the data source.
1. Click on the Add Table button  and click again in the Working Area to place the table.
2. In the Object Properties dialog:
label (category: Label) - Change the name of the label to Agent Table.
valueTable (category: Data) - Right-click in the Property Name field and select Attach to Data>HAWK.
3. In the “Attach to TIBCO Hawk Data” dialog:
Agent Name - Enter *
Microagent Name - Select RTViewDs.
Method Name - Select getAllData.
Return Field Name - Enter *
Agent List Mode - Select List All Agents.
4. Click OK to apply these values and close the Attach to TIBCO Hawk Data dialog.
The table populates with values from TIBCO Hawk Agents.
5. Select File>Save in the Display Builder.
You are now ready to set up the drill down.
Create a Drill Down Target in the Table
In this exercise, you create the drill down using the previously created display, hawk_agent_detail.rtv, as the target.
1. In the Object Properties dialog:
drillDownTarget (category: Interaction) - Double-click in the Property Name field to bring up the Drill Down Properties dialog.
2. In the “Drill Down Properties” dialog:
Apply Drill Down To - Select Named Window from the drop down menu. This option lets you re-use the window when you drill down multiple times.
Window Name - Enter hawk. This name should be unique unless the display is to open in an existing window.
Drill Down Display Name - Select dstutorial\hawk_agent_detail.rtv from the drop down menu.
Note: The drill down display dstutorial\hawk_agent_detail.rtv was created to display information from Windows TIBCO Hawk Agents. Not all methods are available on all agents.
3. Click OK to attach the drill down target and close the dialog.
View the Drill Down Display
In this exercise, you drill down to the target display.
1. Double-click on any cell in the table to drill down to detailed data. The target display opens.
2. Double-click on another row in the table and the same display is used to show different data based on the row you select.
3. Close the drill down window.
4. In the Display Builder select File>Save.
Go to the main “Quick Start Tutorial”
A sample Hawk Spot microagent is provided to enable customers to see how to monitor or execute commands on a microagent without using their environment. Hawk Spot supports the following methods:
§ accelerate
§ addHawk
§ decelerate
§ deleteHawk
§ getAllData
§ getAngle
§ getColor
§ getColorAssignmentCount
§ getMaxThreads
§ getName
§ getReleaseVersion
§ getTraceLevel
§ getTraceParameters
§ resume
§ setAngle
§ setColor
§ setMaxThreads
§ setTraceLevel
§ setTraceParameters
§ suspend
From an initialized terminal window (see “Initializing a Command Prompt or Terminal Window”) type:
run_hawkspot
A Method Repository file is used to populate the initial values of drop down menus in the “Attach to TIBCO Hawk Data” and “Define TIBCO Hawk Command” dialogs. This makes it easy to create displays for agents and microagents when they are not online. See “Application Options - TIBCO Hawk” for more information on creating a Method Repository file.
It is possible to edit an existing Method Repository file, however, the file name hawkmethodrepository.xml cannot be modified. If hawkmethodrepository.xml is not found in the specified directory or your current working directory, RTView will look in the lib directory. If the Method Repository file is not found, dialog drop down menus will remain empty until agents and microagents begin to come online.
To edit an existing Method Repository file, supported tags and attributes are as follows:
|
Tag |
Attribute |
Description |
||
|---|---|---|---|---|
|
hawkmethodrepository |
xmlns |
Top level tag that includes the namespace attribute xmlns, which must be defined as www.sl.com (xmlns="www.sl.com") |
||
|
storeMethodListMode |
Format of Method Repository changes according to the value of storeMethodListMode (values: 0=store common method lists 1=store all method lists) |
|||
|
methodlist |
name |
Method list name |
||
|
method |
name |
Method name |
||
|
async |
Method asynchronous value |
|||
|
impact |
Method impact value |
|||
|
returnfield |
Return field name |
|||
|
argument |
name |
Argument name |
||
|
type |
Argument type |
|||
|
choice |
Choice for argument |
|||
|
agent |
name |
Agent name |
||
|
connection name |
Connection name |
|||
|
microagent |
name |
Microagent name |
||
|
key |
Corresponds to name of method list |
|||
An example Method Repository file:
<?xml version="1.0"?>
<hawkmethodrepository xmlns="www.sl.com" storeMethodListMode="0">
<methodlist name="Self_x86:Windows NT:4.0_4.0.0">
<method name="describe"
async="false"
impact="0">
<argument name="Instance"
type="java.lang.String"/>
<argument name="Name"
type="java.lang.String"/>
</method>
<method name="getComponentInfo"
async="false"
impact="0"
returnfield="Date"
returnfield="Name"
returnfield="Version">
<argument name="Component"
type="java.lang.String"/>
</method>
<method name="getMicroAgentInfo"
async="false"
impact="0"
returnfield="Count"
returnfield="Help"
returnfield="Name">
<argument name="Name"
type="java.lang.String"/>
</method>
<method name="getReleaseVersion"
async="false"
impact="0"
returnfield="Date"
returnfield="Major"
returnfield="Minor"
returnfield="Name"
returnfield="Update"
returnfield="Version">
</method>
<method name="getSecurityInfo"
async="false"
impact="0"
returnfield="Description"
returnfield="Policy Class">
</method>
<method name="getUptime"
async="false"
impact="0"
returnfield="Total days"
returnfield="Total hours"
returnfield="Total millisec"
returnfield="Uptime">
</method>
<method name="turnDiagnosticsOff"
async="false"
impact="1">
</method>
<method name="turnDiagnosticsOn"
async="false"
impact="1">
</method>
</methodlist>
<agent name="MyAgent1" connection="default">
<microagent name="Self" key="Self_x86:Windows NT:4.0_4.0.0"/>
</agent>
<agent name="MyAgent2" connection="default">
<microagent name="Self" key="Self_x86:Windows NT:4.0_4.0.0"/>
</agent>
</hawkmethodrepository>
TIBCO Hawk - Command Line Options
In addition to General Options, the following command line arguments are enabled with the TIBCO Hawk data source when you run RTView applications from a Windows Command Prompt or UNIX terminal window. See “Command Line Options: Display Builder and Display Viewer” for more information.
Note: If a command line argument contains a space or a semicolon, then the entire argument must be enclosed in quotes (e.g.: "-sub:$data:my Data").
|
Name |
Description |
|
-hawkalertcleartime:(milliseconds) |
Set the rate at which cleared alerts are removed from RTView. If you set the rate to 300000, cleared alerts will be removed every 5 minutes. Default is 0 (cleared alerts are never removed). Example: -hawkalertcleartime:300000 |
|
-enablenotifications |
Enable the display of TIBCO Hawk notification events. The AlertString for these notifications will be NO_ALERT. By default, TIBCO Hawk notifications are disabled. Example: -enablenotifications |
|
-displayexistingalerts:(milliseconds) |
Set the rate at which alerts are requested by RTView. If you set the rate to 30000, cleared alerts will be requested every 30 seconds. Example: -displayexistingalerts:30000 |
|
-hawkdaemon: |
TIBCO Rendezvous Session Daemon. Default is tcp:7474. Example: -hawkdaemon:7475 |
|
-hawkdomain: |
TIBCO Hawk Domain. Default is null. Example: -hawkdomain:mydomain |
|
-hawkemsserverurl: |
The complete URL for your EMS server. This must match the settings on the Transport tab of the TIBCO Hawk Configuration Utility. Example: -hawkemsserverurl:tcp://localhost:7222 |
|
-hawkemsusername: |
The user name for your EMS server. This must match the settings on the Transport tab of the TIBCO Hawk Configuration Utility. Example: -hawkemsusername:myuser |
|
-hawkemspassword: |
The password for your EMS server. This must match the settings on the Transport tab of the TIBCO Hawk Configuration Utility. Example: -hawkemspassword:mypassword |
|
-hawknetwork: |
TIBCO Rendezvous Session Network. Default is ;. Example: "-hawknetwork:;" |
|
-hawknoinvoke |
Disables the Invoke Methods Before Subscribe option. By default, this option is enabled. See “TIBCO Hawk Methods and Alerts Tab” for more information. Example: -hawknoinvoke |
|
-hawkservice: |
TIBCO Rendezvous Session Service. Default is 7474. Example: -hawkservice:7475 |
|
-hawksecurity:(security policy class name) |
The fully qualified name of the security policy class. If you are not using one of the security classes included in the TIBCO Hawk jar, security.jar, the jar containing this class must be in your classpath. Example: -hawksecurity:COM.TIBCO.hawk.security.trusted.Trusted |
|
-hawktransportmode: |
Set transport to use when connecting to TIBCO Hawk. Default is 0. Values: 0 = rvd 1 = rva 2 = EMS Example: -hawktransportmode:0 |
|
-hawknocache |
Initial update on data attachments to multiple agents returns a table with a row for each agent, but subsequent updates include only the rows that have changed. This option is useful when using Hawk data attachments as input to the Cache data source or the Historian. Note: If you specify this option on the command line for the Display Builder or Configuration Utility it will be included in HAWKOPTIONS.ini when application options are saved. |
|
-storeMethodListMode:(mode value) |
Control how method information is stored. Default is 0. Values: 1=store all method lists, 0=store common method lists Example: -storeMethodListMode:0 |
|
-rvahost: |
Host running rva. Default is the local host. This option is only used if running in rva mode. Example: -rvahost:computer6 |
|
-rvaport: |
Port running rva. Default is the rva default. This option is only used if running in rva mode. Example: -rvaport:7600 |
Note: The TIBCO Hawk data source may not be licensed in your RTView installation.
By default, the Display Builder and Display Viewer Application communicate with TIBCO Hawk using the TIBCO Rendezvous Daemon (rvd) process. The rvd process is automatically started by TIBCO Hawk whenever it is needed and runs as a background service. Due to security restrictions, TIBCO Hawk does not allow applets to communicate with TIBCO Hawk using rvd. You must either use the TIBCO Rendezvous Agent Process (rva) or, starting in TIBCO Hawk version 4.5, an EMS transport. If you use rva, this process must be started manually and must be configured for your daemon connection. The rva process must already be running before the Display Viewer Applet is started.
If you do not want to use the rva process, you may use an EMS transport or you may redirect TIBCO data through the Data Server. Using the Data Server also eliminates the requirement to run the Display Viewer Applet from a web server. Using an EMS transport requires that you are running TIBCO Rendezvous version 7.2+ and TIBCO Hawk 4.5+.
In order to facilitate testing, you may run the Display Builder and Display Viewer Application using rva. As with the Display Viewer Applet, the rva process must already be running before the Display Builder or Display Viewer Application are started in rva mode.
Running the TIBCO Rendezvous Agent Process
The rva process must be running in order for the Display Viewer Applet to communicate with TIBCO Hawk. It must also be running for the Display Builder or Display Viewer Application to communicate with TIBCO Hawk if they are running in rva mode. RTView assumes that rva is running on your local machine using the default port. If rva is running on a different host or port, you will need to specify both the host and the port either in the Application Options dialog or on the command line. See “Application Options - TIBCO Hawk” and “TIBCO Hawk - Command Line Options” for more information.
Review the appropriate section below to determine what host and port parameters you will need to specify. If you are not sure which section applies to you, contact your TIBCO Hawk system administrator.
If you have never run rva, you must configure rva with your daemon connection.
If rva is already running on your local machine
You do not need to specify a host. You do not need to specify a port if rva is running on the default port. Otherwise, you will need to specify a port either in the Application Options dialog or on the command line. Please refer to TIBCO Rendezvous documentation for more information on running rva. See “Application Options - TIBCO Hawk” and “TIBCO Hawk - Command Line Options” for more information.
If you have not configured the daemon connection, you will need to configure the TIBCO Rendezvous Agent Process in order to communicate with TIBCO Hawk. See “Configuring the TIBCO Rendezvous Agent Process” for more information.
If rva is running on another machine on your network
You need to specify the name of the host that is running rva. You do not need to specify a port if rva is running on the default port. Otherwise, you will need to specify both the host and the port either in the Application Options dialog or on the command line. Please refer to TIBCO Rendezvous documentation for more information on running rva. See “Application Options - TIBCO Hawk” and “TIBCO Hawk - Command Line Options” for more information.
If you have not configured the daemon connection, you will need to configure the TIBCO Rendezvous Agent Process in order to communicate with TIBCO Hawk. See “Configuring the TIBCO Rendezvous Agent Process” for more information.
If rva is not already running
You need to start rva on your local machine:
1. Open a Command Prompt window, go to <rendezvous installation>\bin and type
rva -store rvafilename
where rvafilename is the name of the file where your rva settings are stored. If you have never run rva, this file will not exist. In this case, rva will create a file by the name you specify and save the rva settings to that file.
2. This will start rva and print some information regarding rva to the console. Note the following information:
RVA: Http interface:
RVA Listen:
RVA Host:
RVA Listen will be the port and RVA Host will be the host that you will use to run RTView. The RVA Http interface (e.g.: http://hostname:7680/) is necessary to configure rva to work with messages sent by the data simulator.
3. If the RVA Listen is 7600 and RVA Host is the name of the machine you are running on, you will not need to specify either parameter. Otherwise, you will need to specify the host and/or the port either in the Application Options dialog or on the command line. Please refer to TIBCO Rendezvous documentation for more information on running rva. See “Application Options - TIBCO Hawk” and “TIBCO Hawk - Command Line Options” for more information.
4. Since you have never run rva, you must configure the TIBCO Rendezvous Agent Process for you daemon connection. See “Configuring the TIBCO Rendezvous Agent Process” for more information
Configuring the TIBCO Rendezvous Agent Process
To configure the TIBCO Rendezvous Agent Process (rva) for your daemon connection:
1. Open a browser to the rva http interface address. If you do not know the rva http interface, the default is:
http://host:7680/
where host is the name of your machine. If this does not work, contact your TIBCO Hawk system administrator. Your setup may be running with a different http interface or you may not have permission to change the rva settings. The browser interface should look similar to the following:
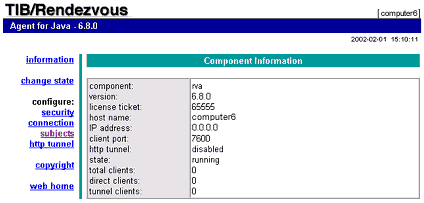
2. Click on the connection link to go to the Connection Configuration screen.
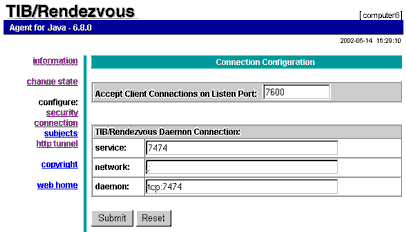
Type your service, network and daemon settings. If you do not know your settings, use the default settings or contact your TIBCO Hawk system administrator. The default settings are
service: 7474
network: ;
daemon: tcp:7474
3. Click the Submit button.
4. Click on the subjects link to go to the Subjects Configuration screen.
Type the following character into the Add Subject field: >
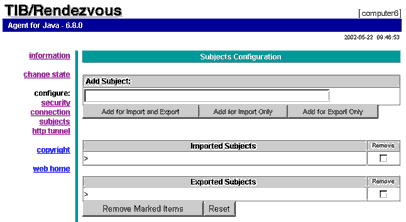
5. Click the Add for Import and Export button.
6. Click on the change state link.
7. Click the button marked Change state to idle. Click the button marked Change state to running.
Once rva has been setup, the daemon configuration information will be stored in the specified settings file. Please refer to your TIBCO Rendezvous documentation for more information regarding configuring rva.