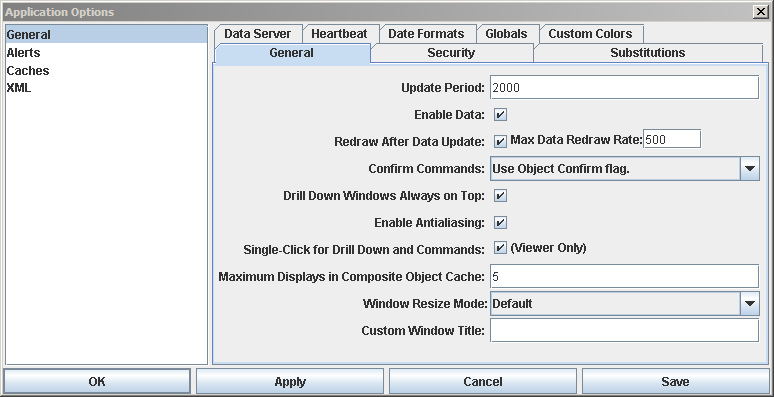
Select a category from the left frame to display corresponding dialog tabs in the main window. Click the Save button to record the new application options in an initialization file.
Note: Do not close the dialog without first saving your changes.
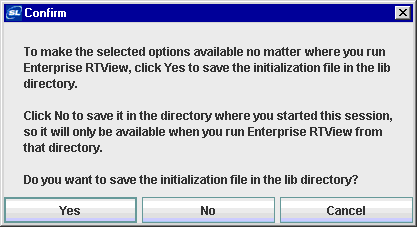
A confirmation dialog will appear to verify in which directory you would like to save the initialization file. If you specified a directory for your initialization files, all initialization (.ini) files will be saved to, and read from, that directory. If you select the lib directory, the initialization file will be available from any directory where you run RTView. If you do not select the lib directory, the initialization file will be saved in the directory where you started the current session and will only be available when you run RTView from that particular directory. See “RTV_JAVAOPTS” for more information.
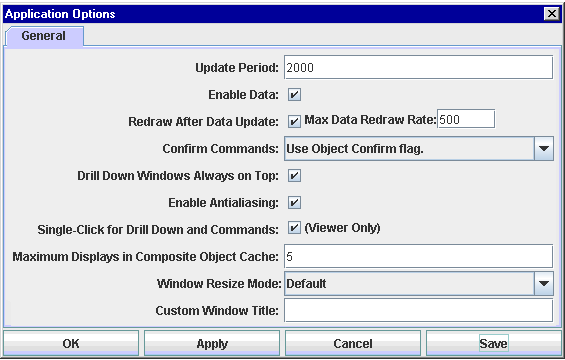
Note: If no initialization file is found, RTView will use the defaults shown above.
The following describes Application Options dialog commands:
|
Command |
Description |
|
OK |
Applies values and closes the dialog. Note: Do not close the dialog until you have saved your changes. |
|
Apply |
Applies values without closing the dialog. |
|
Cancel |
Closes the dialog with last values applied. |
|
Save |
Applies values, saves them to an initialization file, and closes the dialog. |
The Application Options > General option contains the following:
§ “Substitutions Tab” on page 835
§ “Data Server Tab” on page 836
§ “Date Formats Tab” on page 840
§ “Custom Colors Tab” on page 842
§ “Style Sheet Tab” on page 843
|
Field Name |
Description |
||
|
Update Period |
Enter an integer value indicating the number of milliseconds at which RTView will update data. On each update, all synchronous data sources are updated after which all displays are redrawn. Default is 2000 milliseconds. |
||
|
Enable Data |
Check to enable data updates. When not enabled, incoming data is ignored. The default is enabled. |
||
|
Redraw After Data Update |
Check to specify data-driven redraws. Data from an asynchronous data source can arrive at any time between update periods. This means there could be a delay between the time an asynchronous data source receives a data update and when the display showing this data is updated. If selected, displays containing data from asynchronous data sources that have changed since the last update will be redrawn at the rate specified in the Max Data Redraw Rate. Displays where no data has changed will only be redrawn on the update. If not selected, displays are only redrawn based on the update period. |
||
|
Max Data Redraw Rate |
Enter the maximum data redraw rate when data is updated. The default is 500 milliseconds. |
||
|
Confirm Commands |
Set the confirm policy for all commands. Overrides confirm policies set on individual objects. See the “Define/Execute Command” section for more information on commands, |
||
|
|
|
Policy |
Description |
|
|
|
Do not confirm |
Indicates that no commands require confirmation (regardless of each object's confirmation status). |
|
|
|
Confirm all |
Indicates that all commands require confirmation (regardless of each object's confirmation status). |
|
|
|
Use Object Confirm flag |
Indicates that the confirmation status of each object will determine whether confirmation is required. This is the default policy. |
|
Drill Down Windows Always on Top |
Drill down displays will permanently remain in front of the main display until drill down windows are closed. When this setting is changed, the new settings won't apply to windows opened before the change was made. |
||
|
Enable Antialiasing |
Smooth graphics in the display. Default is enabled |
||
|
Single-Click for Drill Down and Commands |
Open drill down windows or execute commands in the Display Viewer with a single click. Note: This option does not apply while working in the Display Builder. |
||
|
Maximum Displays in Composite Object Cache |
Sets the maximum number of display (.rtv) files with composite objects to cache. Default is 5. If value is set to 0, no displays are cached. This is a performance optimization option for the composite object. Of course the higher you set this value, the more memory the cache will require. The impact of increasing the value of this option depends on your application. For example if you have an object grid with 100 objects showing the same display (.rtv) file, then that file can be cached and cloned for each composite object in the grid. However in a situation where you have 100 composite objects showing different display (.rtv) files, caching the files would not significantly optimize performance. |
||
|
Window Resize Mode |
Globally controls object layout when a display window is resized. It is also possible to set a specific Resize Mode for each particular display (.rtv) file using the “Background Properties” dialog. In the Display Builder, the selected Resize Mode is only applied to drill down windows. The main window of the Display Builder is always in Crop mode. All three resize modes support zooming the display (right-click -> zoom). In both Scale and Layout modes if the window is resized while the display is zoomed, then the resize will further zoom the display. Note: If you already have windows open and change the resize mode, the new setting will only apply to new windows that are opened (i.e. windows already open will not change.) Select from the following options: |
||
|
|
|
Default |
Use application level default mode. Defaults are: Scale for the Display Builder, Display Viewer Application and Display Viewer Applet and Crop for the Thin Client. |
|
|
|
Crop |
When the window is resized, the display stays the same size. If the window is bigger than the display, empty space will show around the display. If the window is smaller than the display, scrollbars will be added. The window is not forced to maintain its aspect ratio. This is the default for the Thin Client. |
|
|
|
Scale |
When the window is resized, the display and all of the objects in it are scaled to fit the available space. The window is forced to maintain its aspect ratio. This is the default for the Display Builder, Display Viewer Application, and Display Viewer Applet. |
|
|
|
Layout |
When the window is resized, the display is resized to fit the available space. The objects in the display are positioned according to their anchor and dock properties. The window is not forced to maintain its aspect ratio. Objects that are not docked or anchored will move relative to their offset from the top left corner of the display. For example, if the object is centered on the display, the object will move 50% of the resize amount. If the object is centered at 3/4 of the display, it will move 75% of the resize amount. Note: To prevent objects from overlapping, set resizeWidthMin and resizeHeightMin. If a panel containing a display is resized, the display will not reduce smaller than the specified minimum size. See “Background Properties” for more information. |
|
Custom Window Title |
Specify a custom window title. To specify an empty window title, enter a single space. By default, window titles contain the name of the application followed by the name of the display (.rtv) file (e.g. RTView mydisplay.rtv). A Custom Window Title: § Takes precedence over the title specified in your panel configuration file for “Multiple Display Panels”. § Is superseded by the Window Title option in the “Drill Down Properties” dialog. Note: If you already have windows open and enter a Custom Window Title, the setting will only apply to new windows that are opened (i.e. titles of windows already open will not change). |
||
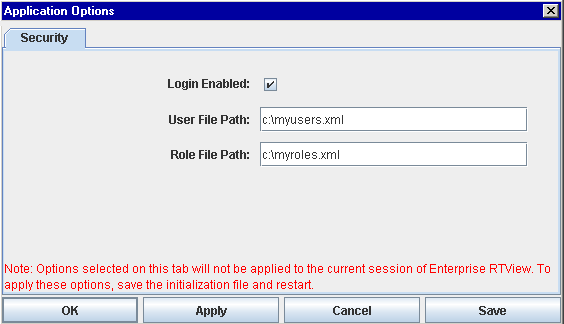
The Security tab allows you to configure security options for RTView. This tab is only available if you are logged in with the admin role. If login is disabled, you can force the login to come up with the -login command line argument.
Options specified on the Security tab cannot be applied to the current session of RTView. Click the Save button to record all Application Options in an initialization file that will be used to apply settings when RTView is restarted.
|
Field Name |
Description |
|
Login Enabled |
Select to require a login for your application. |
|
User File Path |
Enter the name (including path) of the user definition file. This will not be used if you have implemented the Custom User Manager. See “User Definitions” for more information. |
|
Role File Path |
Enter the name (including path) of the role definition file. This will not be used if you have implemented the Custom Role Manager. See “Role Definitions” for more information. |
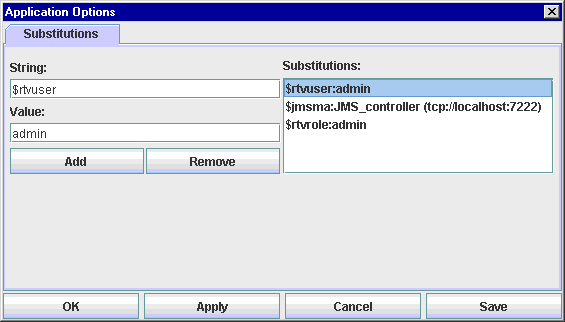
Add, edit or remove substitutions.
Note: The substitution string $value is reserved for internal use.
|
Field Name |
Description |
|
Add |
Enter a String and a Value. Click Add to insert the substitution into the listing. Note: Substitution strings cannot contain the following:: | . tab space , ; = < > ' " & / \ { } [ ] ( ) |
|
Edit |
Select a substitution from the list and edit the String or Value. Click Add to replace the substitution currently listed. |
|
Remove |
Select a substitution from the list and click Remove. |
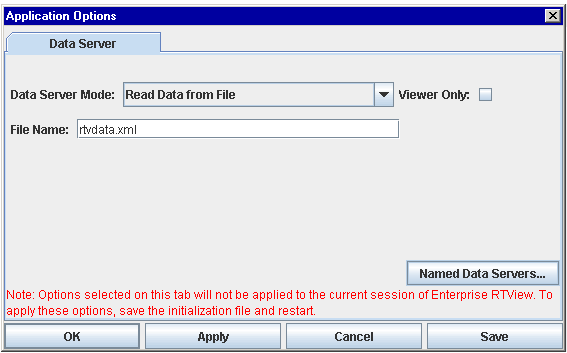
This tab allows you to redirect data requests to the “Data Server”. Once you select to read Data Server data, direct access to data sources will be disabled. RTView clients (Display Builder, Display Viewer Application, Display Viewer Applet) can read Data Server data from a file, directly via socket or through the Data Servlet using HTTP/HTTPS requests.
Note: Settings made in this Application Options dialog must correspond with information entered in the Data Server “Configuration Tab”.
Options selected on the Data Server tab cannot be applied to the current session of RTView. Click the Save button to record all Application Options in an initialization (DATASERVER.ini) file that will be used to apply settings when RTView is restarted. It is possible to specify a directory for your initialization files. If no directory is specified and DATASERVER.ini is not found in the directory where you started the Data Server, then RTView will search under lib in your installation directory. See “RTV_JAVAOPTS” for more information.
|
Field Name |
Description |
||
|
Data Server Modes |
By default RTView reads directly from data sources and not from the Data Server. To configure your default Data Server, select one of the following three options on this tab. |
||
|
|
Do Not Read Data from Data Server -- Reads directly from data sources without redirecting data requests to the Data Server. |
||
|
|
Read Data from File -- Redirect data requests to the Data Server and read XML file output by the Data Server. Once you select Read Data from File, direct access to data sources, except the XML data source, will be disabled when you save your options and restart RTView. Note: The XML data source is never redirected through the Data Server when you read data from a file. |
||
|
|
Read Data from Server -- When you choose to Read Data from Server, a primary and a backup server can be specified for the default Data Server and also for each Named Data Server. At startup, RTView clients will connect to the primary server if available, otherwise to the backup server. If neither server is available, clients will periodically retry connecting to both. If a connection is made to either server and later that connection is lost, then an attempt will be made to connect to the other server. If a connection is made to the backup server and later the primary server becomes available, clients will not switch to the primary server unless the connection to the backup server is lost. All servers specified should use the same initialization files (*OPTIONS.ini) and should have access to the same external data sources, so that displays will appear the same regardless of which server is connected. 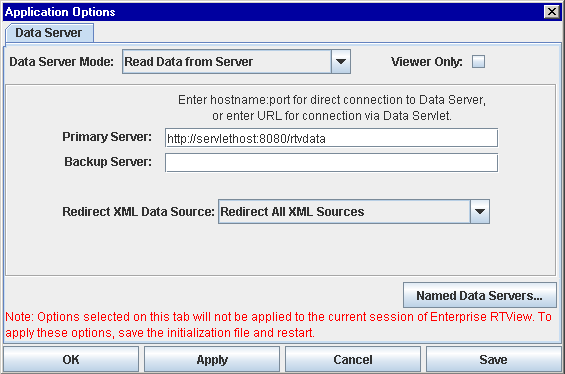
Primary Server - Enter host:port for direct connection to Data Server or enter URL for connection via Data Servlet. Backup Server - Enter host:port for direct connection to Data Server or enter URL for connection via Data Servlet. If Primary Server is unavailable the client will transfer over the to the specified Backup Server. |
||
|
|
Redirect XML Data Source -- This option only applies once you select Read Data from Socket. Select from the following options: |
||
|
|
|
Do Not Redirect XML Data Source |
XML data is not redirected through the Data Server. RTView will connect to the XML data source directly. |
|
|
|
Redirect XML Sources Without HTTP Prefix |
Redirect XML sources that don't start with http: or https:. |
|
|
|
Redirect All XML Sources |
Redirect all XML sources through the Data Server. |
|
|
|
Note: Use the Get Data Server Connection Status function to access information about the status of connections from the Display Builder and Display Viewer Application to the default Data Server and any Named Data Servers. See “Tabular Functions” for more information. |
|
|
Viewer Only |
Select this check box if the Display Viewer should read data from the Data Server, but the Display Builder should read directly from data sources. |
||
|
File Name |
Enter name (including path or URL base) of the Data Server output file. Default file name is rtvdata.xml. Note: This information must correspond with the Data Server “Configuration Tab”, including name and location of Data Server output file. |
||
|
Named Data Servers |
Select Named Data Servers to open the Named Data Servers dialog, which allows you to configure connections to additional data servers. Data Servers are configured by the DATASERVER.ini file, which is generated from the Data Server, in addition to all *OPTIONS.ini files, which are generated when you click Save in the Application Options dialog. When additional Data Servers are configured you should specify a directory in which you can store their respective initialization files so they will not be overwritten. See “RTV_JAVAOPTS” for more information. Note: All servers specified should use the same initialization files (*OPTIONS.ini) and should have access to the same external data sources, so that displays will appear the same regardless of which server is connected. 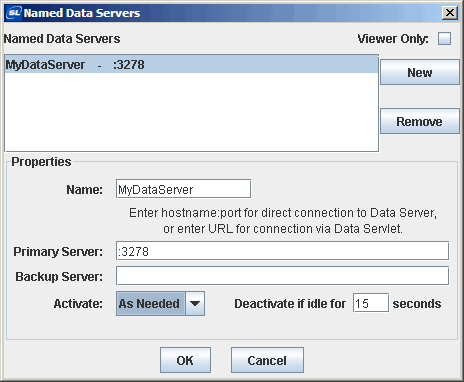
|
||
|
|
|
Named Data Servers |
New - Select New to enter the Name of a Data Server to add to the list. Remove - Select a Data Server from the list and click Remove to delete. |
|
|
|
Viewer Only |
Select this check box if the Display Viewer should read data from the specified Data Server, but the Display Builder should read directly from data sources. |
|
|
|
Name |
Click the New button and enter the name of the Data Server. When you attach an object to data or define a command, this name will appear in Data Server drop down menu. |
|
|
|
Primary Server |
Enter host:port for direct connection to Data Server or enter URL for connection via Data Servlet. |
|
|
|
Backup Server |
Enter host:port for direct connection to Data Server or enter URL for connection via Data Servlet. If Primary Server is unavailable the client will transfer over the to the specified Backup Server. |
|
|
|
Activate |
At Startup - All connections to Data Servers are opened when the selected RTView client application starts. Those connections are closed when that client application exits. |
|
|
|
|
As Needed - A Data Server connection is not opened until the RTView client application loads a display that contains data attachments directed to a particular Data Server. The connection is closed if all such data attachments are removed and/or the specified idle period has elapsed. |
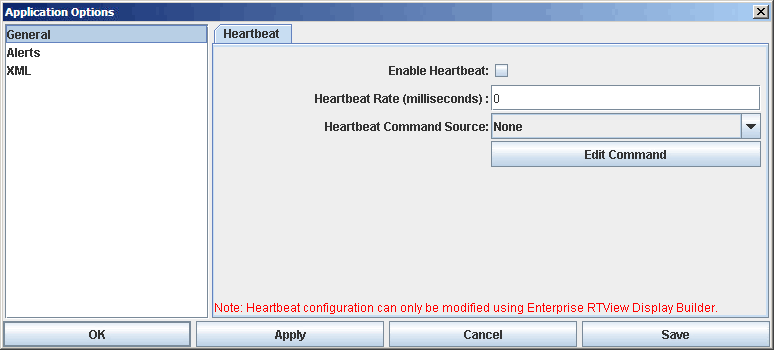
Configure system or data source commands to execute periodically in the Display Builder, Display Viewer, Historian, Display Server, Data Server and Transaction Monitor. See “Define/Execute Command” for more information on where your command will execute in the Display Server or Data Server.
In addition to commands, it is possible to utilize application level substitutions (in conjunction with built-in substitutions $appName and $appVersion--see below) to allow the Display Builder, Display Viewer, Historian, Display Server, Data Server, and Transaction Monitor to all use the same heartbeat configuration.
|
Field Name |
Description |
|
Enable Heartbeat |
Check to enable the heartbeat command. The default is disabled. |
|
Heartbeat Rate (milliseconds) |
Enter an integer value indicating the number of milliseconds at which the heartbeat command will be executed. |
|
Heartbeat Command Source |
Select the source of the heartbeat command. This list will include None, System, Alert and all licensed data sources that support commands. If you select None, the configured command will be cleared. |
|
Edit Command |
Click to open the Define Command dialog for the selected source. |
Note: Data source commands are not supported by the Transaction Monitor. Additionally, the following System commands are not supported by the Historian, Display Server, Data Server and Transaction Monitor:
§ Drill Down or Set Substitution
§ Open Browser
§ Close Window
§ Play Audio File
§ Execute Custom Command (when UI function is invoked)
Application level substitutions, along with the following built-in substitutions, are supported in any field of the Define Command dialog. See “Substitutions Tab” and “Define/Execute Command” for more information.
|
$appName |
Displays name of the application executing the command. |
|
$appVersion |
Displays version of the application (e.g. V: 4.6a0 Date: 01 May 2007) executing the command. |
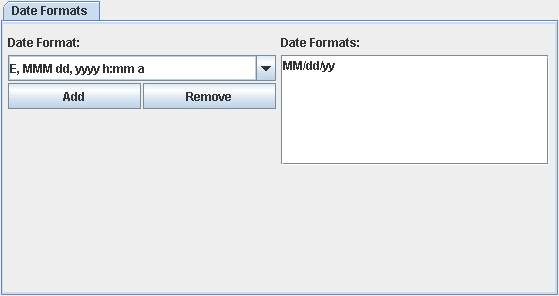
This tab allows you to enter custom date/time formats for use in parsing dates in RTView. The formats entered in this tab will be used when parsing any date entered into RTView, whether the date was typed into a dialog or came in as a string from a data source.
Note: The formats entered in this tab must follow the syntax of the date and time pattern strings documented in the java.text.SimpleDateFormat class.
|
Field Name |
Description |
|
Add |
Click to add a Date Format from the drop down list and then click Apply to execute. |
|
Date Format |
Select a Date Format. Note: Date Formats listed follow the syntax of the date and time pattern strings documented in the java.text.SimpleDateFormat class. |
|
Date Formats |
Formats selected from the Date Format drop down list. |
|
Remove |
Click to remove selected item from the Date Formats list and then click Apply to execute. |
Specify a Global Definition file to be read by the Display Builder, Display Viewer, Display Server, Data Server and Historian. In the Display Builder, select Tools>Options>General>Globals to add, remove or refresh Global Definition files.
Note: Global files are updated even if currently open displays do not use those results.

|
Field Name |
Description |
|
|
Add |
Click to add a (.rtv) file to the Global Definition file list, and optionally a corresponding substitution, then click Apply to execute. |
|
|
|
Global Definition File |
Select from this list to edit a file name or substitution. See “Global Functions and Variables” for information on creating Global Definition files for function data. |
|
|
Substitutions |
Specify substitutions for this Global Definition File. Substitutions are optional and must use the following syntax: $subname:subvalue $subname2:subvalue2 If a substitution value contains a single quote, it must be escaped using a / : $filter:Plant=/'Dallas/' If a substitution value contains a space, it must be enclosed in single quotes. Do not escape these single quotes: $subname:subvalue $subname2:'sub value 2' A substitution string cannot contain the following: : | . tab space , ; = < > ' " & / \ { } [ ] ( ) |
|
Remove Selection |
Click to remove the selected Global Definition file, then click Apply to execute. The Global Definition file is removed from the data source and results for this data will no longer be available. |
|
|
Refresh Selection |
Click to reload the selected Global Definition file. Allows you to edit a Global Definition file and apply changes without restarting the Display Builder. The Refresh Selection option is enabled when you select an Global Definition file that has already been added and applied. |
|
Specify custom colors to use in your displays. Select Tools>Options>General>Custom Colors to add, remove or edit custom color definitions.
Custom colors are saved to an initialization file (COLORS.ini) when you click Save in the Application Options dialog. This initialization file must be deployed with your RTView application.
A Custom Colors tab has been added to the Color Chooser in the Display Builder, so you can select a custom color in the same way you would select a standard color. You must click Apply or Save on this options tab in order to make your custom colors available in the Color Chooser.

|
Field Name |
Description |
|
|
Add |
Click to add a Custom Color to the list. Choose from the following options: Swatches - Standard Java color palette HSB - Color selection by hue, saturation and brightness RGB - Color selection by red, green and blue intensity |
|
|
Color Index |
RTView stores custom colors according to Color Index numbers, not RGB values. Therefore if an object property is defined by a custom color and you change the Color Index number, the color setting for that object property will revert to white. Note: Fx graphs do store RGB values, see “Limitations” below. It is possible to set your own Color Index numbers, but the value must be greater than 5000 |
|
|
Color |
Click on the |
|
|
Delete |
Click to delete the selected Color. Note: If an object property is defined by a custom color and you delete that color, the color setting for that object property will revert to white. |
|
Object limitations
Some objects (e.g.: the bar graph legend, pie wedges and legend, and some control object properties) cache their colors and therefore do not update when a custom color definition changes. To see the color change for these objects, you will either need to restart RTView or reload the display.
Fx graphs store RGB values for all colors, this causes two problems:
§ If you assign a custom color to a Fx graph and then change the custom color definition, the Fx graph will not update since it stored the RGB value of the custom color instead of the Color Index number. The only way to update it is to manually pick a new color in the Display Builder.
§ If you apply a custom color to the Fx graph with the same RGB value as a standard color, when you close and re-open the standard color will be selected not the custom color. Because Fx graphs store RGB values, the corresponding color in the standard palette will be selected first.
Deployment limitations
Multiple applets running in the same VM will share a single Custom Color tab.
Select Tools>Options>General>Style Sheet to add, remove or reorder style sheets applied to your applications. It is also possible to apply specific style sheets to a single display. See “Display-Specific Style Sheets” for more information.
Note: In the Display Builder, style values are also applied to the Object Palette as well as objects added from the Display Builder toolbar.
Application level style sheets are read once, at startup, and applied when display (.rtv) files are opened. If you edit a style sheet, then you need to restart to see those changes. If you add, remove or re-order style sheets, changes will not be applied to open displays. To see these changes, close and reopen your displays. To see changes in the Object Palette you must always restart.
Note: In the following cases, style changes are applied immediately:
§ Objects added from the Display Builder toolbar
§ Objects added to Object Grids
§ Objects added to Composites
|
Field Name |
Description |
|
Add |
Browse for Styles - Locate a specific style sheet (.rts) file. Built-in Style - Choose from available “Built-In Style Sheets”. |
|
Remove |
Select a style sheet (.rts) file from the Style Sheet Files list and click to remove. |
|
Move Up Move Down |
Re-order the Style Sheet Files list. Note: When multiple style sheet (.rts) files are applied, they are processed in the order specified. Therefore if the same property is specified in multiple style sheets, the value in the last style sheet applied will take precedence. |
|
Apply Style Sheets to Main Builder Window |
If selected, style sheets are applied to the main Display Builder window (a.k.a Working Area) and in the Object Palette. To prevent display (.rtv) files from being saved with unwanted style values applied you can choose to deselect this option. |
 button of a selected color to edit that color definition. Once you have clicked