
The SQL data source provides access to JDBC enabled databases. The Attach to SQL Data dialog makes it easy to browse, select data tables, filter information and institute query policies with a simple user interface. For those familiar with SQL, it is also possible to enter SQL commands to make database queries.
This section includes:
§ “SQL System Requirements and Setup” on page 653
§ “Attach to SQL Data” on page 654
§ “Define SQL Command” on page 664
§ “Application Options - SQL” on page 668
§ “RTView Deployment - SQL” on page 672
§ “Quick Start Tutorial - SQL” on page 676
§ “SQL Database Connection Setup” on page 680
§ “SQL Data Source - Command Line Options” on page 682
SQL System Requirements and Setup
In addition to basic “System Requirements”, the SQL data source requires a database with a JDBC driver. See “SQL Database Connection Setup” for information.
If you use the Rich Client Browser with Direct Data deployment, you will need to setup applet permissions on each client to allow access to your database. See “Rich Client Browser Deployment Setup for Direct Data Connection” for more information.
In addition to general environment variables (see “Setup”), you must include the following if you will be using a direct JDBC connection to communicate with your database(s):
|
Name |
Description |
Example |
|---|---|---|
|
RTV_USERPATH |
Location of your SQL database JDBC jar. Note: If RTV_USERPATH already exists, append the JDBC jar to it. |
c:\sql\mydriver.jar;c:oracle\oracledriver |
Note: The SQL data source may not be licensed in your RTView installation.
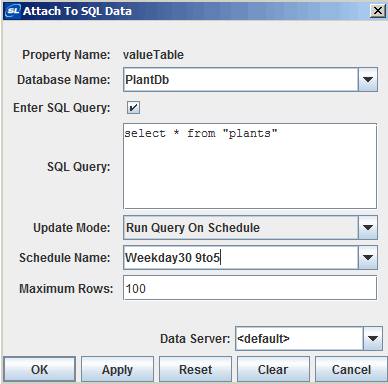
The Attach to SQL Data dialog, which is used to connect an object to your database using an SQL query, can be accessed via the Object Properties window. Once an object has been attached to your database it receives continuous updates.
When an object property is attached to data, the Property Name and Value in the Object Properties window will be displayed in green. This indicates that editing this value from the Object Properties window is no longer possible. To remove the data attachment and resume editing capabilities in the Object Properties window, right-click on the Property Name and select Detach from Data. You will recognize that an object property has been detached from the database when the Property Name and Value are no longer green.
Right-click on the Property Name from the Object Properties window and select Attach to Data>SQL to display the Attach to SQL Data dialog. The Attach to SQL Data dialog provides drop down menus and an optional filter field that allow you to specify information that will be used to create an SQL query for the selected database. Alternatively, select the Enter SQL Query check box to enter an advanced query.
Use the -sqlquote command line or applet parameter options to enclose all table and column names specified in the Attach to SQL Data dialog in quotes when an SQL query is run. This is useful when attaching to databases that support quoted case-sensitive table and column names. See “Command Line Options: Display Builder and Display Viewer” and “Rich Client Browser with Direct Data Connection - Manual Setup” for more information.
Note: If a case-sensitive table or column name is used in the Filter field, or you are entering an advanced query in the SQL Query field, they must be entered in quotes even if the -sqlquote option is specified.
|
Field Name |
Description |
|
Database Name |
Name of database to query or “RTViewDs”. You may specify a database connection on the “SQL Tab” of the Application Options dialog. |
|
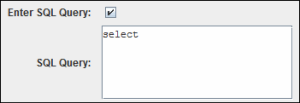
Enter SQL Query |
Select to enter an advanced query. When selected, a SQL Query text field replaces the Table Name, Column(s) and Filter fields. Note: This option is for advanced users, SQL syntax will not be validated or checked for errors. You can also specify a timeout or ID for your query. For details, see “Specifying a Timeout or ID For a Query”. |
|
Table Name |
Name of table in database to query. |
|
Column(s) |
Columns in table to display. |
|
Filter |
Optional SQL filter to apply to query. |
|
Update Mode |
Select one of the following: Run Query Once - Select this check box if the data returned by this query is static. If selected, RTView will run this query only once. This is the default setting. Run Query Every Update Period - Select to run this query each update period. See Application Options>“General Tab” for information on setting the update period. Run Query Every Query Interval - Select to run this query once every Query Interval. Run Query On Demand - Select to run this query each time a display that uses the query is opened and each time a substitution string that appears in the query string has changed. Run Query On Schedule - When selected, the Schedule Name field displays allowing you to select the name of a user-defined schedule. This option provides more control over when user-defined queries are run. See the Schedule Name field (below) for more information. |
|
Schedule Name |
This field displays when the Run Query On Schedule option is selected from the Update Mode drop down list and allows you to select a pre-defined schedule that allows users to define when specific queries are run. See “SQL Scheduler” for more information. |
|
Query Interval (seconds) |
Controls how often RTView will run this query. Enter the time in seconds or a substitution value (e.g. $intervalQueryPeriod). The Update Mode must be set to Run Query Every Query Interval. Note: The query interval is evaluated during each update pass, so the amount of time elapsed between queries may be longer than the value entered. For example, if the update period is 2 seconds and the query interval is 5 seconds, the query will get run every six seconds. |
|
Maximum Rows |
Enter the maximum number of rows to return from this query. Note: On some objects an additional property may further reduce the number of data points displayed. For example, the maxNumberOfRows property on the table or the maxPointsPerTrace property on the trend graph. |
|
Data Server |
Select to read data through your configured Data Server and not directly from the SQL data source. |
|
|
Default - Select the default Data Server you configured in Application Options>“Data Server Tab”. |
|
|
None - Bypass data being redirected through the specified data server(s) for this attachment and instead attach directly to the data source. |
|
|
Named Data Servers - Select a Named Data Server that you configured in Application Options>“Data Server Tab”. |
|
|
Multi-Server Attachment - To configure multiple data servers, enter a semicolon (;) delimited list containing two or more Named Data Servers (e.g. ds101;ds102). Each name specified must correspond with a Named Data Server that you configured in Application Options>“Data Server Tab”. It is also possible to specify __default and __none (e.g. __default;ds101;ds102). The values __default and __none begin with two underscore characters. |
|
|
Alternatively, a value of * can be entered to specify all data servers, including __default and __none. When multiple data servers are specified, the data attachment will be directed to each data server in the list. For tabular data attachments, a column named DataServerName will be added as the first column of the table and contain the name of the server from which the data was received. |
|
|
A multi-server attachment will receive data independently from each of the servers it specifies, so in most cases it will be necessary to combine the tables received into a single table. This can be accomplished in two ways: 1. The multi-server attachment can be applied to a local cache that has the DataServerName column specified as an index column. The current table of that cache will contain the combination of the tables received from all servers. Note: It may also be necessary to configure cache row expiration settings to remove defunct rows. 2. The multi-server attachment can be applied as the Table argument of the RTView function named Combine Multi-Server Tables. See “Tabular Functions” for more information. |
The Database Name drop down menu lists all available databases. The Database Name field automatically displays the name of the default database. If the item you require is not listed, type your selection into the field. A Database Repository file can be used to populate the initial values of drop down menus for Table Name and Column(s). See “Application Options - SQL” for information on how to create a Database Repository file. You can also create a file to exclude tables from the Table Name drop down menu. See “SQL Database Connection Setup” for details. Otherwise, drop down menus populate based on databases added from the Application Options dialog or those typed directly into the Database Name field. The Filter field is optional and uses standard SQL syntax.
Note: If you are using a direct JDBC connection, you will need to add your database in “Application Options - SQL”.
Specifying a Timeout or ID For a Query
When you select Enter SQL Query, you can optionally specify a timeout, an ID, or both for your query.
Note: This option is for advanced users, SQL syntax will not be validated or checked for errors.
Specify Timeout For Query
To specify a timeout for the SQL query, prepend the following text to the query string:
rtvTimeout=NN;
where NN specifies the timeout interval in seconds.
For example: rtvTimeout=20; select * from MyTable
A semicolon must immediately follow the timeout value. You can also specify a substitution string.
For example: rtvTimeout=$timeout; select * from MyTable
When a query with a timeout is invoked by the SQL data adapter, on each subsequent update cycle (2 seconds, by default) the data adapter checks if the query has completed. If the query has not completed it checks if the timeout has expired. If the timeout has expired, the query is canceled and an error message is printed to the RTView console. For example:
ERROR: SQL query timeout after 20 seconds; db=MyDatabase; query=<select * from MyTable>
The status of the query is then set to "timeout" and an empty table is applied to the objects that are attached to the query result. In addition, the query is not executed again for at least the length of the timeout interval. For example, if the query is configured to run every 60 seconds and the timeout is 120 seconds, then after a timeout the next query occurs after 120 seconds, not 60 seconds.
Specify ID For Query
To specify an ID for an SQL query, terminate the ID string with a semicolon and prepend the following text to the query string:
rtvID=S;
where S specifies the ID string.
For example: rtvID=MyTable Query 1; select * from MyTable
The ID string cannot contain a semicolon (;) or equals (=) character. You can also specify a substitution string.
For example: rtvID=$table Query; select * from $table
The ID string has no effect on the execution of the query. The ID string appears as the value of the Query ID column in the Keys table of the “RTViewDs” database. The ID string also appears in any error messages issued by the SQL data adapter that involve the query.
Specify Timeout and ID For Query
To specify both a timeout and a query ID for the query, use the syntax described above and a semicolon after each parameter.
For example: rtvTimeout=120;rtvID=MyTable Query 1; select * from MyTable
The timeout and ID parameters can be specified in either order.
The SQL Scheduler functionality consists of a schedule table and a rule table that allow you to define at what time of day and with what frequency your user-defined SQL queries are run. The schedule table and rule table, which can be created in a database, an XML file, or any other table that can be retrieved using an RTView data source, must contain the following columns:
Rule Table
|
Column Name |
Definition |
|
Name (string) |
The unique name for the rule. Rule names can only contain letters, digits, spaces, underscores, and/or dashes. |
|
Day (string) |
The list of days of the week (Mon, Wed, Fri, for example) or specific dates (dd-MMM-yyyy) that this rule is in effect. |
|
Start Time (string) |
The time of day that this rule goes into effect, in 24 hour format (hh:mm:ss). If left empty, then 00:00:00 is used. |
|
End Time (string) |
The time of day when this rule is no longer in effect, in 24 hour format (hh:mm:ss). If left empty, then 23:59:59 is used. |
|
Exception (boolean) |
If set to false then, when the rule is in effect, the query is run at the indicated interval. If set to true then, when the rule is in effect, the query is NOT run. |
|
Interval (string) |
The time interval between queries when this rule is in effect (1m, 30m, 1h, for example). |
|
Enable (boolean) |
Set to true to enable the rule. Set to false if you do not want the rule to ever be in effect. |
|
Time Zone (string) |
The name of the time zone for the rule (US/Eastern). Leaving the column blank results in using the local time zone. Names that include daylight savings (PST or EDT, for example) should not be used. |
Note: You can add additional formats for specifying dates in your rules using the sl.rtview.scheduler.dateFormat property in your .properties file. For example:
sl.rtview.scheduler.dateFormat=MMM dd, yyyy
Entering -scheduler.dumpFormats:true on the command line will print the accepted formats for days of the week, specific dates, and time zones.
Example Rule Table
|
Name |
Exception |
Days |
Start Time |
End Time |
Interval |
Time Zone |
Enabled |
Description |
|
workdays_30m |
false |
Mon,Tue,Wed,Thu,Fri |
09:00:00 |
17:00:00 |
30m |
|
true |
weekdays 9-5 @30 min |
|
weekends_9_12_15 |
false |
Sat,Sun |
09:00:00 |
09:00:00 |
3h |
|
true |
weekends at 9, noon, 3 |
|
lunch_hour_ex |
true |
Mon,Tue, Wed,Thu,Fri |
12:00:00 |
12:59:59 |
|
|
true |
no queries during lunch |
|
holidays_2016_ex |
true |
1-Jan-2016,4-Jul-2016,25-Dec-2016 |
|
|
|
|
true |
no queries on these days |
|
workdays30m_ central |
false |
Mon,Tue,Wed,Thu,Fri |
09:00:00 |
17:00:00 |
30m |
US/Central |
true |
weekdays 9-5 @30 min (in US/Central timezone) |
Explanation of Rule Examples
|
workdays_30m |
Runs a query every 30 minutes between 9am and 5pm Monday to Friday |
|
weekends_9_12_15 |
Runs a query on weekends at 9am, noon, and 3pm. |
|
lunch_hour_ex |
Exception rule that prevents a query from being run between noon and 12:59 on weekdays |
|
holidays_2016_ex |
Exception rule that prevents a query from being run on 3 specific dates in 2016 (Christmas, 4th of July, and January 1). Note that this rule does not specify a Start Time or End Time, so the rule is in effect for the entire day. |
|
workdays30m_central |
Same as the workdays_30m rule except that it uses the US/Central timezone when checking the time of day against the Start/End time. |
Schedule Table
|
Column Name |
Definition |
|
Name (string) |
The unique name of the schedule. Schedule names can only contain letters, digits, spaces, underscores, and/or dashes. |
|
Rules (string) |
The name(s) of the rule(s) that define the schedules. Multiple rule names must be separated by commas. |
|
Enabled (boolean) |
Set to true to enable the schedule. Set to false to disable all queries that use the schedule. |
|
Description (string) |
The description of the schedule. |
Example of Schedule Table Using Rules Defined Above
|
Name |
Rules |
Enabled |
Description |
|
Weekday30 9to5 |
workdays_30m, lunch_hour_ex, holidays_ex |
true |
weekdays @30 minutes from 9-5, except lunch & holidays |
|
AllWeek |
workdays_30m, weekends_9_12_15 |
true |
weekdays @30minutes from 9-5 & noon & 3pm, weekends @ 9 & noon & 3pm |
|
test_timezone |
workdays30m_central |
true |
weekdays 9-5, in central timezone |
Enabling Schedule and Rule Tables
1. To make the Schedule table and Rule table available in RTView:
§ Create a global function named RtvScheduleTable using Function Type=Reference and attach the function’s Table argument to the XML file, SQL query, or whatever RTView data attachment that retrieves the selected table.
§ Create a global function named RtvScheduleRuleTable using Function Type=Reference and attach the function’s Table argument to the RTView data attachment that retrieves the rule table.
See “Global Functions and Variables” for more information.
2. In the “Attach to SQL Data” dialog, enter your query, select Run Query On Schedule from the Update Mode drop down, and select the desired schedule from the Schedule Name drop down.
Instead of selecting a schedule name from the Schedule Name drop down, there are two other ways of selecting schedules/rules to use:
§ You can enter a substitution string (for example, $mySchedule, which could have a value of weekday30 9to5) in the Schedule Name drop down. See “Substitutions” for more information.
§ You can enter a list of rule names separated by commas (rule1,rule2,rule3) in the Schedule Name drop down. This option might be useful when there is no schedule defined with the desired set of rules.
Note: If schedules and rules are added or modified at runtime, then the next update of the data attachment used as the input to the RtvScheduleTable and RtvScheduleRuleTable will apply those changes to all SQL queries using those schedules and rules.
Example Configuration
An example configuration of the SQL Scheduler is available in the custom/sql_scheduler directory, which includes a schedule table, rule table, and scheduled queries. See the README.txt file in the custom/sql_scheduler directory for more information.
Fields in the dialog change colors according to the information entered. These colors indicate whether or not information is valid. Information entered into the dialog is validated against the selected database or the Database Repository file. See “Application Options - SQL” for information on how to create a Database Repository file.
Note: Filters and advanced SQL queries are not validated.
The following describes the significance of the Attach to SQL Data validation colors:
|
Blue |
Unknown |
Entry does not match any known database (or you have not attempted a connection*). |
|
Yellow |
Offline |
Not connected to database. |
|
White |
Valid state |
Entry is valid. |
|
Red |
Invalid state |
Database is valid, but Table or Column(s) selected are not. |
*If your database is validated as Unknown, see Application Options>“SQL Tab” for information on how to add a database.
Substitutions allow you to build open-ended displays in which data attachments depend on values defined at the time the display is run. Generic names, such as $table1 and $table2, are used instead of specific values. Later when the display is running, these generic values are defined by the actual names, such as production_table and system_table. In this way, a single display can be reused to show data from a number of different databases. For more information on creating displays using substitution values, see “Substitutions”.
The RTViewDs database contains two tables that contain metrics about SQL database connections and queries. In the Attach to SQL Data dialog, select RTViewDs from the Database Name drop down menu and then select either Connections or Keys from the Table Name drop down menu.
Note: RTViewDs tables do not support SQL queries, row filters, custom query intervals or maximum row settings.
The selected Update Mode affects the Keys table as follows:
|
Run Query Once |
Static SQL data attachments are never removed from the Keys table. |
|
Run Query Every Update Period or Query Interval |
Periodic SQL data attachments are removed from the Keys table when the object with the attachment is deleted (e.g., when the display containing the object is closed). |
|
Run Query On Demand |
SQL data attachments are removed from the Keys table when they have completed. |
|
Run Query On Schedule |
SQL data attachments are updated according to the schedule. |
|
RTViewDs Table Name |
Column Available |
Description |
|
Connections |
Database |
Name of database connection. |
|
|
Connected |
True / False. Indicates whether connected. |
|
|
Concurrent |
True / False. Indicates whether Run Queries Concurrently option is selected for this connection. |
|
|
Query Object Count |
Number of queries currently defined on this connection. |
|
|
Total Execution Count |
Number of queries executed on this connection since startup. |
|
|
Listener Count |
Number of data attachments using this connection. Note: In a Data Server deployment, this count indicates the total number of unique queries using the connection. |
|
|
Enabled |
True / False. Indicates whether enabled. |
|
Keys |
Key |
SQL data attachment string. This string begins with the database name, followed by various query parameters and finally the query string itself. |
|
|
Active |
True / False. Indicates that query was either executing or waiting to be executed when the Keys table was last updated. A query may be waiting to execute if the database connection it uses is busy performing other queries. Note: For queries that are scheduled to run every General Update Period, Active and Running columns may always be checked since those queries will always be executing at the same time the Keys table is updated. See “General Tab” for more information. |
|
|
Running |
True / False. Indicates that query was executing when the Keys table was last updated. Note: For queries that are scheduled to run every General Update Period, Active and Running columns may always be checked since those queries will always be executing at the same time the Keys table is updated. See “General Tab” for more information. |
|
|
Execution Count |
Number of times query has been executed. |
|
|
Last Query Time |
Time at which the most recent execution of query completed. |
|
|
Last Execution Time |
Duration (in seconds) of the most recent query execution. |
|
|
Last Row Count |
Number of rows in the most recent query result. Otherwise, -1 if the query failed. |
|
|
Last Process Time |
Elapsed time between when query was scheduled and when it completed. This may be longer than the Last Execution Time if other queries use the same database connection and this query was delayed waiting for other queries to complete. |
|
|
Last Query Status |
Status of most recently completed execution of query. OK -- Query executed successfully. no query -- Query string is blank. error -- Error occurred while executing the query connection failed -- Connection to database was lost. no connection -- Database connection undefined or invalid. timeout -- Query timed out. <blank> -- Query has never been executed. |
|
|
Avg Execution Time |
Average of Last Execution Time for this query. |
|
|
Avg Process Time |
Average of the Last Process Time for this query. |
|
|
Listener Count |
Number of data attachments using this query result. |
|
|
Query ID |
ID string assigned to this query, if any. |
|
|
Database |
Name of the database used by this query. |
|
|
Schedule |
Name of the schedule, if any, configured for the query. |
|
|
Next Query Time |
The next time the query will be run according to its schedule or, if the query does not have a schedule, the next time it will be run according to its configured query interval. For Static and On Demand queries, this field will be populated with 1/1/1970 GMT. |
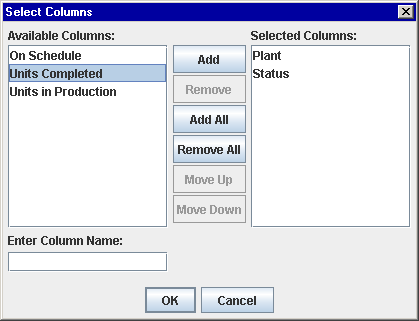
From the Attach to SQL Data dialog you can specify which table columns to display and in what order they will appear. In order to populate the listing of available columns, you must first select a valid database and table.
To bring up the Select Columns dialog, click on the ellipses button  in the Column(s) field (or right-click in the Column(s) field and click on Select Column(s). The dialog should contain a list of Available Columns that you can add to your table.
To add a column, select an item from the Available Columns list and click on the Add button. If the item you require is not listed, type your selection into the Enter Column Name field. Click the Remove button to delete an item previously added to the Selected Columns list. You can control the order of columns in a table by arranging the items in the Selected Columns list with the Move Up and Move Down buttons.
Validation colors indicate whether selected columns are valid. However, if even one column selected is invalid the Column(s) field in the Attach to SQL Data dialog will register as an invalid entry.
Note: Invalid columns will not update.
The following describes the Attach to SQL Data dialog commands:
|
Command |
Description |
|
OK |
Applies values and closes the dialog. |
|
Apply |
Applies values without closing the dialog. |
|
Reset |
Resets all fields to last values applied. |
|
Clear |
Clears all fields. Detaches object from database (once Apply or OK is selected). |
|
Cancel |
Closes the dialog with last values applied. |
Note: The SQL data source may not be licensed in your RTView installation.
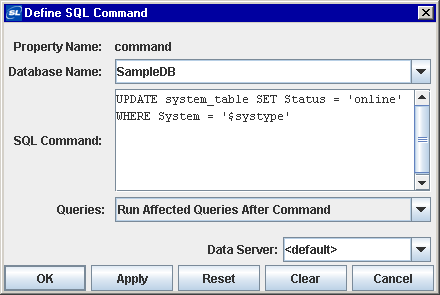
The Define SQL Command dialog, which is used to assign SQL commands that allow you to issue commands from within an RTView display, can be accessed via the Object Properties window. If you execute a SQL command from a Thin Client with Direct Data Connection or any Served Data deployment, the command will execute on the server.
Right-click on the appropriate command property in the Object Properties window and select Define Command>SQL to display the Define SQL Command dialog. The Define SQL Command dialog provides a drop down menu with available databases and a field to enter a SQL statement. See the “Define/Execute Command” section for information on how to execute a command.
|
Field Name |
Description |
|
Database Name |
Name of database to query. To attach the Database Name to data, right-click and choose Attach to Data or double-click in the field. |
|
SQL Command |
Enter a SQL statement to execute using standard SQL syntax. Note: This option is for advanced users, SQL syntax will not be validated or checked for errors. To attach the SQL Command to data, right-click and choose Attach to Data or double-click in the field. See the “Special Values” section for details on SQL commands to use to disable/enable a database. For example, if a database server needs to be shutdown for maintenance, that database can be disabled to avoid repeated connection attempts/failures from RTView. Or disable a database connection that has become unreliable, and then enable again to make a new connection. |
|
Queries |
If Run Affected Queries After Command is selected, RTView immediately runs all queries, including static queries, that use the database table modified by the command. This causes table changes to be displayed immediately, rather than waiting for the next scheduled query update. This option is only supported for update, insert, and delete operations in which the name of the database table to be modified is specified explicitly. If a command performs another SQL operation (such as running a stored procedure which modifies tables), the results of the operation will not be displayed until the next scheduled update of each affected query. Display of the modified data may be delayed for other reasons, for example, if the database does not commit the results immediately and instead returns the old data on the next query. |
|
Data Server |
Select to read data through your configured Data Server and not directly from the SQL data source. Default - Select the default Data Server you configured in Application Options>“Data Server Tab”. None - Bypass data being redirected through the specified data server(s) for this attachment and instead attach directly to the data source. Named Data Servers - Select a Named Data Server that you configured in Application Options>“Data Server Tab”. Multi-Server Command - When multiple data servers are specified, the command will be executed on each data server in the list. |
|
|
To configure multiple data servers, enter a semicolon (;) delimited list containing two or more Named Data Servers (e.g. ds101;ds102). Each name specified must correspond with a Named Data Server that you configured in Application Options>“Data Server Tab”. It is also possible to specify __default and __none (e.g. __default;ds101;ds102). Note: The values __default and __none begin with two underscore characters. Alternatively, a value of * can be entered to specify all data servers, including __default and __none. |
The Database Name drop down menu lists all available databases. The Database Name field automatically displays the name of the default database. If the item you require is not listed, type your selection into the field. Drop down menus populate based on databases added from the Application Options dialog or those typed directly into the Database Name field.
Note: If you are using a direct JDBC connection, you need to add your database in “Application Options - SQL”.
The Database Name field changes colors according to the information entered. These colors indicate whether or not information is valid. Information entered into the dialog is validated against the selected database or the Database Repository file. See “Application Options - SQL” for information on how to create a Database Repository file.
Note: The SQL Command field is not validated.
The following describes the significance of the Define SQL Command validation colors:
|
Blue |
Unknown |
Entry does not match any known database (or you have not attempted a connection*). |
|
Yellow |
Offline |
Not connected to specified database. |
|
White |
Valid state |
Database name is valid. |
*If your database is validated as Unknown, see “Application Options - SQL” for information on how to add a database.
Note: If you are using a direct JDBC connection, you will need to add your database in Application Options.
Substitutions allow you to build open-ended displays in which data attachments depend on values defined at the time the display is run. Generic names, such as $table1 and $table2, are used instead of specific values. Later when the display is running, these generic values are defined by the actual names, such as production_table and system_table. In this way, a single display can be reused to execute commands on a number of different databases. For more information on creating displays using substitution values, see “Substitutions”.
|
rtvEnableDB=false |
Disable database. In the SQL Command field enter: rtvEnableDB=false. Note: This string must be entered exactly as shown, with no embedded spaces. When a database is disabled, RTView will not attempt to make any queries on that database or attempt to reconnect until the database is enabled again. |
|
rtvEnableDB=true |
Enable database. In the SQL Command field enter: rtvEnableDB=true. Note: This string must be entered exactly as shown, with no embedded spaces. |
|
rtvEnableDB=false; rtvEnableDB=true |
Disable database and immediately enable it again. In the SQL Command field enter: rtvEnableDB=false;rtvEnableDB=true. Note: This string must be entered exactly as shown, with no embedded spaces. |
|
$value |
When an actionCommand is executed $value is replaced with the value from the control. This value may be used in any field in the Define SQL Command dialog. Note: This value may only be used for Action Commands. See “Define/Execute Command” for more information. |
The following describes Define SQL Command dialog commands:
|
Command |
Description |
|
OK |
Applies values and closes the dialog. |
|
Apply |
Applies values without closing the dialog. |
|
Reset |
Resets all fields to last values applied. |
|
Clear |
Clears all fields. Detaches object from assigned command (once Apply or OK is selected). |
|
Cancel |
Closes the dialog with last values applied. |
Select Tools>Options in the Display Builder to access the Application Options dialog.
Options specified in the SQL tab can be saved in an initialization file (OPTIONS.ini). On startup, the initialization file is read by the Display Builder, Display Viewer, Display Server, Data Server, and Historian to set initial values. If no directory has been specified for your initialization files and OPTIONS.ini is not found in the directory where you started the application, then RTView will search under lib in your installation directory. See “RTV_JAVAOPTS” for more information.
Note: Options specified using command line arguments will override values set in initialization files. See “SQL Data Source - Command Line Options” for more information.
This tab allows you to add or remove your databases and set the default database. In order for RTView to communicate with your databases, you must set up a direct JDBC connection. See “SQL Database Connection Setup” for more information.
When you add a database to the list, it will be highlighted in yellow indicating that it is not connected. To attempt to connect to a database, click OK, Apply, or Save. If the background remains yellow, then RTView was unable to make a connection to your database.
Note: Databases that have been setup to Use Client Credentials will not connect unless you are logged in and you have objects in your display that are using that connection.
Check your database connection and see “SQL Database Connection Setup” for information on how to set up your driver correctly.
If the connection is successful, and the Get Tables and Columns from Database check box is selected, RTView will use information from this database to populate drop down menus in the “Attach to SQL Data” dialog with available tables and columns. If a database repository is found, information from your database will be merged with data from the repository file. If you deselect the Get Tables and Columns from Database check box, RTView will no longer query your database for this information but the database repository will still be used to populate drop down menus. Using a database repository to populate drop down menus makes it possible to specify which tables and columns from your database will be listed in the Attach to Data dialog and gives you the ability to build displays while databases are offline.
If you are using a direct JDBC connection, you must click Save in order to record your options in OPTIONS.ini. This will allow RTView to reconnect with your database the next time you run the Display Builder or the Display Viewer.
Note: Regardless of which tab you are currently working from in the Application Options dialog, each time you click OK, Apply, or Save, RTView will attempt to connect to all unconnected databases except those that have Use Client Credentials checked.
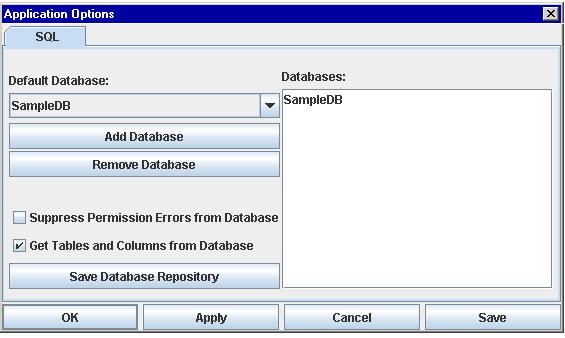
|
Field Name |
Description |
|
Default Database |
Name of database used as the default for data attachments. Select from drop down menu to change default setting. |
|
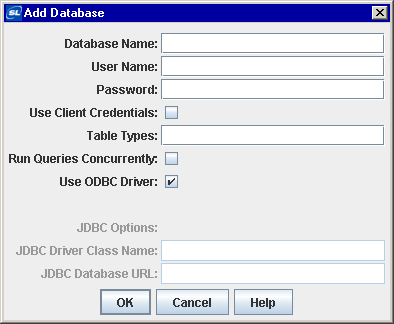
Add Database |
Click to open the Add Database dialog. To edit, select a database from the list and double-click. Databases that are updating objects in a current display cannot be renamed. |
|
|
|
|
|
Database Name -- Name to use when referencing this database connection in your data attachments. |
|
|
User Name -- User name to pass into this database when making a connection. This parameter is optional. |
|
|
Password -- The password to pass into this database when making a connection. This parameter is optional. If you need to provide an encrypted password (rather than expose server password names in a clear text file, use the encode_string command line option with the following syntax: encode_string type mypassword where type is the key for the data source and mypassword is your plain text password. Note: The type argument is only required when you encrypt a string for a data source. |
|
|
For example, enter the following in an initialized command window (see “Initializing a Command Prompt or Terminal Window”): encode_string sql mypassword and you will receive an encrypted password: encrypted value: 013430135501346013310134901353013450134801334 Copy the encrypted value, paste it into the password field and click Save to save this value to the initialization (*.ini) file. Or, if necessary, manually edit the (*.ini) file to include the encrypted value. Note: If you need to manually edit a configuration (*.ini) file, contact SL Technical Support at support@sl.com for information about supported syntax. |
|
|
Use Client Credentials -- If selected, the User Name and Password from the RTView login will be used instead of the User Name and Password entered in the Add Database dialog. Connections to this database will only be made when you are running with login enabled and a display is opened that accesses this database. See “Login” for more information. As a result, this connection will not be made when you click OK or Apply in the Application Options dialog and will remain yellow. If you will be using the Data Server or the Display Server with a database connection that has this option enabled, you must enable Use Client Credentials for Database Login in these applications. |
|
|
Table Types -- Specify the types of tables to retrieve when querying the database for available tables. Refer to your database manual for a list of valid table types. This parameter is optional. Table types are entered as a comma delimited list, e.g., TABLE, VIEW. |
|
|
Run Queries Concurrently -- If selected, each query on the connection is run on its own execution thread. The default is disabled. Note: This option should be used with caution since it may cause SQL errors when used with some database configurations and may degrade performance due to additional database server overhead. See your database documentation to see whether it supports concurrent queries on multiple threads. |
|
|
JDBC Options JDBC Driver Class Name -- Fully qualified name of the JDBC driver class to use when connecting to this database. The path to this driver must be included in the RTV_USERPATH environment variable. JDBC Database URL -- Full database URL to use when connecting to this database using the specified JDBC driver. Consult your JDBC driver documentation if you do not know the database URL syntax for your driver. Note: If a value of __none (two underscores before the n) is entered for the JDBC Driver Class Name or JDBC Database URL, then the SQL data source will not attempt to connect to the database and ignore any SQL data attachments that specify that database. The RTViewDs.Connections table will contain a row for the database, but the Connected and Enabled columns will always show a value of false. If the -sqltrace command line option is used, then you'll see the following message appear once in the console: <dbname>: ignoring connection with driver/url=__none |
|
Remove Database |
Select a database from the list and click Remove Database to delete. Databases that are updating objects in a current display cannot be removed. |
|
Suppress Permission Errors From Database |
If selected, SQL errors with the word "permission" in them will not be printed to the console. This is helpful if you have selected the Use Client Credentials option for a database. In this case, your login does not allow access for some data in their display, you will not see any errors. |
|
Get Tables and Columns from Database |
If selected, information from your database will automatically populate drop down menus in the Attach to Data dialog and you will be able to select from available tables and columns in your database. Note: If a database repository is found, information from your database will be merged with data from the repository file. |
|
Save Database Repository |
Click to save a file that records available tables and columns in your database and applies values to drop down menus in the Attach to Data dialog. |
Click Save Database Repository to save a file that contains available information for tables and columns in your database. Before saving a database repository, you must add the database(s) from which the file will retain information.
Note: If RTView does not make a connection with your database, then information from that database cannot be saved to the database repository file.
Information stored in the database repository file will be used to populate the initial values of drop down menus in the Attach to Data dialog.
Note: The saved file will be named sqlrepository.xml. If the name of the database repository file is changed, RTView will not be able to locate the file. As a result, drop down menus will populate based on databases added from the Application Options dialog or those typed directly into the Attach to Data dialog.
When you click Save Database Repository, a confirmation dialog will appear to verify in which directory you would like to save the database repository file. If you specified a directory for your initialization files, all repository files will be saved to, and read from, that directory. If you select the lib directory, the repository file will be available from any directory where you run RTView. If you do not select the lib directory, the repository file will be saved in the directory where you started the current session and will only be available when you run RTView from that particular directory. See “RTV_JAVAOPTS” for more information.
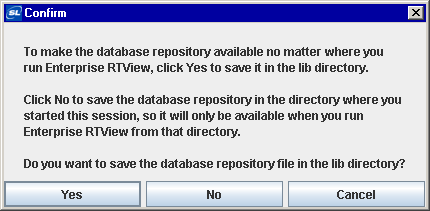
See “SQL Database Connection Setup” for details on editing an existing database repository file.
Excluding Tables From The Attach To SQL Data Dialog
To exclude tables from the Attach to SQL Data dialog, see “SQL Database Connection Setup” for details.
This section contains details about the deployment process that are specific to your data source. Please go to the Deployment section of this documentation for instructions on how to implement your RTView deployment option. Return to this page whenever you are instructed to refer to deployment information that is specific to your data source.
The SQL data source has additional System Requirements and Setup. See “SQL System Requirements and Setup” for more information.
Data Source Configuration File
RTView saves general application settings as well as data source configuration options in initialization files that are read at startup. If no directory has been specified for your initialization files and files are not found in the directory where you started the application, then RTView will search under lib in your installation directory. See “Application Options”, “Application Options - SQL”, and “RTV_JAVAOPTS” for more information.
Include the following initialization file when you deploy RTView with this data source:
|
File Name |
Description |
|
OPTIONS.ini |
Contains general options as well as data source options for SQL. |
Note: Options specified using command line and applet parameters override values set in initialization files.
Rich Client Browser Deployment Setup for Direct Data Connection
Note: If you are using history data you must include the SQL data source in your applet as detailed below.
A. Required Applet Parameters
In addition to basic applet parameters, you must specify the following in your HTML file to host the Display Viewer Applet. See “Rich Client Browser with Direct Data Connection - Manual Setup” for more information.
Include the SQL data source in your applet:
1. Add the following to your ARCHIVE parameter (found under your installation directory in lib):
gmsjsqlds.jar
2. Add the following applet parameter:
name = ds
value = com.sl.gmsjsqlds.GmsRtViewSqlDs
Note: To specify multiple data sources for the value of the ds parameter, separate them with a ;.
3. If your display contains SQL data attachments which use a JDBC driver, include the jar containing your JDBC driver class.
4. If you are using a JDBC driver to connect to a database for any data attachments in your display, include the jar for your JDBC driver in the ARCHIVE parameter.
B. Optional Applet Parameters
The following options are read from OPTIONS.ini if not included in the applet parameters of your HTML file.
|
Parameter Name |
Description |
|
dbretry |
Specify the interval (in milliseconds) to retry connecting to a database after an attempt to connect fails. Default is -1, which disables this feature. |
|
dbfailedlimit |
Specify the number of consecutive failed SQL queries after which to close this database connection and attempt to reconnect. Default is -1, which disables this feature. |
|
noquerydbinfo |
Set to true if you do not want to query your database for available tables and columns in your database. If a Database Repository file is found, it will be used to populate drop down menus in the Attach to SQL Data dialog. Default is false. |
|
sqlquote |
Set to true to enclose all table and column names in quotes when a SQL query is run. This is useful when attaching to databases that support quoted case-sensitive table and column names. |
C. Setup Client
1. If you will be viewing displays that include SQL data attachments or history data, modify your Java security settings to include the following permission:
permission java.util.PropertyPermission "file.encoding", "read";
2. If you will be accessing a database on another system, modify your Java security settings to include the following permission:
permission java.net.SocketPermission "host", "accept, connect, listen, resolve";
Where host is the system where the database is running.
3. If you are using a JDBC driver to connect to your database, include the jar for your driver in the ARCHIVE parameter. Depending on your driver, you may also need to add an accessClassInPackage RuntimePermission for your driver package.
D. Troubleshooting
You may encounter the following error(s):
Problem
Console Error:
load: class com.sl.gmsjsqlds.GmsRtViewSqlDs.class not found
Solution
The gmsjsqlds.jar is not specified in the ARCHIVE parameter or it is not in the directory containing the HTML file. If you specified a relative path for this jar in the ARCHIVE parameter, it was not found.
Except where noted, all demos can be run in three ways, as an application, or via rich or thin client in a browser.
Start the Demo Server
Rich Client and Thin Client Demos only.
There are rich and thin client demos already installed on the “RTView Demo Server”.
In an initialized command window (see “Initializing a Command Prompt or Terminal Window”):
Type run_startup_demoserver
The Data Source Demo is designed to illustrate each data source.
1. Setup Sample SQL Database. See “SQL Database Connection Setup” for more information.
2. Run Demos - Application, Rich Client Browser, or Thin Client Browser
Application Demo
1. In an initialized command window (see “Initializing a Command Prompt or Terminal Window”), go to the demos/dstutorial directory.
2. To view the demo, type:
run_viewer
3. To edit the demo, type:
run_builder
Rich Client Browser Demo
“Start the Demo Server” if it is not running.
1. In an initialized command window (see “Initializing a Command Prompt or Terminal Window”), go to the demos/dstutorial directory.
2. Start the Data Server by typing:
run_dataserver -socket
3. In the Data Server dialog, select:
Start Serving Data
4. Open a browser and navigate to http://localhost:8068/dstutorial_applet.
Thin Client Browser Demo
“Start the Demo Server” if it is not running.
1. In an initialized command window (see “Initializing a Command Prompt or Terminal Window”), go to the demos/dstutorial directory.
2. Start the Display Server by typing:
run_displayserver
3. Open a browser and navigate to http://localhost:8068/dstutorial.
The ElecroSphere demo, a Business Information Application, allows you to navigate through multiple types of business data.
Note: This demo requires Windows and Microsoft Access.
1. Run Demos - Application, Rich Client Browser or Thin Client Browser
Application Demo
On Windows:
In an initialized command window (see “Initializing a Command Prompt or Terminal Window”), go to the demos/esphere directory.
1. To view the demo, type:
run_viewer
2. To edit the demo, type:
run_builder
Rich Client Browser Demo
“Start the Demo Server” if it is not running.
On Windows:
In an initialized command window (see “Initializing a Command Prompt or Terminal Window”), go to the demos/esphere directory.
1. Start the Data Server by typing:
run_dataserver -socket
2. In the Data Server dialog, select:
Start Serving Data
3. Open a browser and navigate to http://localhost:8068/esphere_applet.
Thin Client Browser Demo
“Start the Demo Server” if it is not running.
On Windows:
In an initialized command window (see “Initializing a Command Prompt or Terminal Window”), go to the demos/esphere directory.
1. Start the Display Server by typing:
run_displayserver
2. To view the demo open a browser and navigate to http://localhost:8068/esphere.
This Quick Start Tutorial provides you with the fundamentals on how to use RTView with the SQL data source. Once completed, you can swiftly apply this knowledge to building your own dashboard displays for visual access to your SQL data.
Learn to:
§ Animate graphic objects with SQL data
§ Create a drill down display with SQL data
This tutorial requires the following:
§ Microsoft Access 97+.
§ Setup the sample database - If you have not, you must setup the sample database used in this tutorial. See and “SQL Database Connection Setup” for information.
§ Register for a license key. If you have not, you must do so before continuing. See “Registration” for more information.
§ “Quick Start Tutorial” - This tutorial requires that you have a working knowledge of RTView. We recommend that you complete the Quick Start Tutorial before continuing.
Start the Display Builder
If you are already logged onto the Display Builder, skip this section and go to “Create a Display”.
1. In an initialized terminal window (see “Initializing a Command Prompt or Terminal Window”), type:
run_builder
2. Login to the Display Builder. By default, the Display Builder does not require a login. “Login” can be enabled at setup to support “Role-based Security”. The default user name and password are:
User Name: admin
Password: admin
Note: It is possible that your system administrator may have configured another user name and password. In this case, you may also need to select a role. See “Role-based Security” for more information.
You are now ready to create a display using the SQL data source.
At this point you have:
§ Registered for a license key. See “Registration” for more information.
§ Logged on to the Display Builder
§ Setup the SQL sample database.
§ Completed the “Quick Start Tutorial”.
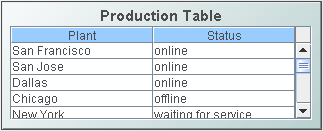
In this tutorial you use the sample SQL database as a data source to create a Production Table that displays production numbers per plant, as seen below.
As you saw in the “Quick Start Tutorial”, the data structure of tables and graphs (tabular data) enables RTView to automatically create several data source specific, built-in Substitutions for you. You will see these built-in Substitutions used in the target display when you create the drill down. For more information on Substitutions, see “Substitutions”.
In this exercise, you create a drill down using the previously created display, sql_dd_qs.rtv, as the target display. First you will set the Production Table to display production status per plant. Then you will create a drill down that opens a bar graph that shows more detailed data for each plant.

Add the SQL Database To List of Available Databases
Adding the sample SQL database to the Database List makes it available for animating graphic objects in your display.
1. In the Display Builder, select Tools>Options to open the Application Options dialog.
2. Select the SQL tab and click on Add Database to open the Add Database dialog.
3. In the Add Database dialog:
Database Name - Enter SampleDB
4. Click OK to close Add Database dialog.
5. Click OK to apply and close the Application Options dialog.
The sample SQL database is now available for animating graphic objects in your display.
Display Data in a Table
In this exercise you add a table and then display data in the table by attaching it to the data source.
1. Click on the Add Table button  and click again in the Working Area to place the table.
2. In the Object Properties dialog:
autoResizeFlag (category: Column) - Click to select the check box.
label (category: Label) - Change the name of the label to Production Table. Press <Enter>.
valueTable (category: Data) - Right-click in the Property Name field and select Attach to Data>SQL.
3. In the “Attach to SQL Data” dialog:
Database Name - SampleDB should already be selected.
Table Name - Select production_table.
Column(s) - Select the  button to open the Select Columns dialog.
4. In the Select Columns dialog:
Select Plant in the Available Columns list and click Add.
Select Status in the Available Columns list and click Add.
Click OK to close the Select Columns dialog.
5. In the “Attach to SQL Data” dialog leave the Filter field blank.
6. Click OK to apply these values and close the Attach to SQL Data dialog.
The table populates with values from production_table in the sample SQL database.
7. In the Display Builder, select File>Save.
You are now ready to create the drill down.
Create a Drill Down Target in the Table
In this exercise, you create the drill down using the previously created display, sql_dd_qs.rtv, as the target.
1. In the Object Properties dialog:
drillDownTarget (category: Interaction) - Double-click in the Property Name field to bring up the Drill Down Properties dialog.
2. In the “Drill Down Properties” dialog:
Apply Drill Down To - Select Named Window from the drop down menu. This option lets you re-use the window when you drill down multiple times.
Window Name - Enter sql. This name should be unique unless the display is to open in an existing window.
Drill Down Display Name - Select dstutorial\sql_dd_qs.rtv from the drop down menu.
3. Click OK to set the drill down target and close the Drill Down Properties dialog.
View the Drill Down Display
In this exercise, you drill down to the target display.
1. Double-click on any cell in the table to drill down to detailed data. The target display opens.
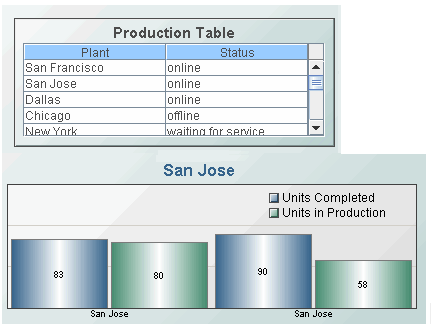
2. Double-click on another row in the table and the same display is used to show different data based on the row you select.
3. Close the drill down window.
4. In the Display Builder select File>Save.
Go to the “Quick Start Tutorial”
RTView communicates with your database using either a direct JDBC connection. Connections require some setup before RTView can communicate with your database.
Once you have setup your database connection, you will need to add your database in the Display Builder from the Application Options dialog on the “SQL Tab”. RTView will attempt to connect to your database. If RTView is unable to connect to your database, this means that either the driver is not setup correctly or that you do not have permission to access the database.
Note: Databases that have been setup to Use Client Credentials will not connect unless you are logged in and you have objects in your display that are using that connection. See Application Options>“SQL Tab”.
If the connection is successful, and the Get Tables and Columns from Database check box is selected in the Application Options dialog, RTView will use information from this database to populate drop down menus in the “Attach to SQL Data” dialog with available tables and columns. If a Database Repository is found, information from your database will be merged with data from the repository file. If you deselect the Get Tables and Columns from Database check box, RTView will no longer query your database for this information, but the Database Repository will still be used to populate drop down menus. Using a Database Repository to populate drop down menus makes it possible to specify which tables and columns from your database will be listed in the Attach to Data dialog and gives you the ability to build displays while databases are offline.
In order for RTView to communicate with your database using a straight JDBC connection, you must have a JDBC driver for your database. JDBC drivers are available from most database vendors. To make your database driver available to RTView, locate the driver on your machine and define an environment variable named RTV_USERPATH so that it includes the path to the driver class or the jar that contains the driver class. The RTV_USERPATH variable is included in the classpath for RTView. It may contain paths to multiple driver classes. You must know the fully qualified class name for the driver class and the database URL required to connect to your database when you add the database in the Application Options dialog. The database URL typically contains the protocol and sub-protocol strings for your database as well as the path to the database and a list of properties. If you do not know the syntax for your database URL, consult the documentation for your JDBC driver.
A Database Repository file may be used to populate the initial values of drop down menus in the “Attach to SQL Data” dialog. See “Application Options - SQL” for information on how to create a Database Repository file.
It is possible to edit an existing Database Repository file, however the file name sqlrepository.xml cannot be modified. If sqlrepository.xml is not found in the specified directory or your current working directory, RTView will look in the lib directory. If the Database Repository file is not found, drop down menus will remain empty until databases are added from the Application Options dialog or typed directly into the Attach to SQL Data dialog. See “RTV_JAVAOPTS” for more information.
To edit an existing Database Repository file, supported tags and attributes are as follows:
|
Tag |
Attribute |
Description |
|
|---|---|---|---|
|
sqlrepository |
xmlns |
Top level tag that includes the namespace attribute xmlns, which must be defined as www.sl.com (xmlns="www.sl.com") |
|
|
db |
name |
Database name |
|
|
table |
name |
Table name |
|
|
column |
Possible column value |
||
An example Database Repository file:
<?xml version="1.0"?>
<sqlrepository xmlns="www.sl.com" version="3.0">
<db name="SampleDB">
<table name="production_table">
<col>Plant</col>
<col>Units in Production</col>
<col>Units Completed</col>
<col>Status</col>
<col>On Schedule</col>
</table>
<table name="system_table">
<col>System</col>
<col>Status</col>
<col>%Free Space</col>
<col>CPU Usage</col>
<col>On Site</col>
</table>
<table name="trade_table">
<col>Customer</col>
<col>Symbol</col>
<col>Shares</col>
<col>Purchase Price</col>
<col>Current</col>
<col>High</col>
<col>Low</col>
</table>
</db>
</sqlrepository>
Excluding Tables From The Attach To SQL Data Dialog
To exclude tables from the Attach to SQL Data dialog, copy the sqlrepository.xml file to a new sqlexcludedtables.xml file and remove the table references that you want to include in the Attach to SQL Data dialog drop down menus. See “Database Repository File” for more information. For example:
<?xml version="1.0"?>
<sqlrepository xmlns="www.sl.com" version="3.0">
<db name="SampleDB">
<table name="production_table">
<col>Plant</col>
<col>Units in Production</col>
<col>Units Completed</col>
<col>Status</col>
<col>On Schedule</col>
</table>
</db>
</sqlrepository>
Save the sqlexcludedtables.xml file to your RTV_HOME\lib directory. Table information stored in sqlexcludedtables.xml will now be excluded from the initial values of Table Name drop down menus in the Attach to SQL Data dialog.
Note: It is not necessary to create a Database Repository file in order to use sqlexcludedtables.xml. RTView will still use the sqlexcludedtables.xml file to exclude tables from the Attach to SQL Data dialog. If you have an sqlexcludedtables.xml file and you click the Save Database Repository button, the new sqlrepository.xml file will not contain any of the tables listed in your sqlexcludedtables.xml file.
To create your own sqlexcludedtables.xml file without creating a Database Repository File, supported tags and attributes are as follows:
|
Tag |
Attribute |
Descriptions |
|
|---|---|---|---|
|
sqlexcludedtables |
xmlns |
Top level tag that includes the namespace attribute xmlns, which must be defined as www.sl.com (xmlns="www.sl.com") |
|
|
db |
name |
Database name |
|
|
table |
name |
Table name to exclude |
|
Note: The file name sqlexcludedtables.xml cannot be modified.
SQL Data Source - Command Line Options
In addition to General Options, the following command line arguments are enabled with the SQL data source when you run RTView applications from a Windows Command Prompt or UNIX terminal window. See “Command Line Options: Display Builder and Display Viewer” for more information.
Note: If a command line argument contains a space or a semicolon, then the entire argument must be enclosed in quotes (e.g.: "-sub:$data:my Data").
|
Name |
Description |
|
-dbfailedlimit:(number of failed queries) |
Specify the number of consecutive failed SQL queries after which to close this database connection and attempt to reconnect. Default is -1, which disables this feature. Example: -dbfailedlimit:20 |
|
-dbretry:(milliseconds) |
Specify the interval (in milliseconds) to retry connecting to a database after an attempt to connect fails. Default is -1, which disables this feature. Example: -dbretry:30000 |
|
-nopermerrors |
SQL errors with the word "permission" in them will not be printed to the console. This is helpful if you have selected the Use Client Credentials option for a database. In this case, your login does not allow access for some data in their display, you will not see any errors. See “Application Options - SQL” for more information. Example: -nopermerrors |
|
-noquerydbinfo |
RTView will no longer query your database for available tables and columns in your database. If a Database Repository file is found, it will be used to populate drop down menus in the Attach to SQL Data dialog. Example: -noquerydbinfo |
|
-smallintbooleans |
Set to interpret the SQL SMALLINT data type as a BOOLEAN, so that tables display a check box for columns of this type. Example: -smallintbooleans |
|
-sqlquerytimeout:(seconds) |
Specify the default timeout (in seconds) for all SQL queries. Example: -sqlquerytimeout:90 |
|
-sqlquote |
Encloses all table and column names specified in the Attach to SQL Data dialog in quotes when an SQL query is run. This is useful when attaching to databases that support quoted case-sensitive table and column names. Note: If a case-sensitive table or column name is used in the Filter field, or you are entering an advanced query in the SQL Query field, they must be entered in quotes, even if the -sqlquote option is specified. Example: -sqlquote |
|
-sqltryodbc: (true/false) |
Specifies whether or not an ODBC connection attempt will be made when a SQL query or command is executed using a database that is not defined in OPTIONS.ini. This option is not recommended and is intended only for backward compatibility with older RTView releases. This option is false by default and, if an undefined database name is encountered, then no connection attempt is made and the following message appears in the console: Undefined SQL database XYZ where XYZ is the name of the undefined database. Set this option to true to force the SQL data source to attempt an ODBC connection when an undefined database is referenced. OPTIONS.ini Example: sqltryodbc true Properties File Example: sl.rtview.sql.sqltryodbc=true Command Line Example: -sqltryodbc:true Note that in Java 1.8 and newer, the ODBC driver is not supported and RTView will not make any ODBC connection attempts, regardless of the option. |