This section describes how to configure the Historian. For information about the Advanced Historian, see the “Advanced Historian” section.
The Historian is used to archive data from any RTView data source to any database using JDBC. The SQL data source is required to view data from the Historian in RTView. It is not required to use the Historian to archive data. You can verify that the SQL data source is licensed in your installation in the Display Builder About dialog. See “RTView Data Sources” for more information.
You configure the Historian by creating Data Configuration (.rtv) files, configuring the Historian to create connections to your data sources, and setting final configurations in the Historian application. The Data Configuration (.rtv) files specify which data the Historian is to archive from each data source. You create Data Configuration (.rtv) files in the Display Builder. The Data Configuration (.rtv) files also specify how to access the data, and perform required transformations in the data.
When you start the Historian, it immediately begins gathering data as specified and places the time-stamped data into the designated tables. After the Historian has stored data over a period of time, you can build a display using History data. See “Building a Display Using History Data” for more information.
You can install multiple versions of the Historian to segment data collection into different databases, and configure fault-tolerance. The Historian comes with default schemas that are largely configurable. For example, you can use configuration files to specify your own table names and, optionally, let the Historian automatically create the tables in your database if they do not already exist. See “Configuring Failover on the Historian” for more information.
Data Configuration File Options
To configure the Historian you create Data Configuration (.rtv) files in the Display Builder. Data Configuration (.rtv) files specify which data to archive from each data source, how to access the data, any transformations to perform with the data, and the table in which to then store the data. There are two Data Configuration (.rtv) file options, Display Files or Cache Definition Files.
Use this option if your RTView deployment does not use caches. With this option you use your existing RTView display (.rtv) files (that you created in the Display Builder) to configure the Historian. Your existing display (.rtv) files contain objects that are already attached to your data. A record is stored in the history database every time new data is received by the Historian for each data attachment in your configuration display.
To use RTView display (.rtv) files to configure the Historian, you must have two history tables configured in your database: one for numeric data, the other for string data (for example, textual data). Numeric values must be attached to numeric object properties, and text values must be attached to string object properties. If you attach a numeric value to a meter label (which is a string object property), the numeric value is stored in the database as a string instead of a number, and the data is not available for trend graphs.
Use this option if your RTView deployment uses caches or, if you need to use the “Advanced Historian”. With this option you configure Cache object properties to point to the historical data to be archived. You can also specify which sources of current and/or historical data to keep in memory. To configure the Historian using this option, you specify which of these cached values to archive in a history database and then use these cache definition (.rtv) files to configure the Historian. The cache definition (.rtv) file specifies the following for the Historian: the data source, the cache and the database in which to store historical data.
The Cache data source allows for much higher performance than the traditional means of either performing analytics on information stored in a database, or querying it from the database to make calculations.
This section contains the following:
§ “Basic Steps To Configure the Historian” on page 1139
§ “Display File Configuration” on page 1140
§ “Cache Definition File Configuration” on page 1143
§ “Database Connection Configuration” on page 1145
§ “Historian Application Configuration” on page 1145
§ “Configuring Failover on the Historian” on page 1149
Basic Steps To Configure the Historian
Perform the following steps in the order given to configure the Historian:
1. Create or prepare Data Configuration files using the RTView Builder. Choose one:
• “Display File Configuration”
• “Cache Definition File Configuration”
For help choosing the type of Data Configuration file, see Data Configuration File Options.
2. Configure Database Connections (see “Database Connection Configuration”). You can configure the Historian to create connections to your data sources using a direct JDBC connection.
3. Configure the Historian application database connection. See “Historian Application Configuration” for more information.
4. After the Historian has stored data over a period of time, you can build a display using History data. See “Building a Display Using History Data” for more information.
Perform the following steps to create a Data Configuration (.rtv) Display File for configuring the Historian. These procedures assume you are using your existing RTView display (.rtv) files (the displays you currently use to view your data) to configure the Historian. These procedures assume that you have already attached your historical data to an object.
To configure the Historian using a Display File:
1. In the Display Builder, verify that your data is attached to the appropriate type of object property for the corresponding value. That is, numeric values must be attached to numeric object properties, and text values must be attached to string object properties. If you attach a numeric value to a meter label (which is a string object property), the numeric value is stored in the database as a string instead of a number, and the data will not be available for trend graphs).
2. Verify that you have two history tables in your database: one for numeric data, and another for string data (textual data). If you do not, configure the two tables. By default, if the -rebuildtables option is on, the first time you run the Historian two tables are created: a numeric table named HISTORY and a string table named HISTORY_S. See “Command Line Options: Historian” for more information.
If you can verify the default numeric table (HISTORY) and the string table (HISTORY_S) are in your database, and you want to use these tables, proceed to “Database Connection Configuration”.
If you do not want the Historian to create the HISTORY and HISTORY_S tables, you can create your own history tables manually. The tables must be created before running the Historian application.
To create your own history tables, use your preferred database client tools or database vendor client tools to do the following:
A. Use the -tablename command line option for the Historian to specify a single table name (other than HISTORY and HISTORY_S). The table name you specify is used for the numeric table, and _S is appended to the name to create the string table. See “Command Line Options: Historian” for more information. For example, if you specify:
MY_TABLE
The table name MY_TABLE is then established, and another table name is automatically created which has _S appended to the name. You then have the following two tables:
MY_TABLE is used for the numeric table.
MY_TABLE_S is used for the string table.
Note: Table names cannot contain spaces.
B. Configure the numeric table as described in the “Numeric Data Table”, below.
C. Configure the string table as described in the “String Data Table”, below.
D. Specify the table name on the command line for the Display Builder and Display Viewer Application and/or in your Display Viewer Applet parameters. See “Command Line Options: Display Builder and Display Viewer” and “Rich Client Browser Deployment” for more information.
Note: The two manually created tables are automatically rebuilt as data is received (you do not need to manually rebuild the tables).
Note: Tables created manually cannot utilize the valueHistoryFlag property to load initial history data on graph traces. See “Enable valueHistoryFlag” for more information.
The following fields are supplied in the numeric data table (HISTORY or the table name you specified):
|
Field Name |
Field Type |
Field Description |
Recommended Field Length (if applicable) |
|
VAR_NAME |
Text |
The data attachment used to store this record. |
80-160 |
|
TIME_STAMP |
Text |
The time this record was stored. This value is rounded to the closest second. Two columns are stored with each record. This field is only necessary if String Timestamps (2) is selected in the Historian GUI. This is the default selection. See “The Historian Application” for more information. |
30 |
|
Standard SQL TIMESTAMP data type |
This field is only necessary if SQL Timestamp is selected in the Historian GUI. See “The Historian Application” for more information. |
N/A |
|
|
TIME_STAMP_LS |
Text |
A string value of the time this record was stored. This value contains the time including milliseconds. This field is only necessary if String Timestamps (2) is selected in the Historian GUI. This is the default selection. See “The Historian Application” for more information. |
14 |
|
VAR_VALUE |
double |
The value for this field. This value is a number. |
N/A |
Note: If you select the historyTableRowNameFlag check box in Object Properties, then you must include and additional text column placed at the beginning of the table to store row name values. The Historian assumes that columns in the history table you create are in the same order as those in your tabular data element. If not, you can use the -insertColumnNames command line option for the Historian to match data to the correct columns. See “Command Line Options: Historian” for more information.
The following fields are supplied in the string (textual) data table (HISTORY_S or the table name you specified):
|
Field Name |
Field Type |
Field Description |
Recommended Field Length (if applicable) |
|---|---|---|---|
|
VAR_NAME |
Text |
The data attachment used to store this record. |
80-160 |
|
TIME_STAMP |
Text |
The time this record was stored. This value is rounded to the closest second. Two columns are stored with each record. This field is only necessary if String Timestamps (2) is selected in the Historian GUI. This is the default selection. See “The Historian Application” for more information. |
30 |
|
Standard SQL TIMESTAMP data type |
This field is only necessary if SQL Timestamp is selected in the Historian GUI. See “The Historian Application” for more information. |
N/A |
|
|
TIME_STAMP_LS |
Text |
A string value of the time this record was stored. This value contains the time including milliseconds. This field is only necessary if String Timestamps (2) is selected in the Historian GUI. This is the default selection. See “The Historian Application” for more information. |
14 |
|
VAR_SVALUE |
Text |
The value for this field. This value is a string. |
40 |
Note: When you attach data to a tabular object property, such as valueTable, it is recommended that you create a table in the history database to store that data. If you do not create a table, data from your tabular element is stored in standard history tables and, in the case of tabular data with multiple columns, row integrity is lost. See “Tabular Functions” for details about how to store tabular data.
For step-by-step instructions on creating data configuration files for the Historian or to learn how to create a table in the history database to store tabular data, go to Examples>Historian.
Proceed to “Database Connection Configuration”.
Cache Definition File Configuration
Perform the following steps to configure the Historian using a Cache Definition File. The Cache Definition file specifies the following for the Historian: the data source, the cache, and the database in which to store historical data. In these Steps you specify your data source and your cache. See “Cache Definition Files” for more information.
To configure the Historian using a Cache Definition File:
1. Use the RTView Builder to create a Cache Definition file, or select a cache on which you want to enable the Historian.
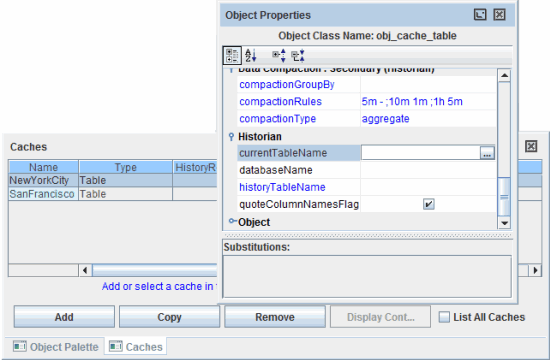
2. Select the cache from the Caches dialog and edit the following Historian properties in the Object Properties dialog. (In this Step you specify your cache.)
|
Field Name |
Description |
|
currentTableName |
Enter the name of a table in your Historian database in which to store the cache current data table. If you specify a currentTableName and no table by that name exists in your database, one will be created for you the first time you run the Historian. On each update of the data attached to the valueTable property, the Historian will create or update corresponding rows in the specified currentTableName in the Historian database. The indexColumnNames property will be used to locate rows to update otherwise, if no indexColumnNames are defined, the Historian will replace the entire table on each update. |
|
|
If the deleteTable property is used to delete rows from the cache's current table, the Historian will also delete those rows from the specified currentTableName table in the Historian database. On startup of an RTView application, the specified currentTableName will be queried from the Historian database for initial rows to be loaded into the cache's current table. To prevent this initial data from being loaded, you can run the Display Builder or Display Viewer from a command window and use the -nohistory command line option. Note: The currentTableName property is not supported in combination with the Historian's -kdbformat command line option. |
|
databaseName |
Enter the name of your Historian database that contains history and/or current tables for this cache. If left blank, the database name RTVHISTORY is assumed. The “Extend with SQL” option requires that the database specified in this property have a SQL database connection. Or, if this property is blank, there must be a database connection to the default RTVHISTORY database. |
|
historyTableName |
Enter the name of a table in your Historian database in which to store the cache history data table. If you specify a historyTableName and no table by that name exists in your database, one is created for you the first time you run the Historian. When rows are appended to the cache history table, the Historian also appends those rows to the specified historyTableName in the Historian database. If you specify a timestampColumnName, the Historian assumes that column is to be used for sorting and purging rows in chronological order and does not append its own timestamp columns to the specified historyTableName table. Before data is stored in the database, the cache schemaTable, if any, is applied. |
|
|
If you specify a historyTableName, RTView applications automatically query the Historian database table for the initial rows to be loaded into the cache history table, provided that: § The initialTable property is not attached to data (indicating an explicit query has been configured to load cache history data), and § A timestampColumnName is specified (so that it can be used to sort the SQL query result by time). The number of rows loaded by this initial query is limited by the maxNumberOfHistoryRows property. To prevent this initial data from being loaded, you can run the Display Builder or Display Viewer from a command window and use the -nohistory command line option. The “Extend with SQL” option requires that this property specify the cache database table name. The table specified in this property is used for queries. You can use the -verbose command line option for the Historian to see the specific SQL command used to create this table. See “Command Line Options: Historian” for more information. |
|
quoteColumnNamesFlag |
If selected, column and table names will be quoted in all SQL queries and commands for this cache. |
3. When you have finished configuring the properties, Save the display (.rtv) file. You will add this Cache Definition file to the list of Data Configuration files in the Historian application. See “Data Configuration File Options” for more information.
Proceed to “Database Connection Configuration”, next.
Database Connection Configuration
Perform the following steps to configure the Historian connections to your data sources. There are two options: “Direct JDBC Connection” or “Historian Application Configuration”.
For the Historian to use a direct JDBC Connection to communicate with your database, you must have a JDBC driver for your database. JDBC drivers are available from most database vendors.
To configure a direct JDBC Connection:
1. Locate the JDBC driver on your machine.
2. Define an environment variable named RTV_USERPATH that includes a path to the driver class or .jar file containing the driver class.
Note: You can define RTV_USERPATH to include paths to multiple driver classes. The RTV_USERPATH variable is included in the classpath for RTView and the Historian.
3. Note the fully qualified class name for the driver class and the database URL required to connect to your database. You need this to setup the database (when you configure the Historian application--see “Historian Application Configuration”). The database URL typically contains protocol and sub-protocol strings for your database, as well as the path to the database and a list of properties. If you do not know the syntax for your database URL, consult the documentation for your JDBC driver.
Proceed to “Historian Application Configuration”.
Historian Application Configuration
This section describes how to add the Data Configuration file you previously created to the Historian application, and configure the database in which your historical data will be stored. See “Data Configuration File Options” for more information.
The Historian Application allows you to configure the database connection. Click Save Configuration to save these settings. The Historian Console tab records errors and information. If you select the Show Data in Console check box, the Historian Application will output a line for each record that is stored in the database.
Data source-specific options are read in from initialization (.ini) files created in the Display Builder. For information on creating initialization files or command line options for your data source, refer to Applications Options or Command Line Options in the Data Sources section of this documentation.
To configure the Historian Application
1. Start the Historian.
In an initialized terminal window (see “Initializing a Command Prompt or Terminal Window”) type: run_historian
The Historian application opens and begins gathering and placing your (now time-stamped) data into tables based on your Data Configuration file specifications.
2. Click Configuration to edit settings.
3. Make the following Database Options entries as appropriate:
|
Field Name |
Description |
|
Historian Database Name |
The Data Source Name for the database the Historian will use to store and query information. Note: This name must also match the name of the history database configured in the Display Builder Application Options>“SQL Tab”. |
|
Database User Name |
The user name to pass into the history database when making a connection. This parameter is optional. You cannot edit this field while the Historian is storing data. |
|
Database Password |
The password to pass into the history database when making a connection. This parameter is optional. You cannot edit this field while the Historian is storing data. If you need to provide an encrypted password (rather than expose server password names in a clear text file, use the encode_string command line option with the following syntax: encode_string mypassword where mypassword is your plain text password. For example, enter the following in an initialized command window (see “Initializing a Command Prompt or Terminal Window”): encode_string mypassword and you will receive an encrypted password: encrypted value: 013430135501346013310134901353013450134801334 Copy the encrypted value, paste it into the password field and click Save to save this value to the initialization (*.ini) file. Or, if necessary, manually edit the (*.ini) file to include the encrypted value. Note: If you need to manually edit a configuration (*.ini) file, contact SL Technical Support at support@sl.com for information about supported syntax. |
|
JDBC Driver Class Name |
The fully qualified name of the JDBC driver class to use when connecting to the history database. The path to this driver must be included in the RTV_USERPATH environment variable. You cannot edit this field while the Historian is storing data. |
|
JDBC Database URL |
The full database URL to use when connecting to the history database using the specified JDBC driver. Consult your JDBC driver documentation if you do not know the database URL syntax for your driver. You cannot edit this field while the Historian is storing data. |
|
Append Timestamp Type |
Specify the type of timestamp: None - No TIMESTAMP column is stored. SQL Timestamp - A single TIMESTAMP column is stored using a standard SQL TIMESTAMP data type. String Timestamps (2) - Two TIMESTAMP columns are stored with each record as strings. This is the default. |
4. Make the following Record Retention Options entries as appropriate:
|
Field Name |
Description |
|
Delete Records Periodically |
If selected, the Historian will periodically delete records from the numeric table (HISTORY or the table name you specified) and the string table (HISTORY_S or the table name you specified) according to the rate set. |
|
Rate to Delete Records |
The length of time (in minutes, hours or days) a record can exist before it marked for deletion. For example if you set the rate to 5 minutes, then the next time you start RTView all records older than 5 minutes will be deleted. For the remainder of your work session, RTView will search every 2.5 minutes (half the rate) for records that exceed the rate. |
|
Purge Database on Start |
If selected, the Historian will clear out the numeric table (HISTORY or the table name you specified) and the string table (HISTORY_S or the table name you specified) before storing new data. |
|
Purge Database |
Clears out the numeric table (HISTORY or the table name you specified) and the string table (HISTORY_S or the table name you specified) immediately. |
5. Make the following Data Cache Options entries as appropriate:
|
Field Name |
Description |
|
Cache Data |
If selected, the Historian will cache data according to the Cache Duration and Cache Size specifications. If both Cache Duration and Cache Size are set, then the data records will be committed as soon as the first limit is reached. |
|
Cache Duration |
Length of time (in seconds) to cache before committing records to the database. If the value is set to 0, the Historian will not commit records in the database immediately, but rather will store them in the cache to be committed later. |
|
Cache Size |
Number of records to cache before committing them to the database. |
|
Flush Cached Records |
Flush all cached records to the database immediately. |
|
Store Last Values Only |
If selected, the Historian will store only the last (most recent) values in the cache for each unique data attachment. By default, the Historian stores all records in the cache each time the Cache Duration or Cache Size limit is reached. This option allows the Historian to store less data than it receives, which can be useful in a configuration where the Historian receives data from the Data Server at a higher rate than necessary for historical storage. For example, suppose the Data Server sends tables from two SQL attachments to the Historian: Query1: select * from table1 Query2: select * from table2 If the Data Server executes those queries every 10 seconds and the Historian has Cache Duration of 60 seconds, then every 60 seconds the Historian's data cache will contain six result tables from Query1 and six result tables from Query2. By default, the Historian will commit all twelve tables to the database. However, if Store Last Values is selected, the Historian will commit only the sixth (most recent) table from Query1 and Query2 and discard all other tables in the cache. Note: This option is available only if Cache Data is selected and the value of Cache Duration is greater than 0. |
6. Make the following Alert Persistence entries as appropriate:
Note: Alerts are sent from the application running the alert engine to the Historian via the RTVAgent. Therefore, you must enable connections from remote agent applications on the “RTVAgent Options Tab” and then copy the RTVAGENTOPTIONS.ini file to the directory where you will be running the Historian.
|
Field Name |
Description |
|
Alert Persistence Enabled |
Select to enable the persistence of alerts during fail over of an alert engine. All fields and current state of all active alerts, as well as all cleared alerts that have not been removed from the system will be stored. |
|
Alert Persistence Table Name |
Name of the table where the alerts will be persisted. Note: This must be the same table name specified in Alert Persistence tab of the Application Options>“Alerts Tab” dialog. |
Note: The Historian must run the RTVAgent data source locally (not via a Data Server) to persist the alerts. If you are running the Historian against a Data Server you can run the RTVAgent data source locally using the following command line option: run_historian -dsenable:RTVAGENT
7. In Data Configuration Files, click Add, enter the name of the Data Configuration (.rtv) file you just created and, optionally, any corresponding substitutions. “Substitutions” allow the same file to be used multiple times by different sets of substitutions.
Note: Each cache that is defined in the file should contain a substitution in the cacheName property, since cache names must be unique.
8. Click Apply to execute. Data Configuration files are added or removed after you click OK, Apply, or Save.
Note: To edit the Data Configuration (.rtv) file and apply changes without restarting the Display Builder, select a file from the list and click Refresh Selection to reload definition settings. The Refresh Selection option is enabled when you select a Data Definition (.rtv) file that has been both added and applied.
The Data Configuration (.rtv) file is added to the data source and data for these caches is collected. See the “Attach to Cache Data” section for details about attaching to cache data variables.
Note: After a Data Configuration (.rtv) file has been added to the data source, data is collected for that cache regardless of whether any currently open display (.rtv) files are showing that data.
9. Select Show Data in Console so that the Historian prints out a line for each record that is being stored in the database.
10. Select Start Storing Data.
11. Select Save Configuration.
12. Verify your configuration by clicking Console to view the Show Data in Console output.
Your setup is complete. After the Historian has stored data for a period of time, proceed to “Building a Display Using History Data”.
Optionally, you can configure failover for the Historian. For information, see “Configuring Failover on the Historian”.
Configuring Failover on the Historian
This section describes how to configure failover for the Historian. You configure failover in the Historian application. For details about configuring the Historian, see “Configuring the Historian”.
The High Availability feature is intended to be used with a database system that also supports redundancy (through mirroring, clustering, or other techniques) so that any Historian in the group can update the same virtual database.
To configure failover, create a Server Group and designate backup Historians to support a failover event. By default, no Server Group is defined. You can specify a primary Historian as well as one or more backup Historians. Only the primary Historian is capable of writing to the database.
Each Server Group member is assigned a port number and a priority. Using a socket connection on the assigned ports, each member monitors the status of the others in the group. The member with the highest priority is elected as the primary Historian. If the primary Historian fails, is shut down, or loses its connection to the database, the backup Historian with the highest priority becomes the new primary. A Historian with a priority of 2 is has higher priority than a Historian with a priority of 1.
For example, if we have three Historians with the following priority:
Historian A / Priority 1
Historian B / Priority 2
Historian C / Priority 3
and Historian C is the Primary. If Historian C is shut down, Historian B becomes the Primary. In the event of a tie in priority ranking, the Historian that was started first becomes the primary.
Note: Each Historian in the group should be configured with the same set of data configuration files, retention options, data source options, etc.
To configure failover for the Historian:
1. Start the Historian application.
In an initialized terminal window (see “Initializing a Command Prompt or Terminal Window”) type: run_historian
The Historian application opens.
2. Click the Server Group tab and make the following entries:

|
Field Name |
Description |
|
Include in Group |
Check the box to enable. |
|
Priority |
Choose a priority for this Historian. The default is 1. The online Historian with the highest priority is the primary Historian, and updates the database. |
|
Port |
Enter a port number on which this Historian accepts connections from other Historians in the group. The default is 3380. |
|
Timeout |
The amount of time, in seconds, at which a connection with a group member is considered down. |
|
Member |
For each Historian in the group, enter the hostname and port in the Member text field. |
3. Click Save Configuration.