The Advanced Historian feature (RTView v.5.4+) provides the following ways to reduce the amount of data stored in the Historian cache table: Table Displacement and Data Aggregation. Both options enable you to automatically reduce the amount of stored data as a background process simply by defining rules for Table Displacement or Data Aggregation. The Advanced Historian feature can be used on new or existing Historian data collections, allowing you to manage existing historical data.
With the standard “Historian”, data is reduced by manually backing up or deleting archived data.
The Advanced Historian is an optional licensed feature that (when activated) provides additional Cache properties to describe your data management preferences. You then determine whether and how to reduce the amount of historical data for each table. If Table Displacement is used, archival data is removed and placed in a separate, new table, at a frequency that you specify (for example, once a day). If Data Aggregation is used, the number of data points is reduced. In this latter case, you specify, using rules, both the granularity and the method for reducing the amount of data (for example: the sum, average, count, minimum or maximum).
The Table Displacement option might be suitable if you only need to view recent data, for example, for the last 24 hours. The Data Aggregation option is suitable if you need to view data from further in the past, for example, for the last few months or years.
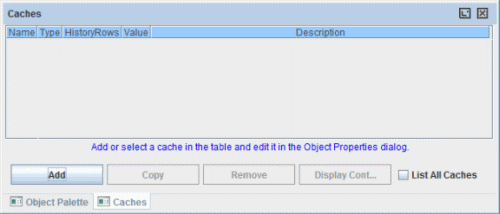
You configure the Advanced Historian feature using the obj_cache_table object and configuring Cache properties. To access the obj_cache_table object, in the Display Builder, select Tools>Caches to open the Caches dialog, add your caches, configure their properties, and Save the display (.rtv) file.
You can use either “Table Displacement” or “Data Aggregation” on a single table, not both. If rules are not specified for either Table Displacement or Data Aggregation, neither displacement nor aggregation occurs.
See “Caches” for more information.
You can configure Data Aggregation for one or more tables in a display. The Data Aggregation option aggregates, or reduces, the number of data points based on the method you specify using a rule (for example, sum, average, count, min, or max).
The aggregation of data is performed by reading data from the Historian table, aggregating the data based on the rule specifications, and then writing it to the Historian table. Data Aggregation is performed at known intervals, specified by the compactiontimerinterval (the default setting is 5 seconds). See “Command Line Options: Historian” for more information.
You setup Data Aggregation by configuring the obj_cache_table cache object to supply data to the historian table.
When aggregated data is stored in a single table, a single RTView object supplies data to a single trend chart. The trend chart shows all the historic data and, as the older data is aggregated, the data points thin out. That is, the length of time between each time-stamp increases. If the raw data is stored at one-second intervals, as it ages, you might not need such granularity. You can configure the Historian to store aged data at longer intervals, for example, one minute intervals. Increasing the time interval for storing aged data makes more table rows available in the Historian.
By default, Data Aggregation uses Single Table Aggregation.
Single Table Aggregation
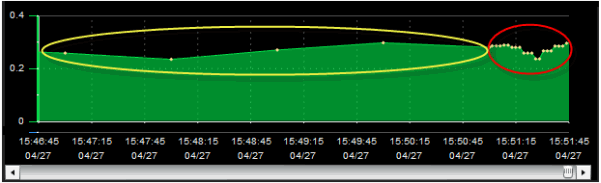
Use a single table if you want to display all of your data in one table, and if it is suitable for the length of time between data points to increase as your data ages. By default, Data Aggregation uses Single Table Aggregation. The following trend graph illustrates how Single Table Aggregation is displayed: current data, located on the right side of the graph, is gathered at one-second intervals, and, as the data ages in the table, the length of time between data points increases to one-minute intervals.
Multiple Table Aggregation
Use multiple tables if you do not need to view all of your data in one table, or you want the option to display your data in different time intervals (for example, 1 hour, 1 day, or 1 month time intervals). Using multiple tables has several advantages. For example, you can use multiple RTView objects to display the data in different ways. For instance, you could have a drop-down menu on a chart that allows the user to select the data view: raw, 20 minutes, 1 hour, 1 day, or 1 month time intervals. Also, the length of time between data points for older data does not increase as they do with a single table.
When multiple tables are used, aggregated data is stored from the most recent point in time for all of the tables. This is different from Table Displacement where, as the data ages, each table storing the data has a different start date and time. This is necessary for a scenario in which multiple RTView data objects supply data to multiple trend charts, which show the historic data separately by interval.
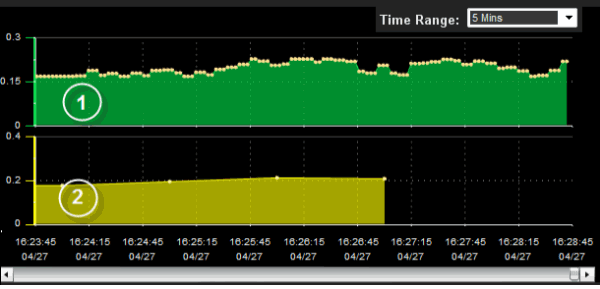
The following trend graphs illustrate how Multiple Table Aggregation might be displayed.
§ Trend Graph 1 data points are per one-second intervals (also referred to as raw data), and the duration is only the previous 5 minutes. The table containing this data is accessed when 2 Mins or 5 Mins is selected from the Time Range drop-down menu.
§ Trend Graph 2 data points are per one-minute intervals, and the duration is for the previous hour. The table containing this data only shows data points at that one-minute interval, back to the time period chosen (up to an hour). The table containing this data might be accessed when a time period of an hour or less is selected from the Time Range drop-down menu. Until Data Aggregation is performed on the most recent two minutes of this table, Table 1 is accessed to display the most recent two minutes of data.
You configure Multiple Table Aggregation in the Edit Compaction Rule dialog. See “Configuring Data Aggregation”, Step 6 for information.
By default, rules for all data are stored in a single table.
The algorithm for Data Aggregation does not do compaction of data that was stored before the current historian session. Use -smoothCompaction to perform Data Aggregation on your previously existing data.
This section provides step-by-step details for configuring the Advanced Historian Data Aggregation option for storing archived data. You configure Data Aggregation using the obj_cache_table object and configuring Cache properties. See “Caches” for more information.
These procedures require a Historian Compaction license key.
Note: The algorithm for Data Aggregation does not do compaction of data that was stored before the current historian session. The following procedures include instructions to use -smoothCompaction, which performs Data Aggregation on your previously existing data.
At this point you have:
§ Attached data to the obj_cache_table object using the valueTable property.
§ Obtained a Historian Compaction license key.
To configure Data Aggregation on a cache table:
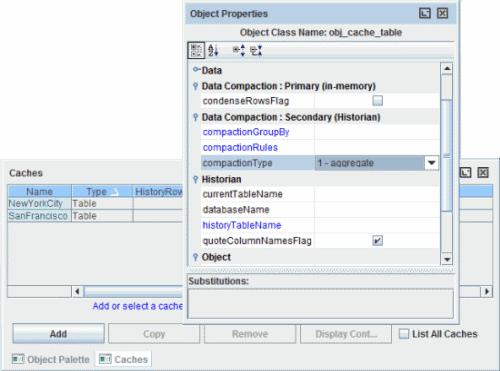
1. In the Display Builder, select Tools>Caches to open the Caches dialog. The obj_cache_table object appears in the display.

2. Click Add. The Add New Cache dialog opens.

3. Enter a name for the cache and select Table from the Select the type of the cache drop-down menu. Add other caches as needed.
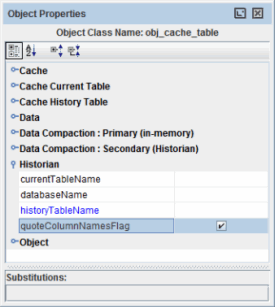
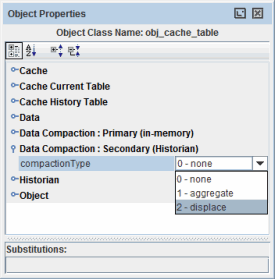
4. Click the obj_cache_table object in your display. The Object Properties window is populated with properties to configure Data Aggregation.
5. In the Object Properties window, under Data Compaction: Secondary (Historian), click the compactionType property, then select Aggregate.
None – No Data Aggregation nor Table Displacement is performed.
Aggregate – Performs Data Aggregation.
Displace – Performs Table Displacement.
6. In the Object Properties window double-click the compactionRules property to open the Compaction Rules dialog, then click Add to open the Edit Compaction Rule dialog.
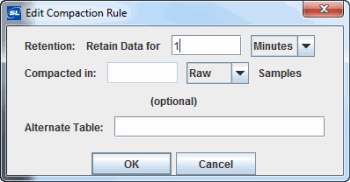
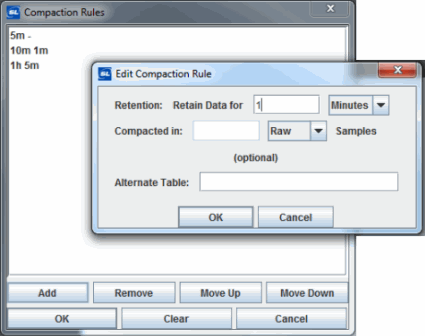
7. In the Edit Compaction Rule dialog, create a rule by making the following entries.
Note: If you choose to configure Multiple Table Aggregation, this is the Step in which you configure it. For each table, enter its name in the Alternate Table field, and configure the Compaction Rule (in the Retention and Compacted fields), as follows:
Retention: Retain Data for - Specify how long to store data for the current rule.
Compacted in - Specify the time interval at which to store data for the current rule. For Raw data this is the update interval. Note: If you select Raw, all values are retained and no compaction is performed.
Alternate Table - Use this field to configure Multiple Table Aggregation. For each table, enter a table name and an associated rule. By default, data is aggregated in the table specified by historyTableName property. Use the Alternate Table field to specify the name of another table.
For example, if we configure the following rules:
Rule 1:
Retain Data for: 5 Minutes
Compacted in: Raw
Rule 2:
Retain Data for: 10 Minutes
Compacted in: 1 Minute
Rule 3:
Retain Data for: 1 Hour
Compacted in: 5 Minutes
the rules are then displayed in the Compaction Rules dialog as follows:
8. Click OK to apply the rule.
9. In the Object Properties window, double-click the compactionGroupBy property to open the Compaction GroupBy Columns dialog, then click Add to open the Edit Compaction GroupBy Column dialog. The columns in your table are populated in the Group Column drop-down menu.
10. In the Edit Compaction GroupBy Column dialog, select a column from the Group Column drop-down menu, then select the data aggregation method from the by drop-down menu:
§ sum: Uses the sum total amount of all data within the specified time period.
§ count: Uses the total number of data points within the specified time period.
Note: This option is typically not used. count is only accurate for the last aggregation performed and should be used sparingly.
§ average: Uses the average total of all data within the specified time period.
§ min: Uses the smallest number of all the data points within the specified time period.
§ max: Uses the largest number of all the data points within the specified time period.
Note: Typically, the sum or average method is used.
11. Click OK. The column and aggregation method is listed in the Compaction GroupBy Column dialog.
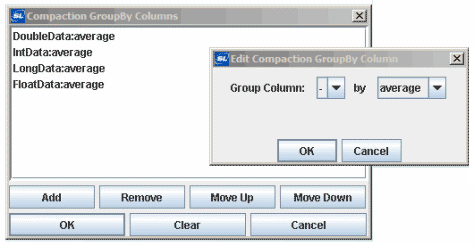
Click OK when finished applying the aggregation method to the columns.
12. In the Object Properties window, under Historian, click the quoteColumnNames property to specify how the column names are processed in the SQL database used for compaction. Choose True (checked) to preserve the column name case. True (checked) is recommended when possible.
Note: This setting is used by Primary Compaction and Secondary Compaction.
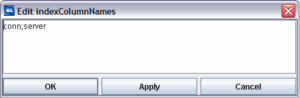
13. In the Object Properties window, click the indexColumnNames property and enter a semicolon (;) separated list of column names to be used as index columns. (See “Table Cache” for details).
14. If you have pre-existing data (table data that was stored before the current historian session) you wish to compact, perform the following. The compaction rules you specified will be applied to the pre-existing data. In a command line, type:
-smoothCompaction
When it is finished compacting the historical data, the Data Aggregation compaction process automatically starts compacting all the data. While smoothing is executing, new (raw) data is also being stored by the Historian.
Note: You may not be licensed to run all RTView features and/or data sources.
15. Save the display (.rtv) file.
Proceed to “Add a Display (.rtv) File to the Historian Application”.
Use the Table Displacement option if you only need to view recent data, for example, for the last 24 hours. The Table Displacement option removes archival data from a table. Table Displacement supports a single compaction rule. No data compaction occurs, nor do any changes to the data. The removed data is placed into a new, separate table at intervals you define, usually every 24 hours. You can configure Table Displacement to place the removed data into more than one table.
For example, let us say we configure Table Displacement for a table, ProductX, to occur every day at midnight. In our example, we also configure Table Displacement to archive the previous three days of data. This means we will have a total of four tables: the (original or source) ProductX table, plus one table for each of the three additional days (24-hour periods).
At midnight at the end of the first day, the Advanced Historian archives each row in the ProductX table and places the data in a new table. The new table is named ProductX_<date>, where date is the date it is stored. To illustrate this example, we number the tables as they are created in the Advanced Historian process. At the end of the first day we have the following two tables:
|
#1 |
ProductX |
This table is now empty. |
|
#2 |
ProductX_2012_1_01_12 |
This table contains data from the previous 24 hours. |
The ProductX table immediately begins storing data for the next 24 hours. At midnight, the Historian again archives each row in the ProductX table and places the data in a new table, ProductX_<date> (Table #3, below):
|
#1 |
ProductX |
This table is now empty. |
|
#3 |
ProductX_2012_1_02_12 |
This table contains data from the previous 24 hours. |
|
#2 |
ProductX_2012_1_01_12 |
This table contains data for the 24 hours prior to Table #3. |
The ProductX table, empty again, begins storing data for the next 24 hours. At midnight, the Historian archives each row in the ProductX table and places the data in a new table, ProductX_<date> (Table #4, below):
|
#1 |
ProductX |
This table is now empty. |
|
#4 |
ProductX_2012_1_03_12 |
This table contains data from the previous 24 hours. |
|
#3 |
ProductX_2012_1_02_12 |
This table contains data for the 24 hours prior to Table #4. |
|
#2 |
ProductX_2012_1_01_12 |
This table contains data for the 24 hours prior to Table #3. |
The ProductX table, empty again, begins storing data for the next 24 hours. At midnight, the Historian again archives each row in the ProductX table and places the data in a new table, ProductX_<date>. But now three archival tables exist, so the oldest table, Table #2 in this scenario, is deleted.
|
#1 |
ProductX |
This table is now empty. |
|
#5 |
ProductX_2012_1_04_12 |
This table contains data from the previous 24 hours. |
|
#4 |
ProductX_2012_1_03_12 |
This table contains data for the 24 hours prior to Table #5. |
|
#3 |
ProductX_2012_1_02_12 |
This table contains data for the 24 hours prior to Table #4. |
The following table describes options for the table name format:
|
Date part for displacement rule |
Code |
Table Name |
|---|---|---|
|
Year |
y |
Tablename_2008 |
|
Month |
M |
Tablename_2008_12 |
|
Week |
W |
Tablename_2008_49 |
|
Day |
D |
D Tablename_2008_271 |
|
Hour |
H |
H Tablename_2008_12_10_09 |
|
Minute |
M |
M Tablename_2008_12_10_09_15 |
|
Second |
S |
S Tablename_2008_12_10_09_15_23 |
|
“default” |
|
Tablename_2008_12_10_09_15 |
Configuring Table Displacement
This section provides step-by-step details for configuring the Advanced Historian Table Displacement option for storing archived data. You configure Table Displacement using the obj_cache_table object and configuring Cache properties. See “Caches” for more information.
Note: These procedures require a Historian Compaction license key.
At this point you have:
§ Attached data to the obj_cache_table object using the valueTable property.
§ Obtained a Historian Compaction license key.
To configure Table Displacement on a cache table:
1. In the Display Builder, select Tools>Caches to open the Caches dialog. The obj_cache_table object appears in the display.
2. Click Add. The Add New Cache dialog opens.
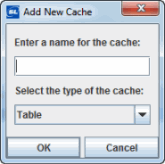
3. Enter a name for the cache and select Table from the Select the type of the cache drop-down menu. Add other caches as needed.
4. Click the obj_cache_table object in your display. The Object Properties window is populated with properties to configure Table Displacement.
5. In the Object Properties window, under Data Compaction: Secondary (Historian), click the compactionType property, then select Displace.
None – No Data Aggregation nor Table Displacement is performed.
Aggregate – Performs Data Aggregation.
Displace – Performs Table Displacement.
6. In the Object Properties window double-click the compactionRules property to open the Compaction Rules dialog, then click Add to open the Edit Compaction Rule dialog. Table Displacement supports a single compaction rule.

7. In the Edit Compaction Rule dialog, create a rule by making the following entries:
Retention: Retain Data for - Specify how long to store compactions for the current rule.
Displaced in - Specify the number of tables to retain, and the time period the tables are to store data.
For example, if you specify:
Displaced in: 5 Day Tables
5 tables are created, each storing data for a 24-hour period.
8. Click OK.
Note: Displacement rules are used if the same RTView object is being used to display data that starts again at a predefined interval. Use only a single displacement rule on each table or the rules will conflict.
9. Save the display (.rtv) file.
Proceed to “Add a Display (.rtv) File to the Historian Application,” next.
Add a Display (.rtv) File to the Historian Application
1. Start the Historian application to specify the configuration (.rtv) file.
In an initialized terminal window (see “Initializing a Command Prompt or Terminal Window”) type: run_historian
The Historian application opens and begins gathering and placing your (now time-stamped) data into tables based on your “Data Configuration File Options”.
2. Click Configuration to add the configuration (.rtv) file.
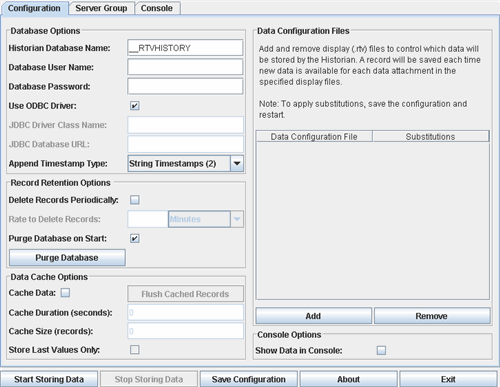
3. In Data Configuration Files, click Add, enter the name of the Data Configuration (.rtv) file you just created and, optionally, any corresponding substitutions. “Substitutions” allow the same file to be used multiple times by different sets of substitutions.
Note: Each cache that is defined in the file should contain a substitution in the cacheName property, since cache names must be unique.
4. Click Apply to execute. Data Configuration files are added or removed after you click OK, Apply, or Save.
Note: To edit the Data Configuration (.rtv) file and apply changes without restarting the Display Builder, select a file from the list and click Refresh Selection to reload definition settings. The Refresh Selection option is enabled when you select a Data Definition (.rtv) file that has been both added and applied.
The Data Configuration (.rtv) file is added to the data source and data for these caches is collected. See the “Attach to Cache Data” section for details about attaching to cache data variables.
Note: After a Data Configuration (.rtv) file has been added to the data source, data is collected for that cache regardless of whether any currently open display (.rtv) files are showing that data.
5. Select Show Data in Console so that the Historian prints out a line for each record that is being stored in the database.
6. Select Start Storing Data.
7. Select Save Configuration.
8. Verify your configuration by clicking Console to view the Show Data in Console output.
Your setup is complete. After the Historian has stored data for a period of time, you can build a display using History data. See “Building a Display Using History Data” for more information.
Optionally, you can configure failover for the Historian. For information, see “Configuring Failover on the Historian”.
Advanced Historian - Cache Properties
Note: You may not be licensed to run all RTView features and/or data sources.
The “Advanced Historian” (when activated) provides the following additional Cache properties (see “Caches”) to describe your data management preferences:
compactionType
The Advanced Historian feature allows you to define rules about data compaction via aggregation or displacement.
§ Aggregate - Specify the granularity of time stamped data and the methods used to perform compaction.
§ Displace - Archive data in displaced tables by creating a new table per each defined retention period.

|
Property Name |
Description |
|
compactionGroupBy |
Note: This property only applies the selected compactionType is Aggregate. Specify column and type of compaction to be performed. Double click on the property name and then click Add to open the Edit Compaction dialog. Once you have added a column, the column name and compaction type will be displayed in the dialog. Group Column - Select a column name to compact. by - Select a method of compaction from the drop down menu: sum count average min max |

|
Property Name |
Description |
|
|
compactionRules |
Specify compaction rules. Double click on the property name and then click Add to open the Edit Compaction Rule dialog. Compaction rules affect data differently depending on the selected compactionType. |
|
|
Aggregate |
Displace |
|
|
Once you have added a compaction rule, that rule will be displayed in the dialog as numbers followed by single characters indicating retention period and rate of compacted data samples (e.g. 1d 10m: over a period of 1 day, aggregate data every 10 minutes). By default, data is aggregated in the table specified by historyTableName. Use the Alternate Table field to enter the name of another table. Retention - Enter a duration and select the desired time range in which to perform compaction. Minutes m Hours h Days d Weeks (7 days) w Months (31 days) M Years (365 days) y Compacted in ... - Samples Compaction rate of data samples within the specified retention period. Enter the duration and select the desired time period from the drop down menu. Note: If you select Raw, all values are retained and no compaction is performed. Raw - Second s Minute m Hour h Day d Week (7 days) w Month (31 days) M Year (365 days) y Alternate Table - Enter an alternate table name in which to compact data. By default, data is compacted in the table specified by historyTableName. |
Once you have added a compaction rule, that rule will be displayed in the dialog as numbers followed by single characters indicating retention period and rate of compacted data samples (e.g. 1d 10m: retain data for 1 day, create a new displaced table every 10 minutes). Note: Currently, when the selected compactionType is Displace, this property only supports one compaction rule Displaced tables are created and named according to the specified retention period and rate of compaction. (e.g. historyTableName_2009_06_16_14_35, historyTableName_2009_06_16_14_45, etc.). Retention - Amount of time displaced tables will be retained before being deleted. Enter the duration and select the desired retention period from the drop down menu (e.g. 1d: retain displaced tables for one day) Minutes m Hours h Days d Weeks (7 days) w Months (31 days) M Years (365 days) y Compacted in ... - Samples Compaction rate of data samples within the specified retention period. Enter the duration and select the desired time period from the drop down menu. (e.g. 10m: create a new displaced table every 10 minutes). Note: If you select Raw, all values are retained and no compaction is performed. Raw - Second s Minute m Hour h Day d Week (7 days) w Month (31 days) M Year (365 days) y |
|