
Note: The RTVAgent data source may not be licensed in your RTView installation.
The RTVAgent data adapter accepts connections from remote agent applications and publishes that data to an RTView application (i.e. Display Builder, Data Server, Display Server, Historian or Display Viewer Application). Once a connection is established, objects (typically Cache objects) can be configured with data tables received from agents via the “Attach to RTVAgent Data” dialog.
The RTVAgent data adapter is ideal when there is a variable or unknown number of applications that wish to publish data to be consumed and processed by a central RTView Data Server. Once the RTVAgent data adapter input port is defined and enabled, the Data Server can begin receiving data from any number of RTVAgents. This data can be received via socket, http, or https, which means that RTVAgent applications can publish data from within or outside of the firewall.
It is possible to create a custom RTVAgent, an external Java application that will provide data to an RTView application. See “Customization - RTVAgent” for details.
This section includes:
§ “System Requirements and Setup - RTVAgent” on page 622
§ “Attach to RTVAgent Data” on page 622
§ “Application Options - RTVAgent” on page 626
§ “RTView Deployment - RTVAgent” on page 627
§ “Command Line Options - RTVAgent” on page 628
System Requirements and Setup - RTVAgent
The RTVAgent data source has no additional “System Requirements”.
The RTVAgent data source requires no additional “Setup”.
Note: The RTVAgent data source may not be licensed in your RTView installation.
The Attach to RTVAgent Data dialog, which is used to connect objects to tabular data sent from remote agent applications, can be accessed from the Object Properties window. The valueTable property of an object, typically a Cache object, will be attached to a data table received from the agent. See “Caches” for more information.
Note: The AgentName column in that table should be specified in the indexColumnNames property of the Cache object.
Right-click on the Property Name from the Object Properties window and select Attach to Data>RTVAgent to display the Attach to RTVAgent Data dialog. The Attach to RTVAgent Data dialog provides several drop down menus that allow you to specify information. The Agent Class drop down menu lists the agent class names of all of agents that have connected to the RTVAgent adapter. Drop down menus for Table Name, Column(s), and Filter Column populate based on the selected agent Class. If the item you require is not listed, type your selection into the field. For information on enabling a connection, see “Application Options - RTVAgent”.
Note: The Attach to RTVAgent Data dialog will only display agents currently connected and publishing data.
|
Field Name |
Description |
|
Agent Class |
The class name of the agent from which you want content. Choose either a class name or “RTViewDs”. You must enable a connection on the “RTVAgent Options Tab” of the Application Options dialog. Note: Since multiple agents can have the same class name, data attachments will receive information from all agents with the specified Agent Class and Table Name. |
|
Table Name |
Name of the table. Note: The agent assigns a name to the table when it sends it to the RTVAgent data adapter. |
|
Column(s) |
Select which column(s) to display. To display the Select Columns dialog, click on the ellipses button |
|
Filter Rows |
Check box to indicate whether or not to filter the RTVAgent data. See “Row Filtering” for more information. |
|
Filter Column |
Name of the column to use as a filter. Multiple column names should be entered as a semicolon (;) delimited list (i.e. col1;col2;col 3). If your column name contains a space or a semicolon, then the entire name must be enclosed in single quotes. |
|
Filter Value |
Value that the Filter Column must equal. Multiple filter values should be entered as a nested list, where values for a given column are separated by commas within a semicolon (;) delimited list (i.e. val1,val2;val3,val4;val5,val6). If your filter value contains a space or a semicolon, then the entire value must be enclosed in single quotes. When * is entered as a filter field value, data for all values in the specified filter column will be used to update the object property. When "*" is entered, only the literal comparative value will be used. |
|
Data Server |
Select to read data through your configured Data Server and not directly from the RTVAgent data source. Default - Select the default Data Server you configured in the Application Options>“Data Server Tab”. None - Bypass data being redirected through the specified data server(s) for this attachment and instead attach directly to the data source. Named Data Servers - Select a Named Data Server that you configured in the Application Options>“Data Server Tab”. Multi-Server Attachment - To configure multiple data servers, enter a semicolon (;) delimited list containing two or more Named Data Servers (e.g. ds101;ds102). Each name specified must correspond with a Named Data Server that you configured in the Application Options>“Data Server Tab”. It is also possible to specify __default and __none (e.g. __default;ds101;ds102). Note: The values __default and __none begin with two underscore characters. |
|
|
Alternatively, a value of * can be entered to specify all data servers, including __default and __none. When multiple data servers are specified, the data attachment will be directed to each data server in the list. For tabular data attachments, a column named DataServerName will be added as the first column of the table and contain the name of the server from which the data was received. A multi-server attachment will receive data independently from each of the servers it specifies, so in most cases it will be necessary to combine the tables received into a single table. This can be accomplished in two ways: 1. The multi-server attachment can be applied to a local cache that has the DataServerName column specified as an index column. The current table of that cache will contain the combination of the tables received from all servers. Note: It may also be necessary to configure cache row expiration settings to remove defunct rows. 2. The multi-server attachment can be applied as the Table argument of the RTView function named Combine Multi-Server Tables. See “Tabular Functions” for more information. |
When an object property is attached to data, the Property Name and Value in the Object Properties window will be displayed in green. This indicates that editing this value from the Object Properties window is no longer possible. Once a property has been attached to data, it receives continuous updates. To remove the data attachment, and resume editing capability in the Object Properties window, right-click on the Property Name and select Detach from Data. You will recognize that an object property has been detached from the data source when the Property Name and Value are no longer green.
Fields in the dialog change colors according to the information entered. These colors indicate whether or not information is valid. Information entered into the dialog is validated against data received from agents.
The following describes the significance of the Attach to RTVAgent Data validation colors:
|
Blue |
Unknown |
Cannot validate entry. |
|
White |
Valid state |
Entry is valid. |
|
Red |
Invalid state |
Incomplete or invalid entry. |
*If an agent is validated as Unknown, RTView will attempt to read it when you click OK or Apply.
The Substitutions feature allows you to build open-ended displays in which data attachments depend on values defined at the time the display is run. A generic name such as $table is used instead of a specific table name. Later when the display is running, this generic value is defined by the actual name of a specific table, such as SalesTable. In this way, a single display can be reused to show data from a number of different sources. For more information on creating displays using substitution values, see “Substitutions”.
There is a predefined agent Class named RTViewDs that defines a single table named Agents. The RTViewDs.agents table contains a row for each agent that is currently connected. The columns in the table are as follows:
|
RTViewDs |
||
|---|---|---|
|
Agents (RTViewDs.agents) |
Column Available |
Description |
|
|
AgentName |
Name of agent. |
|
|
AgentClass |
Class name of agent. |
|
|
LastReceiveTime |
Time that a data table was most recently received from the agent. |
|
|
TotalRowsReceived |
Cumulative count of table rows received from the agent. |
|
|
ClientID |
Unique number assigned to the agent connection. |
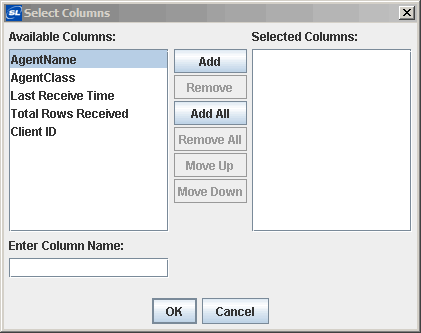
From the Attach to RTVAgent Data dialog you can specify which table columns to display and in what order they will appear. In order to populate the listing of available columns, you must first select a valid agent Class source and Table Name.
Click on the ellipses button  in the Column(s) field (or right-click in the Column(s) field and choose Select Columns) to display the Select Columns dialog. The dialog should contain a list of Available Columns that you can add to your table.
To add a column, select an item from the Available Columns list and click on the Add button. If the item you require is not listed, type your selection into the Enter Column Name field. Click the Remove button to delete an item previously added to the Selected Columns list. You can control the order of columns in a table by arranging the items in the Selected Columns list with the Move Up and Move Down buttons.
Validation colors indicate whether selected columns are valid. However, if even one column selected is invalid, the Column(s) field in the Attach to RTVAgent Data dialog will register as an invalid entry.
Note: Invalid columns will not update.
If no data is available for a table row within a selected column, the table cell will display one the following values: N/A, false, 0, or 0.0.
The following describes the Attach to RTVAgent Data dialog commands:
|
Command |
Description |
|
OK |
Applies values and closes the dialog. |
|
Apply |
Applies values without closing the dialog. |
|
Reset |
Resets all fields to last values applied. |
|
Clear |
Clears all fields. Detaches object from data source (once Apply or OK is selected). |
|
Cancel |
Closes the dialog with last values applied. |
Application Options - RTVAgent
Select Tools>Options in the Display Builder to display the Application Options dialog.
Options specified in the RTVAgent tab can be saved in an initialization file (RTVAGENTOPTIONS.ini). On startup, the initialization file is read by the Display Builder, Display Viewer, Display Server, Data Server, and Historian* to set initial values. If no directory has been specified for your initialization files and RTVAGENTOPTIONS.ini is not found in the directory where you started the application, then RTView will search under lib in your installation directory. See “RTV_JAVAOPTS” for more information.
Note: Options specified using command line arguments will override values set in initialization files. See “Command Line Options - RTVAgent” for more information.
*If you are enabling RTVAgent options to utilize the Historian for Alert Persistence, then you must copy the RTVAGENTOPTIONS.ini file to the directory where you will be running the Historian.
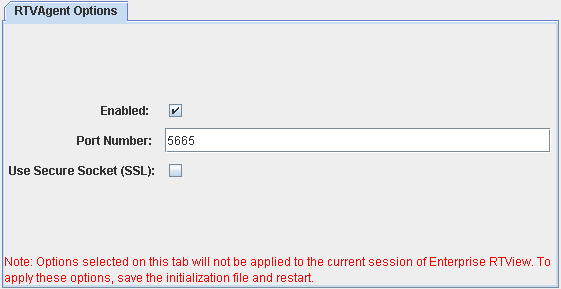
This tab allows you to enable connections from remote agent applications.
|
Field Name |
Description |
|
Enabled |
Select to enable connections from remote agent applications. By default, this option is disabled. Once enabled, agents can send tabular data and objects can be configured with data attachments using the “Attach to RTVAgent Data” dialog. |
|
Port Number |
Port on which the RTVAgent data adapter will accept agent connections. Default is 5665. Valid port numbers are greater than 1024. Note: Only one application at a time can accept connections on a given port. |
|
Use Secure Socket (SSL) |
If selected, a secure socket will be used for each agent that makes a direct socket connection to the RTVAgent data adapter. Data is encrypted before transmission over a secure socket. Note: This option does not apply to agents that connect indirectly via HTTP and the rtvagent servlet. For secure connections in that case, an HTTPS connection should be used from the agent to the rtvagent servlet. |
This section contains details about the deployment process that are specific to your data source. Please go to the Deployment section of this documentation for instructions on how to implement your RTView deployment option. Return to this page whenever you are instructed to refer to deployment information that is specific to your data source.
Note: If you plan to set up the Data Server to accept RTVAgent data via HTTP, then complete the section titled Set up RTVAgent Servlet on Application Server.
This section includes:
§ “System Requirements and Setup - RTVPipe” on page 629
§ “Attach to RTVPipe Data” on page 629
§ “Application Options - RTVPipe” on page 635
§ “RTView Deployment - RTVPipe” on page 636
§ “Command Line Options - RTVPipe” on page 636
The XML data source has additional System Requirements and Setup. See “System Requirements and Setup - RTVAgent” for more information.
Data Source Configuration File
RTView saves general application settings as well as data source configuration options in initialization files that are read at startup. If no directory has been specified for your initialization files and files are not found in the directory where you started the application, then RTView will search under lib in your installation directory. See “Application Options”, “Application Options - RTVAgent”, and “RTV_JAVAOPTS” for more information.
Include the following initialization file when you deploy RTView with this data source:
|
File Name |
Description |
|
RTVAGENTOPTIONS.ini |
Contains general options as well as data source options for RTVAgent. |
Note: Options specified using command line and applet parameters override values set in these initialization files.
Command Line Options - RTVAgent
In addition to General Options, the following command line arguments are enabled with the RTVAgent data source when you run RTView applications from a Windows Command Prompt or UNIX terminal window. See “Command Line Options: Display Builder and Display Viewer” for more information.
Note: If a command line argument contains a space or a semicolon, then the entire argument must be enclosed in quotes (e.g.: "-sub:$data:my Data").
|
Name |
|
Description |
|
-rtvagentoption |
enabled |
Enable connections from remote agent applications. Default is false. Example: -rtvagentoption:enabled=true |
|
|
port |
Specify port on which the RTVAgent data adapter will accept agent connections. Default is 5665. Valid port numbers are greater than 1024. Note: Only one application at a time can accept connections on a given port. Example: -rtvagentoption:port=5665 |
|
|
ssl |
Select to encrypt data before transmission over a secure socket. Default is false. Note: This option does not apply to agents that connect indirectly via HTTP and the rtvagent servlet. For secure connections in that case, an HTTPS connection should be used from the agent to the rtvagent servlet. Example: -rtvagentoption:ssl=true |
 in the