Data Server
The Data Server is an option when it is
not desirable, or possible, to directly connect the Display Viewer Application,
Display Viewer Applet or Display Server to data sources. Select the
Data Server tab in the Application Options dialog to configure your Data
Server(s).
The Data Server uses EII
and XML technologies to gather, federate and distribute information from
disparate data sources based on information currently in demand. It also
caches the data so that multiple demands are delivered to any number of
clients - without need of subsequent data queries. These important factors
greatly enhance processing speed. Because the Data Server can exist behind
firewalls, it also greatly simplifies and strengthens the secured delivery
of information to clients beyond the firewall.
The Data Server can be used to serve
data to the Display Viewer Application, Display Viewer Applet and Display
Server. See the Deployment section
for more information.
The following scenarios, or a combination of them, would indicate that one or
multiple instances of the Data Server would be useful.
Data Access
In some cases the data source resides in a sub-network where it is not possible
or desirable to connect directly. For example, you may have a data source that
communicates via a TCP/IP port that is not exposed across a security firewall.
In this case, the Data Server would exist behind the firewall and connect
to the chosen display technology via HTTP or an available exposed port. In most
cases, at least one Data Server must be configured if the Display Viewer applet
is used. Applets are restricted to making connections back to the webserver
host and will throw an exception if connection attempts are made to any other
host.
Data Centralization
While a direct TCP/IP connection to the data sources may be possible, it may not be desirable for each data
source and each client. For example, with a Display Viewer Application
deployment you might
not want a direct TCP connection from each client to every data source. In this
case, the Data Server could act as a proxy by directly
connecting to all data sources and providing data to each Java application
client. Data
Reduction/Aggregation
In some cases, there may be a lot of raw data that does not need to be sent
except upon demand. Using the Data
Server in this situation can reduce network traffic by performing data
calculations from within a sub-network and providing either only the aggregated
data or raw data on demand to the chosen display technology. For example the
Data Server may publish an average metric over all servers in a subnet, but
provide raw data on drill down to a selected server.
Scalability
The Data Server has several data processing features including: an in
memory data cache, a persistent alert rules engine, and the ability to perform
data calculations. This processing load can be scaled out by dividing the labor
across multiple Data Servers that will connect to the chosen display
technology.
High Availability
To ensure client access to data in the event
of a server failure, a pair of redundant Data Servers can be deployed on two
separate hosts. In such a deployment each server has the same configuration and
access to the same data sources. Typically, one server is considered the primary
and the other is the backup. Each client is configured with two Data Server
connections, one to the primary and another to the backup.
At startup, the client connects to the primary server if available, otherwise it
connects to the backup server. If neither is available, the client periodically
retries connecting to both. Client connections are specified on the
Data Server
tab of the Option dialog in the Builder, as or via the -dataserver
command line options when launching the
Display Builder, Display Viewer Application or
Display Server.
A running Data Server is either "active" or "standby". An active server loads
all global, cache, and alert definitions and activates them. In a standby
server, none of these actions are performed, thereby avoiding the overhead of
maintaining alert and cache data sources until the server is active.
NOTE: All servers specified should use the same
initialization files (*OPTIONS.ini) and should have access to the same external
data sources, so that displays appear the same regardless of which server
is connected.
A primary/backup redundant server pair can be configured in the following three
modes:
1. Active / Active: In this mode, both servers are always active. This
configuration is the simplest and provides the quickest response to clients in
the event of a server failure. However, this mode increases data processing as
both servers are always storing cache data, as well as processing and generating
duplicate alerts.
2. Active / Standby with manual reset: In this mode, the backup server is
started with the
-standby:warm command line option. The backup does not become active
until a client connects to it (typically after the primary fails). However,
after the backup server becomes active it remains active and clients stay
connected to it, even if the primary server becomes active. This mode reduces
data processing in normal conditions but after a primary server fails and
recovers both servers might become active, possibly with clients connected to
both servers. To restore the system to its initial active / standby state, the
backup server must be manually stopped and restarted (with the
-standby:warm command line option).
3. Active / Standby with auto-reset. In this
mode, both servers belong to a server group, where one server is designated as
the preferred primary server and the other as the preferred backup server. Each
server monitors the status of the other. The backup runs in standby mode until
it detects the failure of the primary and then becomes active. If the primary
server then becomes active the backup server automatically returns to standby
mode. Clients then automatically disconnect from the backup and (re)connect to
the primary.
This mode ensures that only one server in the group has its alert data source
activated at any time, thereby avoiding duplicate alert generation. Also by
default, the cache data source is only active in the primary server, thereby
avoiding duplicate cache storage. However in some cases it may be preferable to
also activate the cache data source in the backup Data Server, Otherwise, caches
may miss data during the failover of the primary server to the passive backup
server, while the backup server is activating its cache data source. This can be
accomplished by the
group_standby_mode option.
NOTE: The cache and alert persistence features can also be used to ensure that
the backup server gets the correct state of those data sources when it becomes
active.
See the
Server Group section (below) for
details about configuring this high availability mode using the Builder GUI. This
mode can also be configured on the command line.
For details, see the -group_member
argument.
Security
You can use client access lists to specify which clients can
connect to a Data Server. Any RTView application (the Builder, Viewer, Display
Server, another Data Server and so forth) can be a Data Server client. By
default, the client access lists are empty which means that any client can
connect to the Data Server.
When a client connection request is denied, that client
makes no further attempts to connect to that Data Server unless the client
application is restarted. This is true even if the client has a failover
connection specified for that Data Server.
There are
three access lists:
- Blacklist: Clients on this
list are denied access to the Data Server.
- Graylist: Clients on this
list are
permitted access to the Data Server if they provide a trusted SSL
certificate. NOTE:
Graylisting should be used only when necessary since it involves certificate
management, delays from SSL handshaking, and overhead from data encryption.
- Whitelist: Clients on this
list are
permitted access to the Data Server, no SSL certificate is required.
Access
List Process Flow
When access lists are
enabled, the Data Server checks the access lists for entries upon receiving
a connection request: first the Blacklist, then (if not
blacklisted) the Graylist,
and lastly (if not graylisted) the Whitelist. To illustrate this process in greater detail, let us say that that a
Data Server receives a request from a client with IP address X and
hostname H:
1. If the Blacklist is not empty (it has one or more clients
specified) the Data Server checks the Blacklist and if X or H matches an entry in the Blacklist,
the server rejects the client connection.
2. Otherwise, if the Graylist is not empty and X or H
matches an entry in the Graylist, the server performs an SSL
handshake with the client. If the client presents a certificate that the
server trusts and vice-versa, the handshake completes successfully and the
connection is accepted. Otherwise, the server rejects the connection.
3. Otherwise, if the Whitelist is not empty and X or H
matches an entry in the Whitelist, the server accepts the
client connection.
4. Otherwise, neither X or H is matched on any list. If the
Whitelist is empty, the connection is accepted. If the Whitelist
is not empty, the connection is rejected. The Blacklist has the highest precedence
and the
Whitelist has the lowest precedence. If a client address or hostname has
matches on multiple access lists, the most restrictive list is used. For
example, if a client address matches an entry on the Blacklist its
connection request is denied even though the client address also matches an entry on the Graylist or
Whitelist.
If the
Whitelist has at least one entry all clients are rejected that have no match in the
Whitelist or the Graylist. However, if the
Whitelist is empty, then all
clients that are not blacklisted are accepted (with an SSL handshake if its
graylisted, unconditionally otherwise).
Using the hostname H in a list is effective only if the Data Server's host
system is able to lookup that hostname via its address X, using a naming
service. For example, if hostname H is specified in a list then "ping
H" should complete successfully if run on the Data Server's host system.
If any client_whitelist values are specified and the
Data Server
belongs to a redundant server group for failover, specify a client_whitelist entry for the address or hostname of the other group
member. Otherwise, the server cannot connect to its partner.
If the
client_whitelist values are specified and the rtvdata servlet
is used, you must also specify a client_whitelist for the address or
hostname of the system on which the servlet is deployed. Otherwise, the servlet cannot connect to
the Data Server.
Specifying Client Lists
To enable this feature you add client
hostnames or IP addresses to the access lists, as appropriate, using the
client_blacklist, client_graylist and client_whitelist
options. Each option can be specified multiple times. The order in
which you specify the client list does not
affect the connection request process.
The client access list options can be specified as Data Server command line
arguments, as options in the DATASERVER.ini file, or as entries in a
properties file. The value of each option is either a client hostname or IP
address which may contain * characters as wildcards, or a range of
IPv4 addresses in the format of n.n.n.n-n.n.n.n, where each n
is a number between 0 and 255. The * character cannot be used
in an address range. NOTE:
For best performance use IPv4 addresses, rather than hostnames, in the
access lists whenever possible. This mitigates the possible performance penalty
involved in using hostnames, as the Data Server uses a name service to perform
hostname lookups.
When this feature is enabled, the Data Server checks both incoming socket
connections and HTTP connections (via the rtvdata servlet) against those
lists using the process described previously. Case is ignored when a client
hostname is compared to a list entry. For example, a list entry of host1
matches HOST1, Host1, and host1. Examples:
| |
run_dataserver -client_whitelist:192.168.1.* -client_whitelist:localhost |
| |
In this command line argument example, the
Data Server accepts connections from all clients on localhost or
with IPv4 addresses that begin with 192.168.1.Connections from any other
clients are denied (because the Whitelist is not empty). |
| |
|
| |
run_dataserver -client_blacklist:DMZ |
| |
In this command line argument example, the
Data Server denies connections from a client with hostname DMZ and
accepts connections from all other clients. |
| |
|
| |
client_whitelist localhost
client_blacklist 192.168.1.44
client_blacklist DEV*
client_whitelist 192.168.1.1-192.168.1.255 |
| |
In this DATASERVER.ini file
example, the Data Server accepts connections from the localhost and any
clients with IPv4 addresses in the range of 192.168.1.1 through
192.168.1.255 except for address 192.168.1.44 or any client whose hostname
begins with DEV, dev, Dev, etc. Connections from any other clients are
denied (because the whitelist is not empty). |
| |
|
| |
sl.rtview.dataserver.client_whitelist=localhost
sl.rtview.dataserver.client_blacklist=192.168.1.44
sl.rtview.dataserver.client_blacklist=DEV*
sl.rtview.dataserver.client_whitelist=192.168.1.1-192.168.1.255 |
| |
This rtview properties file example
specifies the same configuration as the previous DATASERVER.ini file
example. |
Graylist and SSL Certificates
If a client matches an entry on the graylist, an SSL handshake is
performed between the client and the server in which the client must provide
a certificate the server trusts, and the server must provide a certificate
the client trusts. If the SSL handshake is successful the
client connection is accepted. All traffic between the client and server on
that connection is encrypted, typically using a 128-bit key. (This might
impact CPU and network performance on connections that transmit high volumes
of data).
Example:
The following example describes the self-signed
certificate process using the keytool utility provided with the Java JDK.
For illustrative purposes, some of the keytool commands appear on multiple lines, but must be entered as a single line.
The Data Server runs on host1 and the
client runs on host2. The filenames, passwords, aliases and
so forth used here are only for illustration and are not required values.
For example, there is nothing significant about the use of rtview in
the example strings. In an actual configuration all of these strings could
be replaced with strings of your choice (if they are replaced consistently). NOTE: For details about SSL and certificates,
see vender documentation. For details about keytool, execute "keytool -help" for usage
information. 1. Create a keystore filed named server_keystore.jks to store the
server's private key and self-signed certificate, with a 10-year expiration.
For example:
| |
keytool -genkey -keystore server_keystore.jks -alias rtview_server
-validity 3650 -keyalg RSA -storepass mypswd -keypass mypswd -dname cn=host1 |
2. View the certificate just created. For example:
| |
keytool -list -v -keystore server_keystore.jks -storepass mypswd |
| |
Output is similar to the following: |
| |
Keystore type: JKS
Keystore provider: SUN
Your keystore contains 1 entry
Alias name: rtview_server
Creation date: Nov 15, 2012
Entry type: PrivateKeyEntry
Owner: CN=host1
Issuer: CN=host1
Serial number: 50a567d2
Valid from: Thu Nov 15 17:08:18 EST
2012 until: Sun Nov 13 17:08:18 EST 2022
Certificate fingerprints:
MD5:
96:89:2D:37:71:8E:7F:89:7A:08:71:9F:7F:C2:C1:50
SHA1:
63:1B:1B:ED:75:58:11:34:F0:80:56:45:9B:C9:74:02:CD:D4:C6:89
Signature algorithm name: SHA1withRSA
Version: 3 |
3. Export the server's certificate to a file named server.cer:
| |
keytool -export -alias rtview_server -keystore server_keystore.jks -storepass
mypswd -file server.cer |
4. Import the server certificate into a truststore file for the client:
| |
keytool -importcert -alias rtview_server -file server.cer -v -noprompt
-keystore client_truststore.jks -storepass mypswd |
5. Create a keystore filed named client_keystore.jks to store the
client's private key and self-signed certificate:
| |
keytool -genkey -keystore client_keystore.jks -alias rtview_client
-validity 3650 -keyalg RSA -storepass mypswd -keypass mypswd -dname cn=host2 |
6. Export the client's certificate to a file named client.cer:
| |
keytool -export -alias rtview_client -keystore client_keystore.jks
-storepass mypswd -file client.cer |
7. Import the client certificate into a truststore file for the server:
| |
keytool -importcert -alias rtview_client -file client.cer -v -noprompt
-keystore server_truststore.jks -storepass mypswd |
8. Verify that you now have four files with a .jks extension:
client_keystore.jks
client_truststore.jks
server_keystore.jks
server_truststore.jks
9.
Copy the files as follows:
- Copy server_keystore.jks and
server_truststore.jks to the directory on host1 where the Data
Server will run.
- Copy client_keystore.jks and
client_truststore.jks to the
directory on host2 where the client will run.
- If you copy the keystore (.jks) files between Windows an Linux/UNIX
hosts, copy them in binary mode.
- The client.cer and server.cer files are not needed and can be
deleted.
10. On host1, run the Data
Server as follows (Note that the "set RTV_JAVAOPTS" command is shown in Windows command syntax and should be
entered on a single line):
| |
set RTV_JAVAOPTS=-Djavax.net.ssl.keyStore=server_keystore.jks -Djavax.net.ssl.keyStorePassword=mypswd
-Djavax.net.ssl.trustStore=server_truststore.jks -Djavax.net.ssl.trustStorePassword=mypswd |
| |
run_dataserver -daemon -verbose -client_graylist:host2 |
11. On host2, run a Viewer client as follows
| |
set RTV_JAVAOPTS=-Djavax.net.ssl.keyStore=client_keystore.jks -Djavax.net.ssl.keyStorePassword=mypswd
-Djavax.net.ssl.trustStore=client_truststore.jks -Djavax.net.ssl.trustStorePassword=mypswd |
| |
run_viewer -dataserver:remote:host1 |
12.
Verify that you now see output similar to the following on the Data Server
console, which indicates that the Viewer's connection to the Data Server is
accepted:
| |
GmsRtViewDataServer connect client 1,
192.168.1.200:55401
created SSL socket
192.168.1.200:55401
cipher=SSL_RSA_WITH_RC4_128_MD5
add Client: 1 (127.0.0.1/127.0.0.1)
accept graylisted client 1
(127.0.0.1) |
| |
Note the lines indicating creation of an SSL socket and the cipher used. If
errors occur, see Troubleshooting
(below). |
SSL Encryption
Without Certificates
The
-ssl option can be specified when the Data Server is started.
With this option, the Data Server uses an SSL socket for each socket
connection to clients but without performing an SSL authentication handshake. All data transmitted on the socket is encrypted
using an anonymous cipher.
The -ssl option can be used in combination with client access lists.
If a client is graylisted an SSL handshake is performed
when it connects to the Data Server (as described in the
Access List
Process Flow). If a client is whitelisted its connection is accepted without an SSL handshake and an SSL
socket with an anonymous cipher is used. The Data Server's verbose output
indicates this with messages similar to the following:
comparing client 192.168.1.200 to
whitelist entry 192.168.1.*: MATCH
created SSL socket
192.168.1.200:55812
cipher=SSL_DH_anon_WITH_RC4_128_MD5
add Client: 4 (host2/192.168.1.200)
Note that encryption may impact CPU and network performance on connections
that transmit high volumes of data.
Troubleshooting Client Connection Requests
The
following are available for troubleshooting Data Server client connection
requests. To Debug
Requests
Use the client_access_debug option to debug Data Server client
connection requests. This option prints messages to the Data Server console
as each client connection request is compared to the client lists. This can
be useful for determining which list entries match and do not match a client
connection.
To specify on the Data Server
command line:
-client_access_debug
To specify in DATASERVER.ini:
client_access_debug true
To specify in a properties file:
sl.rtview.dataserver.client_access_debug=true
To Debug SSL Authentication and Certificate Issues
For troubleshooting SSL handshaking and certificate issues, set the
following before running the Data Server or the client.
To specify in RTV_JAVAOPTS:
set RTV_JAVAOPTS=-Djavax.net.debug=ssl,keymanager
To specify in an RTView properties file:
sl.rtview.jvm=-Djavax.net.debug=ssl,keymanager
Note that this option may produce a great deal of output.
Running the Data Server
You can run the Data Server
as an application, a daemon process, or in the
background as a Windows Service. NOTE:
The first time you run the Data Server you must run it as an application
to configure the initial settings.
Running the Data Server as a daemon process will
allow you to run without a display.
To do so, run the -daemon
command line parameter from a Windows Command Prompt or UNIX terminal window. Several
command line options are supported
for the Data Server. Java options specified in
RTV_JAVAOPTS
will be used by the
run_dataserver scripts. NOTE: These options will not be used when the
Data Server is started from the Windows Start menu.
Data source specific options are read
in from initialization files created in the Display Builder. For information on
creating initialization files or command line options for your data source,
refer to Application Options or Command Line Options under the Data Sources
section of this documentation.
NOTE: To stop the Data Server, you can use the
kill_dataserver
Command Line Option.
Run the Data Server: Windows or UNIX
|
Windows |
|
UNIX |
| From the Windows Start Menu:
Select
Start-->Programs-->RTView Data Server
NOTE: When you start the Data Server
from the Windows Start menu, it runs from the demos directory. The Data Server
will try to read initialization (.ini) files and resolve XML sources containing
relative paths from that directory. To start the Data Server in another
directory, you must run RTView from a command window. NOTE: It is
possible to
specify a directory for your
initialization files. |
From a Command Prompt
window: Select Start-->Programs-->RTView--> GMS Command Prompt
In
the command window type:
run_dataserver
|
In
an initialized terminal window
type:
run_dataserver
|
Configuration
When
running as an application, the Configuration tab allows you to specify
settings for the Data Server. Click Save Configuration to save these
settings. If you select the Show Data in Console check box, the
Data Server Console will output a line for each piece of data that is served.
When running as a daemon process, this information will be output to the
command window in which the daemon process was started.
To
begin serving data, click Start Serving Data. Click Stop Serving
Data to end this process. If you configure the Data Server to output
to an XML file, when you start serving data information will be added to
the output XML file each time new data is received for each attachment
in all of the specified data configuration files. If you configure the
Data Server to output data via socket, when you start serving data the
Data Server will receive data requests from RTView clients (Display
Builder, Display Viewer Application, Display Viewer Applet) indicating
what data is needed for currently running displays.
Server
Modes
This
information must correspond with information entered in the Application
Options - Data Server dialog. NOTE: By default, the Data Server
starts in File Mode. If you change the Server Mode, then you must save
the configuration and restart the Data Server.
File
Data
redirected from configuration files will be output to an XML file.
NOTE:
The XML data source is never redirected through the Data Server when you
output data to a file. When
you start serving data, information will be added to the output XML file
each time new data is received for each data attachment in all of the specified
data configuration files.
Output
File Name - Name of file output by the Data Server containing data
from specified configuration files. Default output file name is rtvdata.xml.
Data
Configuration Files
Specify
which data configuration (.rtv) file(s) will be used to generate the output
XML file. Data configuration files are display (.rtv) files created in
the Display Builder that contain attachments to data you want to redirect
through the Data Server.
|
Data
Configuration Files |
Add
- Add a data configuration file to the list. If a data configuration file
is added while the Data Server is serving data, it will start serving data
for attachments in that file as soon as new information becomes available. |
| Remove
- Remove the selected data configuration (.rtv) file from the list. If
the Data Server is serving data when a file is removed, it will stop serving
data for that file immediately. |
| Substitutions |
To add or edit
a substitution on a specified
data configuration (.rtv) file, double-click in the corresponding field of the
Substitutions column. |
Socket
Data
requested by RTView clients will be output via socket. When
you start serving data, the Data Server will receive data requests from
RTView clients indicating what data is needed for currently
running displays. NOTE: By default the RTView client will connect
directly to the XML data source, while all other data sources are redirected
through the Data Server. For information
on redirecting the XML data source, see Application
Options - Data Server.
Port
- Specify the port over which the Data Server will communicate with
RTView. You do not need to specify a port if you are using the
default: 3278.
Use
Secure Sockets - If selected, a secure socket layer (SSL) will be used.
RTView clients may connect directly via socket or through the
intermediary Data Servlet using HTTP or HTTPS requests
to receive data. NOTE: Using the servlet requires a separate installation
process, see the Data Servlet
section for details.
Use
Client Credentials for Database Login -
Pass RTView login information into all data sources that have the Use Client
Credentials option enabled. NOTE:
Use
Client Credentials for Database Login only works in Socket mode.
Some data sources do not support
this feature.
For information on Application Options for your data source, refer to the
Data Sources section of this
documentation.
Send Changed Data Only
- If selected, data will be sent only when it has changed. If you want
to continuously plot data that has not changed in the trend graph, deselect
the Send Changed Data Only checkbox to send all the data
regardless of whether or not it has changed. NOTE: Sending all data can
lead to performance issues given the amount of information that will be
sent over the socket.
Preload Data for
Configuration Files
You
may specify configuration files for data that you want the Data Server
to preload so it will be immediately available to any clients that request
it.
Data
Configuration Files
Specify
which data configuration (.rtv) file(s) will be preloaded by the Data Server.
This data will be immediately available to any clients that request it
later, and will be updated during Data Server updates. Data configuration
files are display (.rtv) files created in the Display Builder that contain
attachments to data you want to redirect through the Data Server. Enabled
if the Preload Data for Configuration Files flag is selected.
|
Add
- Add a data configuration file to the list. |
|
Remove
- Remove the selected data configuration (.rtv) file from the list. |
Console Options
|
Show
Data in Console - If selected, the Data Server Console will print out
a line for each piece of data that is being served. |
General Options
| Start/Stop
Serving Data - Start or stop serving data. |
| Save
Configuration - Save settings to an initialization file (DATASERVER.ini), which will be used next time you run the Data Server. NOTE: Unless you
specify a directory for your initialization files,
you must run the Data Server from the same directory in which the initialization
(.ini) file
was saved. |
| About - Click on
to read about RTView. |
| Exit
- Exit the Data Server, stop serving data and close the Data Server window. |
Console
The
Console tab records errors and information. If you select the Show Data
in Console check box on the Configuration tab, the console will
also display a line for each piece of data that is being served. Click
the Clear button to purge all data from the console.
NOTE: By default, timestamps are displayed in the
Console window. Refer to
Setup>RTV_JAVAOPTS
for details on how to disable timestamps.
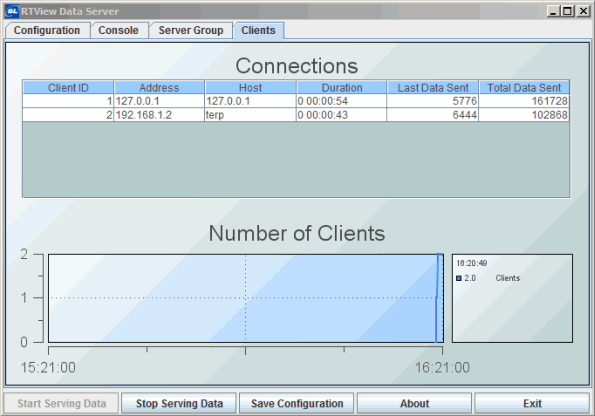
Clients
The
Clients tab appears when you start the Data Server in Socket mode. NOTE:
By default, the Data Server starts in File Mode. If you change the Server
Mode, then you must save the configuration and restart the Data Server.
Connections
This
table displays one row for each client that is connected via socket to
the Data Server. When clients are connected through the Data Servlet, one
connection is shown for the servlet and separate connections are displayed
for each HTTP/HTTPS client. If an HTTP/HTTPS client exits under abnormal
circumstances, it may not be removed from the table for several minutes.
NOTE: Use the
Get Data
Server Connection Status function to access information about the
status of connections from the Display Builder and Display Viewer
Application to the default Data Server and any Named Data Servers.
For each
client connection, the table contains the following columns.
| Client
ID - A unique number assigned by the Data Server to this client connection.
The first client connection is assigned an ID of 1, the second is assigned
an ID of 2, etc. The ID for an HTTP/HTTPS client will contain extra digits,
starting with the ID of the Data Servlet's connection. For example, if
the servlet is assigned a client ID of 1, then the first HTTP/HTTPS client
will be assigned an ID of 10001, the next will be 10002, etc. ID numbers
will not be reused during a Data Server session. |
| Address
- IP address of the client. Clients running on the same host as the Data
Server will display the IP address 127.0.0.1. |
| Host
- Name of the host on which the client is running. Clients running
on the same host as the Data Server will display the host name
localhost.
If a client's host cannot be determined, the IP address will be shown instead. |
| Duration
- Time elapsed in this client's session with the Data Server. |
| Last
Data Sent - Number of characters of XML data contained in this client's
most recent update. |
| Total
Data Sent - Number of characters of XML data contained in all updates
during this client's session with the Data Server. |
Number
of Clients
This
trend graph (above) displays the number of clients (direct socket, servlet, HTTP/HTTPS)
connected to the Data Server over the past hour.
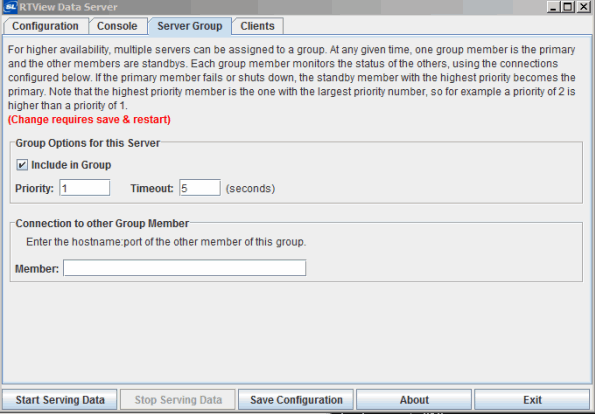
Server
Group
Use the Server Group tab to configure the
Active / Standby
with auto-reset high
availability mode. This mode can also be configured on the command line.
For details, see the -group_member
argument.
NOTE:
For best performance, configure clients to connect to the primary server first
(before attempting to connect to the backup server). For example, if the default
primary Data Server is A:5555 and the default backup server is B:5555,
set each client's connection string to the server pair as "A:5555,B:5555".
Or, if connections are made via the rtvdata servlet, set each client's
connection string to "http://A/rtvdata,http://B/rtvdata".
Group Options for this Server
Configure high availability settings for the Data Server.
Include in Group
Select to include the server in the
server group.
Priority
Enter a value of 1 or more, with
1 being the lowest priority. A larger value assigns a higher
priority. The running server in the pair with the highest priority
becomes the primary server. The priority
defaults to a value of 1 (the lowest priority) if
Include in Group
is selected and the priority
is not specified.
Timeout
Enter the amount of time (in
seconds) that the backup server waits for a connection or response from the
primary server, after which it assumes the primary has failed.The default is 5
seconds. (Note that in most cases, if the primary server terminates
or the host on which it is running is shut down, the backup server
detects this immediately).
NOTE: You can use the
group_initial_wait
option to lengthen the wait time for the backup server to connect to
its pair at startup. This prevents a failure when the primary and
backup server are both started and the backup server attempts to connect to the
primary server before it is connection ready.
Connection to other Group Member
Specify the members of the fault tolerant pair.
Member
Enter the hostname and port number
connection of the other Data Server in this
redundant pair using the following format:
hostname:port
If a hostname is specified without a port
number, port 3278 is assumed. Do not specify a URL for the rtvdata servlet.
NOTE: Selecting Include in Group mitigates the need to specify the -standby:warm
option. The server remains in standby mode until its determined which
server is the primary.
|