Running
as a Windows Service
This section describes how to run the Data Server,
Display Server and Historian in the background as Windows Services (on 32- or
64-bit Windows systems). These
services run using AlwaysUp CLT, which is included in your RTView deliverable.Windows Service is run as a
local system service. Therefore, if you will be using ODBC connections for the
Historian or an SQL data source, you need to set these as system
data sources, rather than user data sources. Additionally, it is not
possible to install an application as a Windows Service if RTView is
running off a networked drive, it must be installed on your local system.
Windows Service supports a single log
file for both stdout and stderr. By default, both stdout
and stderr are written to a log file named appName_out.log. For
example, displayserver_out.log. Use the -serviceout command line
option to override this option.
Logging is appended to the log file
each time RTView restarts. When the log file size exceeds 5MB, the oldest 25% of
the log file is discarded. For better control over your logging, use either the
-logfile or the
-log4j command line options. With both of
those options, the service outputs any information written to the console by
third party libraries to the log file specified by -serviceout.
If UAT is enabled on your system, you must run install_service and
uninstall_service as an Administrator: Right-click on RTView Command
Prompt in the Windows Start menu and select Run as Administrator. Use
this command prompt to execute the install_service and
uninstall_service commands.
Some RTView applications use very long command line strings. If the command line
string is too long, when you try to view the service properties the Window
Services dialog shows the following error: The stub received bad data. If
this occurs, view look the service properties of your in the Windows Registry
under HKEY_LOCAL_MACHINE\SYSTEM\CurrentControlSet\services\Key, where
Key is the name of your service.
Command lines with more than 10,240 characters cannot be installed as a service.
This section includes:
Install
and Start Application as a Windows Service
After an RTView Data
Server, Display Server or Historian is
installed as a Windows Service, you can start, stop and configure it in the
Windows Services dialog.
For information about using Log4j
logging with Windows Service, see Log4j and Windows
Service.
To install and start the application as a
Windows Service:
1.
Open the command line window:
Windows Vista and Windows 7:
Select
Start-->Programs-->Accessories-->Command Prompt-->Right-click Run as
administrator
All other Windows versions:
Select
Start-->Programs-->RTView--> GMS Command Prompt
2. Start the application and Windows Service
using the following syntax:
install_service appName
-service:service_name -dir:startup_directory
Where
appName is
dataserver, displayserver or historian.
service_name is the text of
your choice which appears in the Windows Event Viewer.
For example:
- Data Server:
install_service
dataserver
-service:SLDataserver -dir:c:\myproject
- Display Server:
install_service
displayserver
-service:SLDisplayserver -dir:c:\myproject
- Historian:
install_service
historian
-service:SLHistorian -dir:c:\myproject
The following arguments are supported
for install_service.
|
Argument |
Description |
| appName |
Required. Must be
dataserver, displayserver or historian. |
| -dir |
Required. Specify
the full path to the directory where the application runs. This is the project directory that contains all files necessary (for
example, .rtv files,
configuration files) to run the application.
Example:
-dir:c:\myproject
NOTE: If the
directory name contains spaces, enclose the entire argument in quotes:
"-dir:c:\my dir". |
|
-manualStart |
Optional. Set the
service startup type to manual. The service starts when it
is installed but does not automatically start on system startup. If not
specified, the service startup type is wet to auto. |
|
-service |
Required. Specify
the name to use for this service. This name is displayed in the
Windows Event Viewer.
Example:
-service:MyService
NOTE: If
the service name contains spaces, enclose the entire argument in quotes:
"-service:my service". |
| -serviceout |
Optional. Specify
the full path and file name for the out log file. If not specified, the
out
log is written to the -dir specified and named
appNamed_out.log.
Example:
-serviceout:c:\logs\ds_out.log |
Stop and Uninstall Application as a
Windows Service
This section describes how to stop
and uninstall the
Data Server, Display
Server or Historian as a
Windows Service.
To stop and uninstall the
application as a Windows Service:
1.
Open the command line window:
Windows Vista and Windows 7:
Select
Start-->Programs-->Accessories-->Command Prompt-->Right-click Run as
administrator
All other Windows versions:
Select
Start-->Programs-->RTView--> GMS Command Prompt
2. Stop the application and Windows Service using
the following syntax:
uninstall_service appName
-service:service_name
Where appName
is
dataserver, displayserver or historian, and
service_name is the name used for
this service (displayed in the Windows Services dialog).
For example:
- Data Server: uninstall_service dataserver -service:SLDataserver
- Display Server: uninstall_service
displayserver -service:SLDisplayserver
- Historian: uninstall_service
historian -service:SLHistorian
NOTE: If the
service name contains spaces, enclose the entire argument in quotes: "-service:my
service".
Log4j and Windows Service
This section describes how to
install Log4j and start the
Data Server, Display
Server or Historian as a
Windows Service using Log4j. There are three .properties files
that are used with Log4:
- Data Server:
sl-dataserver-service.log4j.properties
- Display
Server:
sl-displayserver-service.log4j.properties
- Historian:
sl-historian-service.log4j.properties
To install Log4j and start your
application as a Windows
Service using Log4j:
1. Download the file logging-log4j-1.2.16.zip from the Apache site
http://archive.apache.org/dist/logging/log4j/1.2.16/.
2. Extract the Windows .dll assembly from the .zip file.
3. Select the NTEventLogAppender.dll
file and place it in a directory that is on the PATH of the Windows system.
We recommend the following location for 32-bit systems:
C:\Windows\System32.
NOTE: The absence of
the NTEventLogAppender.dll file causes the java.lang.UnsatisfiedLinkError error.
4. Open the command line window:
Windows Vista and Windows 7:
Select
Start-->Programs-->Accessories-->Command Prompt-->Right-click Run as
administrator
All other Windows versions:
Select
Start-->Programs-->RTView--> GMS Command Prompt
5. Start Log4j and Windows Service using the
following syntax:
install_service appName
-service:service_name -dir:startup_directory -log4j -log4jprops:<log4j
configuration file> -serviceout:<log
directory>\<out log file name> -serviceerr:<log
directory>\<err log file name>
Where
appName is
dataserver, displayserver or historian.
service_name is the text of
your choice which appears in the Windows Event Viewer.
For example:
- Data Server: install_service dataserver
-service:SLDataserver -dir:startup_directory -log4j -log4jprops:sl-dataserver-service.log4j.properties
-serviceout:c:\logs\dataserver_out.log -serviceerr:c:\logs\dataserver_err.log
- Display Server: install_service
displayserver
-service:SLDisplayserver -dir:startup_directory -log4j -log4jprops:sl-displayserver
-service.log4j.properties
-serviceout:c:\logs\displayserver _out.log -serviceerr:c:\logs\displayserver _err.log
- Historian: install_service historian
-service:SLHistorian -dir:startup_directory -log4j -log4jprops:sl-historian-service.log4j.properties
-serviceout:c:\logs\historian_out.log -serviceerr:c:\logs\historian_err.log
NOTE: Upon startup, Log4j writes a few lines to
the log files used by the previous "redirect" logging method (the logging method
in RTView v.5.9 and earlier). For this reason the redirect method log file names
are used (specified by
–serviceout and –serviceerr. Log4j then switches to the NT Event Viewer.
6. View your Log4j log files by opening the Windows Computer Management
application:
Start-->Programs-->Administrative
Tools-->Computer
Management
Or, if Administrative
Tools is not available:
Start-->Programs-->Right-click
Computer-->Manage
The Computer Management application opens.
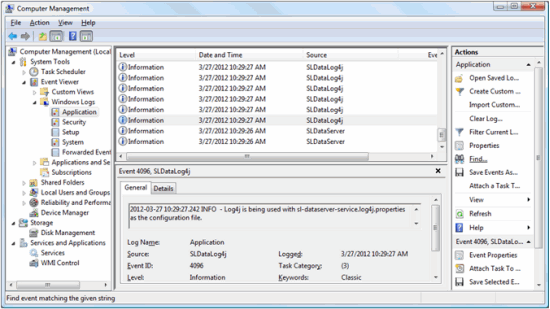
7. Go to System Tools-->Event
Viewer-->Windows
Logs-->Application.
8. Verify that the center upper panel lists each
line in the log file, and the text for the line appears in the General
tab panel. The Source field, in the lower panel, identifies the service
name (specified in the -service
argument).
The following arguments are supported
for install_service and Log4j.
|
Argument |
Description
|
|
-log4j |
Optional.
Used for Log4j logging. Specify to use Log4j logging.
Example:
install_service dataserver
-service:my_data_server -dir:C:\newyork
-log4j |
|
-log4jprops |
Optional.
Used for Log4j logging. Specify the .properties file to use to format the Log4j log file.
Use the following files for the:
- Data Server:
sl-dataserver-service.log4j.properties
- Display
Server:
sl-displayserver-service.log4j.properties
- Historian:
sl-historian-service.log4j.properties
Example:
-log4j
-log4jprops:sl-dataserver-service.log4j.properties |
|
-log4jlevel |
Optional.
Used for Log4j logging. Specify the Log4j Level. INFO is the default. Valid values are:
FATAL: Indicates a severe error that likely causes the
application to abort.
ERROR: Indicates an event that might
not cause the application to abort.
WARN : Indicates a potentially
harmful event.
DEBUG: Indicates detailed informational about events
for debugging the application.
INFO: Indicates informational
messages about the progress of the application at coarse-grained level.
Example:
-log4j
-log4jlevel:DEBUG |
|
-showlogcat |
Optional.
Used for Log4j logging. Specify to turns on the Category column
in the log file output.
Example:
-log4j
-showlogcat
|
|