Application
Options
To access the Application Options
dialog, in the Display Builder select Tools>Options.
Options specified in TIBCO Hawk tabs can be saved in an initialization file (HAWKOPTIONS.ini). On
startup, the initialization file is read by the Display Builder, Display Viewer,
Display Server, Data Server and Historian to set initial values. If no
directory has been specified for your initialization files
and HAWKOPTIONS.ini is not found in the directory where you started the
application, then RTView will search under lib in your
installation directory. NOTE: When you start an RTView application
from the Windows Start menu, it runs from the demos directory.
NOTE: Options specified using
command line arguments will override values
set in initialization files. There are two Application Options tabs
for TIBCO Hawk: TIBCO Hawk Communication and
TIBCO Hawk Methods and Alerts. TIBCO Hawk Communication
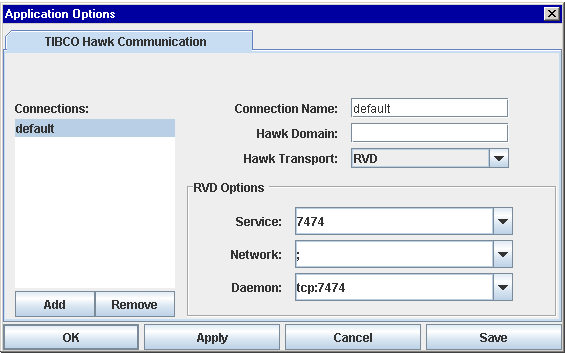
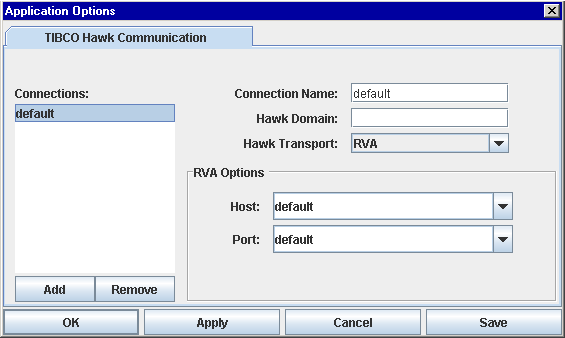
This tab allows you to add
and remove TIBCO Hawk connections and set your default connection. RTView supports multiple connections to TIBCO Hawk.
If you are using only one
connection, select default in the Connection list, edit it and click
Add.
If you are using more than one connection, type in the configurations including
a unique connection name, then click Add. The new connection appears
in the Conection list. To edit a connection, select it in the Connection
list, edit it and click Add. To remove a connection, select it in
the Connection list and click Remove,
Apply, OK,
Save
applies all changes. Cancel effects all the recently made connections.
If RTView is unable to make a connection, an error message will
appear on the console when you click Apply.
A unique name must be specified
for each connection. This name is used to create an Agent
Group by the same name containing all agents on that connection.
A default connection is automatically created that can be modified but
not removed. By default, TIBCO Hawk uses rvd. Different configurations
apply to rva and EMS, as described below.
NOTE: Connections should
have unique parameters or some agents may not be added to the appropriate
group.
See
Communicating with TIBCO Hawk for a detailed explanation of rva and rvd.
TIBCO Hawk Communication Settings
The following settings apply
to rvd, rva and EMS.
| Field |
Description |
| Connection Name |
Unique
name for the connection. |
| Hawk Domain |
TIBCO
Hawk Domain. The default is null. |
| Hawk Transport |
The transport to use when
connecting to TIBCO Hawk. The default is rvd. |
RVD
When using rvd (the default),
the Service,
Network and Daemon settings apply.

RVD Settings
| Field |
Description |
| Service |
TIBCO Rendezvous Session
Service. The default is 7474. |
| Network |
TIBCO Rendezvous Session
Network. The default is ;. |
| Daemon |
TIBCO Rendezvous Session
Daemon. The default is tcp:7474. |
RVA
When using rva, Host
and Port parameters apply. If the Host is set to default,
the local host will be used. If the Port is set to default, the
TIBCO Rendezvous default port will be used.
RVA Settings
| Field |
Description |
| Host |
Host running
rva. The default is the local host. This option is only used if running
in rva mode. |
| Port |
Port on which
rva is running. The default is the rva default. This option is only used
if running in rva mode. |
EMS
When using EMS, Server
URL, User Name, and Password settings apply.
EMS Settings
| Field |
Description |
| Server URL |
The complete URL for your
EMS server. This must match the settings on the Transport tab of the TIBCO
Hawk Configuration Utility. If nothing is specified, use the default: tcp://localhost:7222. |
| User Name |
The user name for your EMS
server. This must match the settings on the Transport tab of the TIBCO
Hawk Configuration Utility. |
| Password |
The password. This must
match the settings on the Transport tab of the TIBCO Hawk Configuration
Utility.
If you need to
provide an encrypted password (rather than expose server password names in a
clear text file,
use the
encode_string command line option with the following syntax:
encode_string type mypassword
where
type is the key for the data source
and
mypassword is your plain text password. NOTE: The type
argument is only required when you encrypt a string for a data source.
For example, enter
the following in
an
initialized command window:
encode_string hawk mypassword
and you will
receive an encrypted password:
encrypted value:
013430135501346013310134901353013450134801334
Copy the encrypted value, paste it into the
password field and click
Save to save this value to the initialization (*.ini) file. Or, if
necessary, manually edit the (*.ini) file
to include the encrypted value.
NOTE: If you need to manually edit a configuration (*.ini) file, contact
SL Technical Support at support@sl.com for
information about supported syntax. |
NOTE: Additional setup is
required if you are using SSL with
EMS Transport.
TIBCO
Hawk Methods and Alerts
The TIBCO Hawk Methods and Alerts
tab allows you to select the Store Method List Mode,
save a Method Repository file and set the Rate
to Remove Cleared Alerts or Display Existing
Alerts.
NOTE: Options selected on
the TIBCO Hawk Methods and Alerts tab are not applied to the current
session of RTView. Click the Save button to record all
TIBCO Hawk application options to the initialization file HAWKOPTIONS.ini
and restart RTView to apply these changes.
Store Method
List Mode
The Store Method List Mode option
allows you to control how method information is stored in RTView.
When you change the Store Method List Mode, click
the Save button to record this change in the initialization file.
Because settings on this tab cannot be applied to the current session of
RTView, you must restart in order to enable the selected method
list mode and then save a corresponding method repository file.
Store Common Method Lists -
Stores a single method list for multiple microagents running on the same
platform and version of Hawk. This option is memory efficient and the best
choice for most users.
Store All Method Lists - Stores
a method list for each microagent running. This options uses more memory,
but enables data attachments to multiple microagents (on a single platform)
that contain different method definitions for the same method name.
NOTE:
RTView will output an error message in your command window to alert you
that the current method repository file does not correspond to the selected
method list mode. If you continue to use RTView with a method
repository file that is incorrectly formatted, no method descriptions from
that file will be used.
Method Repository
Click Save Method Repository
to create a file that records the current listing of agents and microagents
that are online at the time the file is saved. The information stored in
this file is then used to populate the initial values of drop down menus
in the Attach to Data and
Define
Command dialogs. This makes it possible to build displays when
agents and microagents are offline. Depending on your Hawk Agent settings,
it may take up to a few minutes for a complete listing of agents and microagents
to come online. The saved file will be named hawkmethodrepository.xml.
NOTE: If the name of the method repository file is changed,
RTView
will not be able to locate the file. As a result, drop down menus will
remain empty until agents and microagents begin to come online.
The format of the method repository
file must correspond to the Store Method List Mode.
The Display Builder must be started with the selected method list mode
enabled in order for you to save a method repository file that is formatted
correctly. When you save a new Store Method List Mode, you must restart
RTView (in order for the change to take effect) and then save
a method repository file.
NOTE: RTView will output
an error message in your command window to alert you that the current method
repository file does not correspond to the selected method list mode. If
you continue to use RTView with a method repository file that
is incorrectly formatted, no method descriptions from that file will be
used.
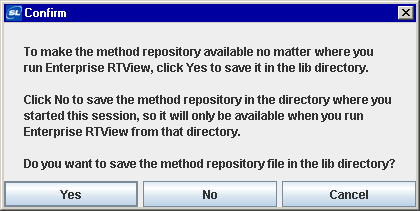
When you click Save Method Repository,
a confirmation dialog will appear to verify the directory in which you
would like to save the method repository file.
If you
specified a directory for your initialization files, all repository
files will be saved to, and read from, that directory.
If you select the lib directory, the
repository file
will be available from any directory where you run RTView. If you do
not select the lib directory, the
repository file will be saved in the
directory where you started the current session and will only be available when
you run RTView from that particular directory.
See the
TIBCO Hawk
Method Repository section for information on how to edit an existing
Method Repository file.
Rate to Remove Cleared Alerts
Enter the time (in milliseconds)
to control how often cleared alerts should be removed from RTView.
For example, if you set the rate to 300000 then cleared alerts will be
removed every 5 minutes. This setting is useful to optimize performance
if you are running displays over a long period of time on a system that
generates a large number of alerts. If you do not enter a rate, cleared
alerts will never be removed.
Display Existing Alerts
By default, only alerts
that occur after you have started RTView are visible in your
displays. If you select this checkbox, RTView will begin to
request alerts as soon as a display is opened that contains data attachments
to the RTViewDs getAlertData
method. Existing alerts will be requested, one agent at a time, for each
agent referenced in these data attachments. NOTE: TIBCO does not immediately
return alerts, so the first time a display is opened there may be a delay
before existing alerts are displayed.
Every 10 seconds (10000 milliseconds)
alerts are requested for one agent until existing alerts are displayed
for all agents referenced in data attachments to the RTViewDs
getAlertData method. TIBCO documentation warns applications not
to request all existing alerts at the same time as this may cause an unacceptably
large number of simultaneous network messages.
Rate to Request Existing
Alerts
Enter the time (in milliseconds)
to control how often RTView will request alerts. The default
rate is 10000 milliseconds (10 seconds). In determining the request rate,
you should consider the average number of alerts outstanding on the entire
network when a display is opened that contains data attachments with the
RTViewDs
getAlertData method.
Enable Hawk Notifications
Select this checkbox activate the
display of TIBCO Hawk notification events. The AlertString for these
notifications will be NO_ALERT. By default, TIBCO Hawk notifications are
disabled. Disable Data
Caching
Select this checkbox to disable the
caching of data in the TIBCO Hawk data source. When selected the initial update on data attachments to multiple agents returns a table with a row for
each agent, but subsequent updates will include only the rows that have changed. This
option is useful when attaching TIBCO Hawk data as input to the Cache data
source or the Historian.
Include Index Columns
If selected, the following three
additional columns will be available in the Return Field menu of the Attach
to TIBCO Hawk Data dialog. Note that if you select the RTViewDs microagent,
then these additional columns will not
be available.
AgentName
MicroAgentName
MicroAgentInstance
NOTE: In the
Attach to TIBCO Hawk Data dialog if *
is entered for the Return Field value, then
values from all available return fields will be used to update the object.
Invoke
Methods Before Subscribe
If selected,
RTView invokes synchronous microagent methods before subscribing to them for
data
attachments. This makes the data for these data attachments available
immediately after the data attachment is made instead of waiting for the first
update from the subscription. By default, this option is selected.
You can disable this option from the TIBCO Hawk Methods and Alerts tab in the
Application Options dialog, using a command line argument or using an applet
parameter. The command line argument and applet parameter are:
Command Line: -hawknoinvoke
Applet Parameter: param = hawknoinvoke value = true
Data attachments to asynchronous methods are not affected by this option.
See the TIBCO Hawk documentation for your microagent method to determine whether
or not it is synchronous.
TIBCO
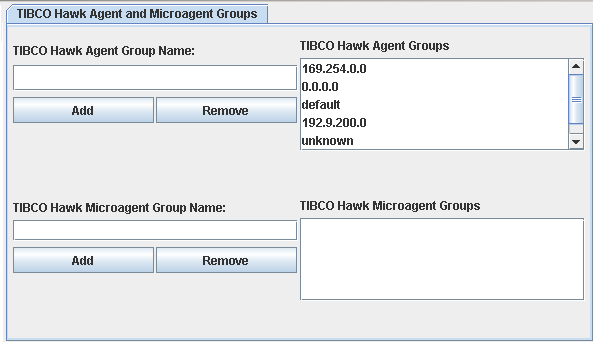
Hawk Agent and Microagent Groups
The TIBCO Hawk Agent and
Microagent Groups tab allows you to define Agent and Microagent Groups and add them to the drop down menu
in the Attach to Data and Define Command dialogs. As soon as this information is saved to HAWKOPTIONS.ini
it
will be used to populate dialog menus each time
you run RTView.
NOTE:
Agent
Groups are automatically created for each TIBCO Hawk cluster and each Hawk
Connection defined on the TIBCO Hawk Communication tab.
It is not possible
to modify or delete Agent Groups that are automatically created for TIBCO Hawk clusters.
TIBCO
Hawk Agent Groups
| TIBCO Hawk Agent Group Name
|
Enter
a name for the Agent Group |
| Add
|
Click Add to insert the Agent Group into the listing.
NOTE: You must click Save in order for Agent Groups you've added
to be listed the next time you run RTView. |
| Remove
|
Select an
Agent
Group from the list and click
the Remove button to delete. NOTE:
It is not possible to permanently remove Agent Groups that are automatically
created for TIBCO Hawk clusters.
|
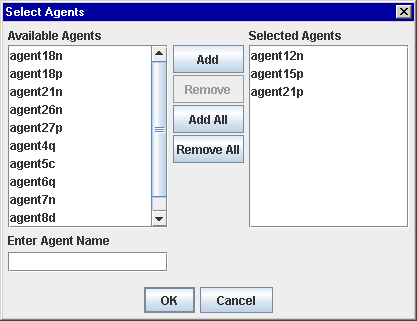
Define TIBCO Hawk Agent Groups
To select which agents to add to a
group, double-click on the name of a group from the TIBCO Hawk Agent Groups
listing. The Select Agents dialog should contain a list of Available Agents
that you can add. NOTE: It is not possible
to modify or permanently remove Agent Groups that are automatically created for TIBCO Hawk clusters.
|
Add |
Select from
the Available Agents list and click on Add or click Add All. |
| Enter Agent Name |
If the agent
you require is not listed, type your selection into the Enter Agent Name
field. NOTE: For agents that are not on the
default connection, specify the connection in parentheses after the agent
name. For example, to specify Agent1 on Connection1, use Agent1(Connection1).
|
| Remove |
Select from the Selected Agents list
and click on Remove or click Remove All. |
NOTE: It
is not possible to add or remove agents while the selected group
is currently updating an object.
Validation
colors indicate whether selected agents are valid.
TIBCO Hawk Microagent Group
Microagent groups are useful when you want to attach
to multiple microagents that have different names, but the same methods. This is
often the case with TIBCO adapter microagents running on different domains.
| TIBCO Hawk Microagent Group
Name |
Enter
a name for the Microagent Group |
| Add
|
Click Add to insert the Microagent Group into the listing.
NOTE: You must click Save in order for Microagent Groups you've added
to be listed the next time you run RTView. |
| Remove
|
Select an
Microagent
Group from the list and click
the Remove button to delete. |
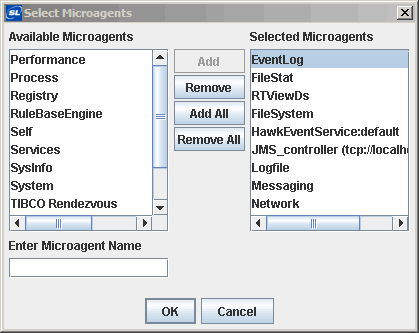
Define TIBCO Hawk Microagent Groups
To select which Microagents to add to a
group, double-click on the name of a group from the TIBCO Hawk Microagent Groups
listing. The Select Microagents dialog should contain a list of Available Microagents
that you can add. NOTE: In order for a Microagent Group to be useful, the
microagents in the group must have common methods.
|
Add |
Select from
the Available Microagents list and click on Add or click Add
All. |
| Enter
Microagent Name |
If the
microagent
you require is not listed, type your selection into the Enter Microagent Name
field. NOTE:
Microagent names can include *. |
| Remove |
Select from the Selected Microagents
list and click on Remove or click Remove All. |
NOTE: It
is not possible to add or remove microagents while the selected group
is currently updating an object. Validation
colors indicate whether selected microagents are valid.
|