Indicator
Objects
The Object Palette features
four types of indicators:
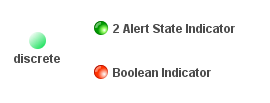
Discrete
Supports
3 discrete comparisons.
 |
|
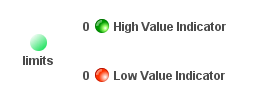
Limits
Supports
2 high and 2 low thresholds.
|
|
|
|
|
Multi
Supports an unlimited number of comparison
values. For each comparison, you can specify whether the value property must
be equal, not equal, greater than or less than the comparison value.
 |
|
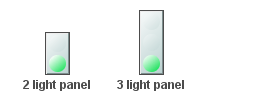
Panel
Panel of
2 or 3 indicator lights. Each indicator light supports a discrete
comparison.
 |
|
|
|
|
Image
Property
Labels objects that feature the image
property can be customized to display your image (.gif, .jpg or
.png) file. Click in the image Property Value field and type the
name of the image. Or, select
the  button to open the
Select Image dialog containing up to three
directories:
button to open the
Select Image dialog containing up to three
directories:
- Current Directory - Contains images in the current directory and one
level of subdirectories.
- Custom Image Library - If you have specified a custom image library, this
directory contains those images. See Creating a
Custom Image Library for details.
- Symbol Library - Contains symbolic images (for example, symbols for
various types of hardware, shapes, lights, arrows, etc.).
Navigate to the image you want to use and select it. A preview of the image
appears in the pane to the right. Click OK or Apply to set the
image on your object. If an image
is not listed, enter the name of the file, including the relative path.
To scale your image to the size of the object, check the imageScaleFlag.
The visFlag property controls the visibility of the object. The
transparencyPercent
property controls the transparency of the object.
NOTE: The sample display file general_objects.rtv
(located in demos/tutorials) features information on working
with objects from the General tab.
Creating a Custom
Image Library
The custom image
library enables you to make your own images available in the Select Image
dialog. To add your own image library, perform the following steps.
1. Place your images .jar file and add
it to the RTV_USERPATH environment
variable. The images must be in a directory (not in the top level
of the jar). They can be organized into subdirectories of one top level
directory.
2. In the Display Builder, select Tools/Builder Options and, in the
Custom Image Library Path field, set the path to the directory containing
your images .jar file.
For example, if you have a jar with this directory
structure:
com/mycompany/Images
com/mycompany/Images/Blue Images
com/mycompany/Images/Red Images
com/mycompany/Images/Green Images
you would enter com/mycompany/Images. This adds a directory named
Images to the tree in the Select Image dialog. The Images directory
will have three subdirectories: Blue Images, Red Images and Green
Images. Only directories containing images are added to the Select Image
dialog.
To access the images, you can edit any property
that allows you to set an image on an object (for example, the image,
barImage and filterProperties properties), or edit the
File>Background Properties>Image Name
field.
|