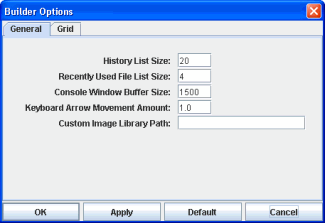
| Specify the location of your image files
to create a custom image library. The custom
image library enables you to make your own images available in the Select Image
dialog.
Before entering the path in the
Custom Image Library Path
field, you must place your images in a .jar
file and add it to the RTV_USERPATH
environment variable. NOTE: The images must be in a directory and not at the top level
of the .jar file. They can be organized into subdirectories of one top level
directory.
After you have
prepared the .jar file as described
above, specify the location of
the directory containing your images in the Custom Image Library Path field.
For example, suppose you have a .jar
file with the
following directory
structure:
com/mycompany/Images
com/mycompany/Images/Blue Images
com/mycompany/Images/Red Images
com/mycompany/Images/Green Images
In the
Custom Image Library Path field you would enter com/mycompany/Images
to add a directory named Images to the tree in the Select Image dialog. The
Images directory
will have three subdirectories: Blue Images, Red Images and Green
Images. NOTE: Only directories containing images will be added to the Select Image
dialog.
To access your custom image library, edit any
property that allows you to set an image on an object (e.g. image, barImage and
filterProperties properties) or select File>Background Properties
and edit the
Image Name
field.
|