Application
Options
To access the Application Options
dialog, in the Display Builder select Tools>Options.
Options specified in the SQL tab can be saved in an initialization file (OPTIONS.ini). On
startup, the initialization file is read by the Display Builder, Display Viewer,
Display Server, Data Server and Historian to set initial values. If no
directory has been specified for your initialization files
and OPTIONS.ini is not found in the directory where you started the
application, then RTView will search under lib in your
installation directory. NOTE: When you start an RTView application
from the Windows Start menu, it runs from the demos directory.
NOTE: Options specified using
command line arguments will override values
set in initialization files. SQL
This tab allows you to add
or remove your databases and set the default database. In order for RTView to communicate with your databases, you must
set up either a direct JDBC connection or an ODBC-JDBC bridge connection. When you add a database to
the list it will be highlighted in yellow indicating that it is not connected.
To attempt to connect to a database, click OK, Apply or Save.
If the background remains yellow, then RTView was unable make a connection to your database. NOTE: Databases that
have been setup to Use Client Credentials will
not connect unless you are logged in and you have objects in your display
that are using that connection.
Check
your database connection and see
SQL Database Connection Setup for information on how to set up your driver
correctly.
If the connection is successful,
and the Get Tables and Columns from Database checkbox is selected,
RTView will use information from this database to populate drop
down menus in the Attach to Data dialog
with available tables and columns. If a database
repository is found, information from your database will be merged with
data from the repository file. If you deselect the Get Tables
and Columns from Database checkbox RTView will no longer
query your database for this information, but the database repository will
still be used to populate drop down menus. Using a database repository
to populate drop down menus makes
it possible to specify which tables and columns from your database will
be listed in the Attach to Data dialog and gives you the ability to build
displays while databases are offline.
If you are using a direct
JDBC connection or a password protected ODBC-JDBC bridge connection, you
must click Save in order to record your options in OPTIONS.ini.
This will allow RTView to reconnect with your database the next
time you run the Display Builder or the Display Viewer.
NOTE: Regardless of which
tab you are currently working from in the Application Options dialog, each
time you click OK, Apply, or Save RTView
will attempt to connect to all unconnected databases, except those that
have Use Client Credentials checked.
|
 |
| Default
Database |
Name of database used as the default
for data attachments. Select from drop down menu to change default setting. |
|
Add
Database |
Click to open the Add Database
dialog. To edit, select a database
from the list and double-click. Databases that
are updating objects in a current display cannot be renamed. 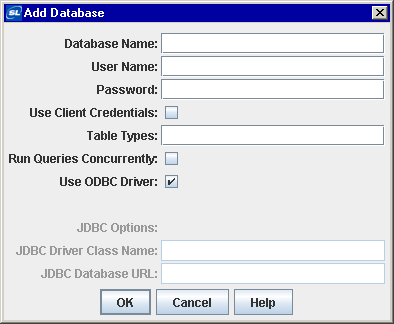 |
|
Database Name |
Name to use when referencing this database connection in your data attachments.
If this connection will use an ODBC driver, this name must be the data
source name used in the ODBC setup. |
|
User Name |
User
name to pass into this database when making a connection. This parameter
is optional. |
|
Password
|
The password
to pass into this database when making a connection. This parameter is
optional.
If you
need to provide an encrypted password (rather than expose server password
names in a clear text file,
use the
encode_string command line option with the following syntax:
encode_string type mypassword
where
type is the key for the data
source and
mypassword
is your plain text password. NOTE: The type
argument is only required when you encrypt a string for a data source.
For example,
enter the following in
an
initialized command window:
encode_string sql mypassword
and you will
receive an encrypted password:
encrypted value:
013430135501346013310134901353013450134801334
Copy the encrypted value, paste it into the
password field and
click Save to save this value to the initialization (*.ini) file. Or,
if necessary, manually edit the (*.ini) file
to include the encrypted value.
NOTE: If you need to manually edit a configuration (*.ini) file, contact
SL Technical Support at support@sl.com for
information about supported syntax.
|
|
Use Client Credentials |
Use
Client Credentials - If selected, the User Name and Password from the
RTView login will be used instead of the User Name and Password
entered in the Add Database dialog. Connections to this database will only
be made when you are running with login
enabled and a display is opened that accesses this database.
As a result, this connection
will not be made when you click OK or Apply in the Application
Options dialog and will remain yellow. If you will be using the Data
Server or the Display
Server with a database connection that has this option enabled,
you must enable Use Client Credentials for Database Login in these
applications.
|
|
Table Types |
Specify
the types of tables to retrieve when querying the database for available
tables. Refer to your database manual for a list of valid table types.
This parameter is optional. Table types are entered as a comma delimited
list, e.g., TABLE, VIEW. |
|
Run Queries Concurrently |
If selected, each query on the connection is run on its own execution
thread. The default is disabled. NOTE: This option should be used with
caution since it may cause SQL errors when used with some database configurations
and may degrade performance due to additional database server overhead.
See your database documentation to see whether it supports concurrent queries
on multiple threads. |
|
Use ODBC Driver |
If
selected, use an ODBC-JDBC bridge to connect to this database. An ODBC
data source must be setup for this database to connect using an ODBC driver.
Otherwise, deselect to activate JDBC Options. |
|
JDBC Options |
|
JDBC Driver Class Name |
Fully qualified name of the JDBC driver class to use when connecting
to this database. The path to this driver must be included in the RTV_USERPATH
environment variable. |
|
JDBC Database URL |
Full database URL to use when
connecting to this database using the specified JDBC driver. Consult your
JDBC driver documentation if you do not know the database URL syntax for
your driver. |
NOTE: If a value of __none
(two underscores before the n) is entered for the JDBC Driver
Class Name or JDBC Database URL, then the SQL data source will
not attempt to connect to the database and ignore any SQL data attachments
that specify that database. The RTViewDs.Connections table will
contain a row for the database, but the Connected and Enabled
columns will always show a value of false. If the -sqltrace command
line option is used, then you'll see the following message appear once in
the console:
<dbname>: ignoring connection with
driver/url=__none
|
|
Remove Database |
Select a database from the list and click Remove
Database to delete. Databases that are updating objects in a current
display cannot be removed.
|
|
Suppress Permission Errors
From Database |
If selected, SQL errors with the word "permission"
in them will not be printed to the console. This is helpful if you have
selected the Use Client Credentials option for
a database. In this case, your login does not allow access for some data
in their display, you will not see any errors. |
|
Get Tables and Columns from Database |
If selected, information from your database will automatically
populate drop down menus in the Attach to Data dialog and you will be able
to select from available tables and columns in your
database. NOTE: If a database repository is found, information from your
database will be merged with data from the repository file. |
|
Save Database Repository |
Click to save a file that records available
tables and columns in your database and applies values to drop down
menus in the Attach to Data dialog. |
Database Repository
Click Save Database Repository
to save a file that contains available
information for tables and columns in your database.
Before saving a database repository, you must add the database(s) from
which the file will retain information. NOTE: If RTView does
not make a connection with your database, then information from that database
cannot be saved to the database repository file.
Information stored in the database
repository file will be used to populate the initial values of drop down
menus in the Attach to Data dialog. NOTE: The saved file will be named
sqlrepository.xml.
If the name of the database repository file is changed,
RTView
will not be able to locate the file. As a result, drop down menus will
populate based on databases added from the Application Options dialog or
those typed directly into the Attach to Data dialog.
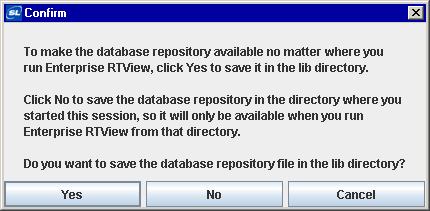
When you click Save Database Repository,
a confirmation dialog will appear to verify in which directory you would
like to save the database repository file. If
you specified a directory for your
initialization files, all repository files will be saved to, and read
from, that directory. If you select the
lib directory, the repository
file will be available from any directory where you
run RTView. If you do not select the lib directory, the
repository file
will be saved in the directory where you started the current session and will
only be available when you run RTView from that particular directory.
See
SQL
Database Connection Setup for details on editing an
existing database repository file.
Excluding Tables From The
Attach To SQL Data Dialog
To exclude tables from the
Attach to SQL Data dialog, see
SQL
Database Connection Setup for details.
|