User Guide
| Enterprise
RTView®
User Guide |
|
Archiving and Viewing Historical Data Requirements
Objectives
Getting
Started
If you have not already Setup the Historian Database, you must do so before continuing. On Windows 1.
Start the XML data
simulator:
2. Start the Display Builder:
3. Login to the Display Builder. By default, the Display
Builder
does not require a login. Login can be
enabled at setup to support role
based security. The default user name and password are:
NOTE: It is possible that your system administrator may have configured another user name and password. In this case, you may also need to select a role.
On UNIX 1. Open a UNIX terminal window. 2. In the terminal window, go to your Enterprise RTView installation directory. 3.
Initialize the terminal window.
NOTE: You must initialize each new terminal window you open. See the Setup section for more details about setting up your environment. 4. In the initialized terminal window, go from your installation directory to the demos directory. 5. Start
the XML data
simulator:
The XML data simulator will run as a background process in a separate terminal window. 6. Start
the Display Builder in your original, initialized terminal window:
7.
Login to the Display Builder. By default, the Display
Builder
does not require a login. Login can be
enabled at setup to support role
based security. The default user name and password are:
NOTE: It is possible that your system administrator may have configured another user name and password. In this case, you may also need to select a role.
Application Options 1. In the Display Builder, select Tools>Options to open the Application Options dialog. 2. Select the XML tab and click on Add. 3.
In the Add XML Source dialog:
4. Click OK to add the XML source. 5. Click on the SQL tab and select Add Database. 6.
In the Add Database dialog:
7. Click OK to add this database. 8. Click Save to save these options and select No in the confirmation dialog.
Create
a Configuration File to Store Historical Data
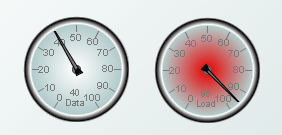
1. Select Edit>Add. 2. In the Object Palette window, select the Meters tab and add the first meter in the palette (class name: obj_meter20) to the display. 3. In the
Object Properties dialog:
4.
In the Attach to XML Data
dialog:
5. Click OK to apply these values and close the Attach to XML Data dialog. 6. Select
the Element 1 Data meter and click the Copy button 7. Click
the Paste 8. Click to place the new meter. 9. In the
Object Properties dialog:
10.
In the Attach to XML Data
dialog:
11. Click OK to apply these values and close the Attach to XML Data dialog.
Store Historical Data 1. Start the Historian: On Windows
On UNIX
2. Click Add on the Configuration tab. 3. Select tutorial_history_config.rtv 4. Click Open to insert into the Data Configuration Files list. 5. Select the Show Data in Console checkbox. This prompts the Historian to print a line to the console for each record it stores to the history database. NOTE: If you are using a password protected ODBC-JDBC bridge connection to communicate with the history database, you will need to enter your Database User Name and Database Password. If you are using a direct JDBC connection, deselect the Use ODBC Driver checkbox and enter a JDBC Driver Class Name and JDBC Database URL. See Database Options in Running the Historian for more details. You must enter the same configuration settings you entered in the Add Database dialog. 6. Click Save Configuration to save these settings. 7. Select the Console tab. 8. Click Start Storing Data. Data will immediately start printing to the console window. NOTE: Let the Historian run as you go through the next section.
View
Historical Data
1.
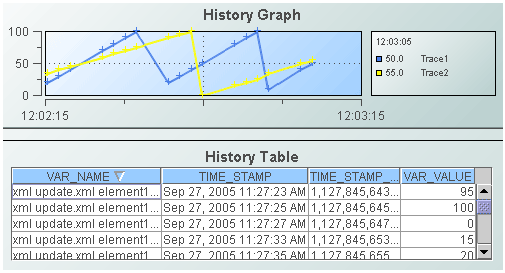
In the Display Builder click on the New 2. In the Object Palette window, select the Graphs tab and add the second graph in the palette (class name: obj_trendgraph02) to the display. 3. In the
Object Properties dialog:
4.
In the Attach to XML Data
dialog:
5. Click OK to apply these values and close the Attach to XML Data dialog. 6. In the
Object Properties dialog:
7.
In the Attach to XML Data
dialog:
8. Click OK to apply these values and close the Attach to XML Data dialog. Data attachments in the History Graph now match the data attachments on the meters in the configuration display file you saved as tutorial_history_config. rtv. 9. Select File>Save and name this file tutorial_history_display.rtv. When you open this display, the graph will load initial data from the history database and will continue to update as live XML data comes in. 10. Select File>Open to reopen the display (.rtv) file you saved as tutorial_history_display.rtv. 11. In the Object Palette window, select the Tables tab and add the first table in the palette (class name: obj_table02) to the display. 12. In
the Object Properties dialog:
13.
In the Attach to SQL Data
dialog:
14. Click OK to apply these values and close the Attach to SQL Data dialog. The table will now display the entire HISTORY table from the history database.
Setup
Database to Store Historical Tabular Data
1. Exit the Historian and Display Builder. 2. Add a table named production_archive to the history database. 3.
Add the following columns to that table:
Create a Configuration File
to Store Historical Tabular Data
Restart the Display Builder On
Windows
2. Login to the Display Builder. By default, the Display
Builder
does not require a login. Login can be
enabled at setup to support role
based security. The default user name and password are:
NOTE: It is possible that your system administrator
may have configured another user name and password. In
this case, you may also need to
select a role.
On
UNIX
2. Login to the Display Builder. By default, the Display
Builder
does not require a login. Login can be
enabled at setup to support role
based security. The default user name and password are:
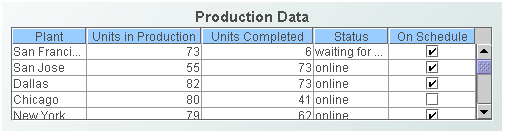
NOTE: It is possible that your system administrator may have configured another user name and password. In this case, you may also need to select a role. 3. Select Edit>Add to open the Object Palette. 4. Select the Tables tab and add the first table in the palette (class name: obj_table02) to the display. 5. In the
Object Properties dialog:
6.
In the Attach to XML Data
dialog:
7.
Click OK to apply these values and close the Attach to XML Data
dialog.
8.
In the Object Properties window:
9. Select File>Save and name this file tutorial_history_table_config.rtv.
Store Historical Tabular Data Restart the Historian: 1. On Windows
1. On UNIX
2. Click Add on the Configuration tab. 3. Select tutorial_history_table_config.rtv 4. Click Open to insert into the Data Configuration Files list. The Show Data in Console flag should already be checked. This prompts the Historian to print a line to the console for each record it stores to the database. 5. Click Save Configuration to save these settings. 6. Click on the Console tab. 7. Click Start Storing Data. Data will immediately start printing to the console window. Note: Let the Historian run as you go through the next section.
View Historical Tabular Data 1.
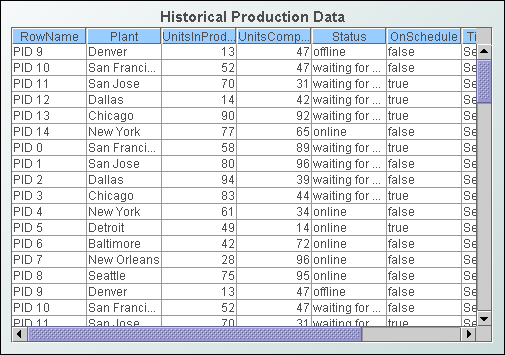
In the Display Builder, click on the New 2. In the Object Palette window, select the Tables tab and add the first table in the palette (class name: obj_table02) to the display. 3. In the
Object Properties dialog:
4. In
the Attach to SQL Data dialog:
Click OK to attach data and close the Attach to SQL Data dialog.
6.
Exit the Historian, Display Builder, and XML data simulator.
|
|
|
|
|
|
|
|
|
|
|
|
|
|
|