Attach
to SQL Data
NOTE: The SQL data
source may not be licensed in your Enterprise RTView installation.
From the Object Properties
window you can access the Attach to SQL Data dialog, which is used to connect
an object to your database using an SQL query. Once an object has been
attached to your database it receives continuous updates.
When an object property is
attached to data, the Property Name and Value in the Object Properties
window will be displayed in green. This indicates that editing this value
from the Object Properties window is no longer possible. To remove the
data attachment and resume editing capabilities in the Object Properties
window, right-click on the Property Name and select Detach from Data.
You will recognize that an object property has been detached from the database
when the Property Name and Value are no longer green.
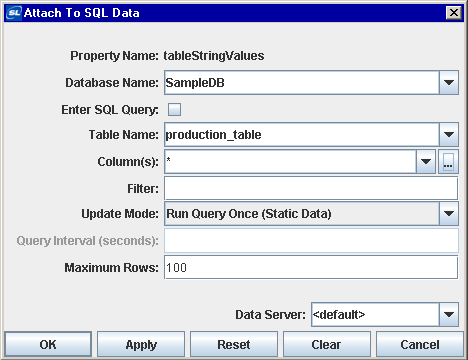
To bring up the Attach to
SQL Data dialog, right-click on the Property Name from the Object Properties
window and select Attach to Data>SQL. The Attach to SQL Data dialog
provides drop down menus and an optional filter field that allow you to
specify information that will be used to create an SQL query for the selected
database. Alternatively, select the Enter SQL Query checkbox in
order to enter an advanced query.
Use the -sqlquote command
line or applet parameter
options to enclose all table and column names specified in the Attach to
SQL Data dialog in quotes when an SQL query is run. This is useful when
attaching to databases that support quoted case-sensitive table and column
names. NOTE: If a case-sensitive table or column name is used in the Filter
field, or you are entering an advanced query in the SQL Query field, they
must be entered in quotes even if the -sqlquote option is specified.
| Database
Name |
Name
of database to query or RTViewDs.
You may specify a database connection on the SQL
Connections tab of the Application Options dialog. |
| Enter SQL Query |
Select the checkbox in order
to enter an advanced query. If selected, the SQL Query text field,
where you can enter your query, will replace the Table Name, Column(s)
and Filter fields. NOTE: This option is for advanced users, SQL
syntax will not be validated or checked for errors. |
| Table
Name |
Name
of table in database to query. |
| Column(s) |
Columns in table to display. |
| Filter |
Optional SQL filter to apply
to query. |
| Update
Mode |
Select one of the following:
Run Query Once - Select
this checkbox if the data returned by this query is static. If selected,
Enterprise RTView will run this query only once. This is the default setting.
Run Query Every Update
Period - Select to run this query each update period. See Application
Options for information on
setting the update period.
Run Query Every Query
Interval - Select to run this query once every Query Interval.
Run Query On Demand -
Select
to run this query each time a display that uses the query is opened and
each time a substitution string that appears in the query string has changed. |
| Query Interval
(seconds) |
Enter the time in seconds
to control how often Enterprise RTView will run this query. NOTE: The query
interval is evaluated during each update pass, so the amount of time elapsed
between queries may be longer than the value entered. For example, if the
update period is 2 seconds and the query interval is 5 seconds, the query
will get run every six seconds. This option is only available if the Update
Mode is Run Query Every Query Interval. |
| Maximum Rows |
Enter the maximum
number of rows to return from this query. NOTE: On some objects an additional
property may further reduce the number of data points displayed. For example,
the maxNumberOfRows property on the table or the maxPointsPerTrace
property on the trend graph. |
| Data Server |
Select to read data through your configured Data
Server and not directly from the SQL data source.
Default - Select the default Data
Server you configured in Application
Options>Data Server.
None - Bypass data being redirected
through the specified data server(s) for this attachment and instead attach
directly to the data source.
Named Data Servers - Select a
Named Data Server
that you configured in Application Options>Data Server.
|
The Database Name drop down menu lists
all available databases. The Database Name field automatically displays
the name of the default database. If the item you require is not listed,
type your selection into the field. A Database Repository file can be used
to populate the initial values of drop down menus for Table Name and Column(s).
See Application Options for
information on how to create a Database Repository file. You can also create
a file to exclude tables from the Table Name drop down menu. See
SQL Database
Connection Setup for details. Otherwise, drop down menus populate based on databases
added from the Application Options dialog or those typed directly into
the Database Name field. The Filter field is optional and uses standard
SQL syntax.
NOTE: By default Enterprise RTView
will attempt to communicate with your database using a JDBC-ODBC bridge
connection that is not password protected. If you are using a direct JDBC
connection or a password protected ODBC-JDBC bridge connection, you will
need to add your database in Application
Options - SQL.
Validation Colors
Fields in the dialog change colors
according to the information entered. These colors indicate whether or
not information is valid. Information entered into the dialog is validated
against the selected database or the Database Repository file. See Application
Options for information on how to create a Database Repository
file. NOTE: Filters and advanced SQL queries are not validated.
The following describes the significance
of the Attach to SQL Data validation colors:
| |
Blue |
Unknown |
Entry does
not match any known database (or you have not attempted a connection*). |
| |
Yellow |
Offline |
Not connected to database. |
| |
White |
Valid state |
Entry is valid. |
| |
Red |
Invalid state |
Database is
valid, but Table or Column(s) selected are not. |
*If a database is validated
as Unknown, when you click OK or Apply Enterprise
RTView will attempt to communicate with it using an ODBC-JDBC bridge connection
that is not password protected. If the validation response remains Unknown,
see Application
Options - SQL for information
on how to add a database. NOTE: If you are using
a direct JDBC connection or a password protected ODBC-JDBC bridge connection,
you will need to add your database in Application Options.
Substitutions
Substitutions allow you
to build open-ended displays in which data attachments depend on values
defined at the time the display is run. Generic
names, such as $table1 and $table2, are used instead of specific values.
Later when the display is running, these generic values are defined by
the actual names, such as production_table
and system_table. In
this way, a single display can be reused to show data from a number of
different databases. For more information on creating displays using substitution
values, see Substitutions.
RTViewDs
The RTViewDs database contains two tables that
contain metrics about SQL database connections and queries. In the Attach to SQL
Data dialog, select RTViewDs from the Database Name drop down menu
Then, select either Connections or Keys from the Table Name drop
down menu. NOTE: RTViewDs tables do not support SQL queries, row filters, custom
query intervals or maximum row settings. The selected Update Mode affects
the Keys table as follows: Run Query
Once - Static SQL data attachments are never removed from the Keys table.
Run Query Every Update Period or Query Interval - Periodic SQL data
attachments are removed from the Keys table when the object with the attachment
is deleted (e.g., when the display containing the object is closed).
Run Query On Demand - SQL data attachments are removed from the Keys
table when they have completed.
| RTViewDs Table Name |
Column Available |
Description |
| Connections |
Database |
Name of database connection. |
| Connected |
True / False. Indicates
whether connected. |
| Concurrent |
True / False. Indicates
whether Run Queries Concurrently
option is selected for this connection. |
| Query Object Count
|
Number of queries
currently defined on this connection. |
| Total Execution Count
|
Number of queries executed on this connection since startup. |
| Listener Count |
Number of data
attachments using this connection. NOTE: In a Data Server deployment, this count
indicates the total number of unique queries using the connection. |
|
Keys |
Key |
SQL data attachment string. This string begins with
the database name, followed by various query parameters and finally the query
string itself. |
| Active |
True / False.
Indicates that query was either executing or waiting
to be executed when the Keys table was last updated. A query may be waiting to
execute if the database connection it uses is busy performing other queries.
NOTE: For queries that are scheduled to run every
General Update Period,
Active and Running columns may always be checked since those
queries will always be executing at the same time the Keys table is updated. |
| Running |
True / False.
Indicates that query was executing when the Keys
table was last updated.
NOTE: For queries that are scheduled to run every
General Update Period,
Active and Running columns may always be checked since those
queries will always be executing at the same time the Keys table is updated. |
| Execution Count |
Number of times query has
been executed. |
| Last Query Time |
Time at which the most
recent execution of query completed. |
| Last Execution Time |
Duration (in seconds) of
the most recent query execution. |
| Last Row Count |
Number of rows in the
most recent query result. Otherwise, -1 if the query failed. |
| Last Process Time |
Elapsed time between when
query was scheduled and when it completed. This may be longer than the Last
Execution Time if other queries use the same database connection and this
query was delayed waiting for other queries to complete. |
| Last Query Status |
Status of most recently
completed execution of query.
| OK |
Query
executed successfully. |
| no query |
Query
string is blank. |
| error |
Error
occurred while executing the query |
| connection failed |
Connection to database was lost. |
| no connection |
Database connection undefined or invalid. |
| timeout |
Query
timed out. |
| <blank> |
Query
has never been executed. |
|
| Avg Execution Time |
Average of Last
Execution Time for this query. |
| Avg Process Time |
Average of the Last
Process Time for this query. |
| Listener Count |
Number of data
attachments using this query result. |
| Query ID |
ID string assigned to
this query, if any. |
| Database |
Name of the database used
by this query. |
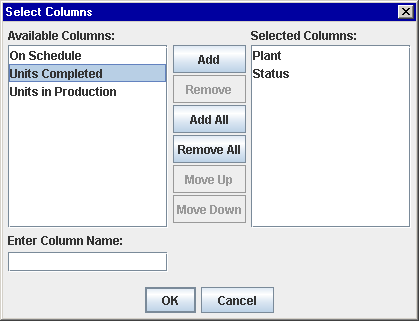
Select Table Columns
From the Attach to SQL Data dialog
you can specify which table columns to display and in what order they will
appear. In order to populate the listing of available columns, you must
first select a valid database and table.
To bring up the Select Columns dialog,
click on the ellipse button  in
the Column(s) field (or right-click in the Column(s) field and click on
Select
Columns). The dialog should contain a list of Available Columns that
you can add to your table. in
the Column(s) field (or right-click in the Column(s) field and click on
Select
Columns). The dialog should contain a list of Available Columns that
you can add to your table.
To add a column, select an item from
the Available Columns list and click on the Add button. If the item you
require is not listed, type your selection into the Enter Column Name field.
Click the Remove button to delete an item previously added to the Selected
Columns list. You can control the order of columns in a table by arranging
the items in the Selected Columns list with the Move Up and Move Down buttons.
Validation colors
indicate whether selected columns are valid. However, if even one column
selected is invalid the Column(s) field in the Attach to SQL Data dialog
will register as an invalid entry. NOTE: Invalid columns will not update.
The following describes the
Attach to SQL Data dialog commands:
| Command |
Description |
| OK |
Applies
values and closes the dialog. |
| Apply |
Applies
values without closing the dialog. |
| Reset |
Resets
all fields to last values applied. |
| Clear |
Clears
all fields. Detaches object from database (once Apply or OK is selected). |
| Cancel |
Closes
the dialog with last values applied. |
|