User Guide
| Enterprise
RTView®
User Guide |
|
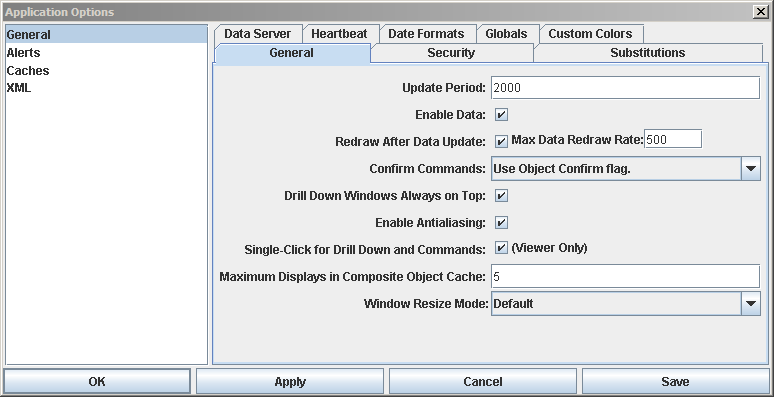
Application Options The Application Options dialog allows you to set general and data source specific options used in Enterprise RTView. Available options and dialog tabs depend on which data sources are licensed in your Enterprise RTView application. For information on Application Options for your data source, refer to the Data Sources section of this documentation. Options specified in the Application Options dialog are saved into initialization (.ini) files when you click the Save button. On startup, these initialization files are read by the Display Builder, Display Viewer, Display Server, Data Server and Historian to set initial values for all application options. It is possible to specify a directory for your initialization files. If no directory is specified and initialization files are not found in the directory where you started the current application, then Enterprise RTView will search under lib in your installation directory. NOTE: When you start an Enterprise RTView application from the Windows Start menu, it runs from the demos directory. If initialization files are still not found, Enterprise RTView uses the default values in the dialog shown below.
NOTE: Options specified using
command line arguments will override values
saved in initialization files.
The Application Options dialog can opened within the Display Builder or run as a stand-alone application on Windows or UNIX. Setting Options in the Display Builder Setting Options via Windows or UNIX By default, the Configuration Utility does not require a login. Login can be enabled at setup to support role based security. The default user name and password are:
NOTE: It is possible that your system administrator may have configured another user name and password. In this case, you may also need to select a role.
On Windows:
On UNIX:
Select a category from the left frame to display
corresponding dialog tabs in the main window. Click the Save button to
record the new application options in an initialization file. NOTE: Do not close
the dialog without first saving your changes.
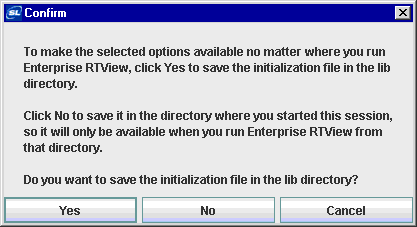
A confirmation dialog will appear to verify in which directory you would like to save the initialization file. If you specified a directory for your initialization files , all initialization (.ini) files will be saved to, and read from, that directory. If you select the lib directory, the initialization file will be available from any directory where you run Enterprise RTView. If you do not select the lib directory, the initialization file will be saved in the directory where you started the current session and will only be available when you run Enterprise RTView from that particular directory. NOTE: If no initialization file is found, Enterprise RTView will use the defaults shown above. The following describes Application Options dialog commands:
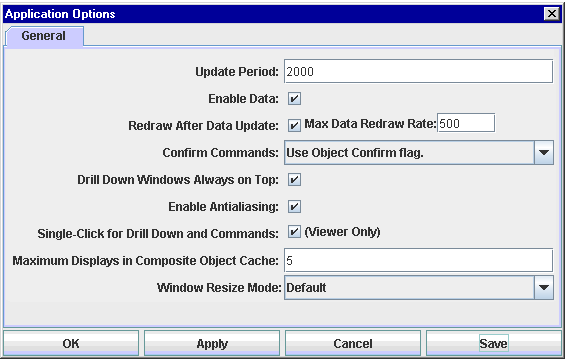
General Options
Update Period - Enter an integer value indicating the number of milliseconds at which Enterprise RTView will update data. On each update, all synchronous data sources are updated after which all displays are redrawn. Default is 2000 milliseconds. Enable Data - Check to enable data updates. When not enabled, incoming data is ignored. The default is enabled. Redraw After Data Update - Check to specify data-driven redraws. Data from an asynchronous data source can arrive at any time between update periods. This means there could be a delay between the time an asynchronous data source receives a data update and when the display showing this data is updated. If selected, displays containing data from asynchronous data sources that have changed since the last update will be redrawn at the rate specified in the Max Data Redraw Rate. Displays where no data has changed will only be redrawn on the update. If not selected, displays are only redrawn based on the update period. Max Data Redraw Rate - Enter the maximum data redraw rate when data is updated. The default is 500 milliseconds. Confirm Commands
- Set the confirm policy for all commands. Overrides confirm policies
set on individual objects. For more information on commands see
the Object Commands section.
Drill Down Windows Always on Top - Drill down displays will permanently remain in front of the main display until drill down windows are closed. When this setting is changed, the new settings won't apply to windows opened before the change was made. Enable Antialiasing - Smooth graphics in the display. Default is enabled. Single-Click for Drill Down and Commands - Open drill down windows or execute commands in the Display Viewer with a single click. NOTE: This option does not apply while working in the Display Builder. Maximum Displays in Composite Object Cache - Sets the maximum number of display (.rtv) files with composite objects to cache. Default is 5. If value is set to 0, no displays are cached. This is a performance optimization option for the composite object. Of course the higher you set this value, the more memory the cache will require. The impact of increasing the value of this option depends on your application. For example if you have an object grid with 100 objects showing the same display (.rtv) file, then that file can be cached and cloned for each composite object in the grid. However in a situation where you have 100 composite objects showing different display (.rtv) files, caching the files would not significantly optimize performance. Window Resize Mode - Globally controls object layout when a display window is resized. It is also possible to set a specific Resize Mode for each particular display (.rtv) file using the Background Properties dialog. In the Display Builder, the selected Resize Mode is only applied to drill down windows. The main window of the Display Builder is always in Crop mode. All three resize modes support zooming the display (right-click -> zoom). In both Scale and Layout modes if the window is resized while the display is zoomed, then the resize will further zoom the display. NOTE: If you already have windows open and change the resize mode, the new setting will only apply to new windows that are opened (i.e. Windows already open will not change.) Select from the following options:
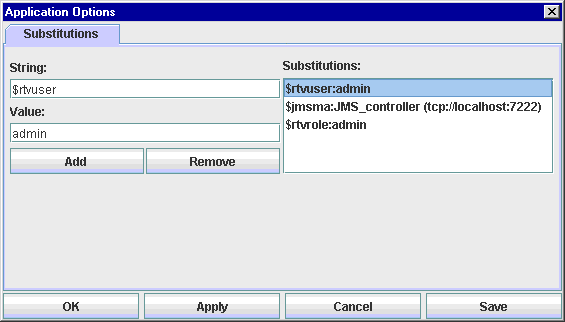
Substitutions Add, edit or remove substitutions. NOTE: The substitution string $value is reserved for internal use.
Add - Enter a String and a Value. Click Add to insert the substitution into the listing. NOTE: Substitution strings cannot contain the following:
Edit - Select a substitution from the list and edit the String or Value. Click Add to replace the substitution currently listed. Remove - Select a substitution from the list and click Remove. |
|
|
|
|
|
|
|
|
|
|
|
|
|
|