Using the Platform - Administration
These displays
enable you to set alert thresholds, observe how
alerts are managed, and modify your
Service Data Model.
-
Alert Administration:
Displays active alerts and
provides interface to modify and manage alerts.
-
Alert Admin Audit:
Track modifications of alerts
throughout your system, such as alert threshold
modifications.
-
Alert Action Audit Trail:
Track alert management throughout your system, including the name of the user who performed the action,
the time the action was performed and what the action was.
-
CMDB Admin:
View or modify your Service
Data Model.
Alert Administration
Set global or override alert thresholds.
Alert settings are global by default.
NOTE: To filter the alerts shown in the Alert Administration
display
by Solution Package, use the
$rtvAlertPackageMask substitution.
Global
To set a global alert,
select an alert from the Active
Alert Table. The name of the selected alert populates the Settings for
Selected Alert Name field. Edit Settings
for Selected Alert and click Save Settings when
finished.
The manner in which global alerts
are applied depends on the Package. For example, the EMS
Monitor package has queue alerts, topic alerts and server alerts. When a queue
alert is applied globally, it is applied to all queues on all servers. Likewise,
a
server alert applies to all servers, and a topic alert applies to
all topics on all servers.
Override
Setting override alerts
allows you to set thresholds for a single resource (for example, a single
server). Override alerts are useful if the majority of your alerts require the
same threshold setting, but there are other alerts that require a different
threshold setting.
For example, you might not usually be concerned with
execution time at a process level, but perhaps certain processes are critical. In this case, you can apply alert thresholds to each
process individually.
To apply an
individual alert you Index the Monitored Instance or resource (such as a
message queue, in the case of the EMS Monitor package). The Index Types available
are determined by the Package
installed. For example, with the EMS Monitor package you can set
an alert for a specific topic on a specific server (the
PerServerTopic
Index option)--rather than for all topics
on all servers. For information about setting
override alerts, see Tabular Alert Administration.

| Date, Time |
The
current date and time. When the time is incorrect, this might indicate that
an RTView
EM component stopped running. |
| Data OK |
The data connection state.
NOTE: When the Date, Time
field displays the correct time and Data OK indicator is green, this is a strong indication
that the RTView EM platform is receiving current and valid data. |
| Red |
The data source is
disconnected (for example, if the Data Server is not receiving data from
the Monitored Instance, or if the Display Server does not receive data from the Data Server,
this will be red). |
| |
| Green |
The data source is
connected. |
| |
|
Alert Settings |
The Alert Server connection state. |
| Red |
The Alert Server is not connected.
|
| |
| Green |
The Alert Server is connected. |
|
Active Alert
Table |
This table describes the global settings for all
alerts on the system. Select an alert. The name of the selected alert
populates the Settings for
Selected Alert Name field (in the lower panel). Edit Settings
for Selected Alert fields and click Save Settings when
finished.
NOTE: To filter the alerts shown in the table by Solution Package, use the
$rtvAlertPackageMask substitution. |
|
Alert
|
The
name of the alert. |
|
Warning Level |
The
global warning threshold for the selected alert. When the specified value is
exceeded a warning is executed. |
|
Alarm Level |
The global alarm threshold for the selected
alert. When the specified value is exceeded an alarm is executed. |
|
Duration (Secs) |
The
amount of time (in seconds) that the value must be above the specified
Warning Level or Alarm Level threshold before an alert is executed. 0
is for immediate execution. |
|
Alert Enabled |
When
checked, the alert is enabled globally. |
|
Override Count |
The
number of times thresholds for this alert
have been defined individually in
the
Tabular Alert Administration display. |
| |
|
Settings for Selected Alert |
To
view or edit Global settings, select an alert from the Active Alert Table.
Edit Settings
for Selected Alert and click Save Settings when
finished. NOTE:
To set
override alerts, click on Override
Settings to open the
Tabular Alert Administration display. |
|
Name |
The
name of the alert selected in the Active Alert Table. |
|
Description |
Description of the selected alert. NOTE: Click
on the
 button for more detail.
 |
|
Warning Level |
Set
the Global
warning threshold for the selected alert. When
the specified value is exceeded a warning is executed. To set the warning to
occur sooner, reduce the Warning Level value. To set the warning to
occur later, increase the Warning Level value.
NOTE: For low value-based alerts (such as EmsQueuesConsumerCountLow),
to set the warning to occur sooner, increase the Warning Level value.
To set the warning to occur later, reduce the Warning Level value. |
|
Alarm Level |
Set the
Global alarm threshold for the selected
alert. When the specified value is exceeded an alarm is executed. To set the
alarm to occur sooner, reduce the Alarm Level value. To set the
warning to occur later, increase the Alarm Level value.
NOTE: For low value-based alerts (such as EmsQueuesConsumerCountLow),
to set the alarm to occur sooner, increase the Alarm Level value. To
set the alarm to occur later, reduce the Alarm Level value.
|
|
Duration |
Set the amount of time (in seconds) that the value must be above the specified
Warning Level or Alarm Level threshold before an alert is executed.
0 is for immediate
execution. This setting is global. |
|
Enabled |
Check to enable alert globally. |
|
Save Settings |
Click to apply alert settings. |
|
Override Settings |
Click to open the
Tabular Alert Administration display
to
set
override alerts on the selected
alert. |
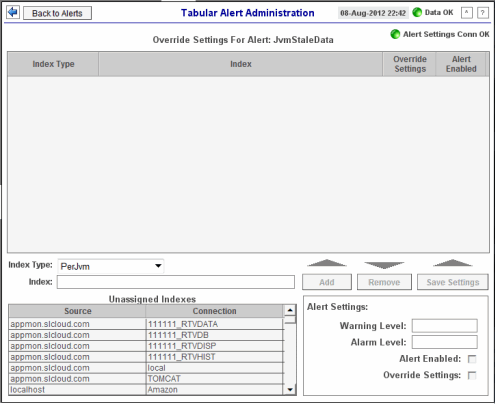
Tabular Alert Administration
Set override alerts (override global alert settings). This display opens when
you select an alert in the
Alert Administration display and then select
Override Settings.
For step-by-step instructions
setting thresholds for individual alerts, see
Setting Override Alerts.
|
Alert Settings Conn OK |
The connection state. |
| Red |
No
servers are found. |
| Green |
One or
more servers are delivering data. |
|
Override Settings For
Alert:(name) |
This table lists and describes alerts that have
override settings for the selected alert. Select a row to edit alert thresholds. The selected item appears in
the Index field. Edit settings in the Alert Settings fields, then click
Save Settings. |
|
Index Type |
Select the type of alert index to show in the
Values table. Options in this drop-down menu are populated by the type
of alert selected, which are determined by the Package installed. For example,
with the EMS Monitor package the following
Index Types
are available:
PerServer: Alert settings are applied
to a specific server.
PerQueue: Alert settings are applied
to the queue on each server that has the queue defined.
PerServerQueue: Alert settings are
applied to a single queue on a specific server.
PerTopic: Alert settings are applied
to the topic on each server that has the topic defined.
PerServerTopic: Alert settings are
applied to a single topic on a specific server.
|
|
Index |
The value of the index column.
|
|
Override Settings |
When
checked, the override settings are applied. |
|
Alert Enabled |
When
checked, the alert is enabled. |
| |
|
Index Type |
Select
the index type. The index type specifies how to apply alert settings. For
example, to a queue (topic or JVM, and so forth) across all servers, or to a
queue on a single server. NOTE: Options in this drop-down menu are populated
by the type of alert selected from the
Alert Administration display.
Index Types available depend on
the Package installed. |
|
Index |
The selected index column to be edited. This field is populated by the selection made in
the Unassigned Indexes table.
|
|
Unassigned Indexes |
This table
lists all possible indexes corresponding to the Index Type chosen in the
drop-down list. Select a row to apply individual alert thresholds. The selected
item appears in the Index field. Edit settings in the Alert Settings fields, then click Add. |
| |
| Add |
Click to add changes made in Alert Settings,
then click OK to confirm. |
|
Remove |
Click to remove an alert selected in the
Index Alert Settings
table, then click OK to confirm. |
|
Save Settings |
Click to save changes made to alert settings. |
|
Alert Settings |
Select a topic, server or queue from the
Unassigned Indexes
table and edit the following settings. |
|
Warning Level |
Set
the warning threshold for the selected alert. When the specified value is
exceeded a warning is executed. To set the warning to occur sooner, reduce
the Warning Level value. To set the warning to occur later, increase
the Warning Level value.
NOTE: For low value-based alerts (such as EmsQueuesConsumerCountLow),
to set the warning to occur sooner, increase the Warning Level value.
To set the warning to occur later, reduce the Warning Level value.
Click Save Settings to save settings. |
|
Alarm Level |
Set
the alarm threshold for the selected alert. When the specified value is
exceeded an alarm is executed. To set the alarm to occur sooner, reduce the
Alarm Level value. To set the warning to occur later, increase the
Alarm Level value.
NOTE: For low value-based alerts (such as EmsQueuesConsumerCountLow),
to set the alarm to occur sooner, increase the Alarm Level value. To set the
alarm to occur later, reduce the Alarm Level value.
Click
Save Settings to save settings. |
|
Alert Enabled |
Check to enable the alert, then click
Save Settings. |
|
Override Settings |
Check to enable override global setting, then click
Save Settings. |
Setting Override Alerts
Perform the following steps to set an override alert.
Index Types available depend on the
Package installed.
In this example, we use the
EMS Monitor Package to illustrate.
NOTE: To turn on an alert,
both Alert Enabled and
Levels Enabled must be selected.
To turn
on/off, change threshold settings, enable/disable or remove an alert on a single
resource:
1. In the Alert
Administration display, select an
alert in the
Active Alert Table
and click
Edit Index Levels. The
Tabular Alert Administration
display opens.
2. In the Tabular Alert Administration
display, from the Index Type drop-down menu, select the Index type (options
are populated by the type of alert you previously selected).
For example, with the EMS Monitor package, select PerServerQueue,
PerServerTopic or PerServer . NOTE: If you select PerServerQueue or
PerServerTopic, the alert settings are applied to the queue or topic
on a single server.
3. In the Values table, select the server
to apply alert settings and click Add. In a few moments the server
appears in the Index Alert Settings table.
4. In the Index Alert Settings table
select the server.
5. In the Alert Settings panel (lower
right), if needed, modify the Warning Level and Alarm Level
settings.
6. In the Alert Settings panel, set the
following as appropriate:
| |
To turn on the alert
for this index
with the given thresholds: |
| |
|
Alert Enabled |
Select this option. |
|
| |
|
Levels Enabled |
Select this option. |
|
| |
|
|
|
|
| |
To turn off the alert
for only this
index (global alert thresholds will no longer apply to this index): |
| |
|
Alert Enabled |
Deselect this option. |
|
| |
|
Levels Enabled |
Select this option. |
|
| |
|
|
|
|
| |
To no longer
evaluate this indexed alert and revert to global settings (or, optionally,
Remove it if it is never to be used again): |
| |
|
Alert Enabled |
Not used. |
|
| |
|
Levels Enabled |
Deselect this option. |
|
6. Click Save Settings. In a few moments
the modifications are updated in the Index Alert Settings table.
Alert Admin Audit
View alert management
details such as alert threshold modifications.
Each table row is a single
modification made to an alert. To view modifications for a single alert in a
group, sort the ALERTNAME column using
the
 button.
|
Audit Conn OK |
The Alert Server connection state. |
| Red |
The Alert Server is disconnected. |
| |
| Green |
The Alert Server is connected. |
| |
|
TIME_STAMP |
The
date and time of the modification. |
|
USER |
The
user name of the administrator who made the modification. |
|
ACTION |
The
type of modification made to the alert, such as UPDATED. |
|
ALERTNAME |
The
name of the alert modified. |
|
INDEXTYPE |
The type of alert Index.
Index Type
refers to the manner in which alert
settings are applied and vary among
Packages.
For example, JVMs have a PerJvm Index Type. the EMS Monitor package
PerServer, PerTopic and
PerQueue Index Types, which apply alerts to servers, topics and queues,
respectively. |
|
ALERTINDEX |
The index of the alert which identifies its source. |
|
WARNINGLEVEL |
The
warning threshold value for the alert at the time this modification was
made, as indicated in the TIME_STAMP column.
The warning level
is a
threshold that, when
exceeded, a warning is executed. |
|
ALARMLEVEL |
The
alarm threshold value for the alert at the time this modification was made,
as indicated in the TIME_STAMP column.
The alarm level
is a
threshold that, when
exceeded, an alarm
is executed. |
|
DURATION |
The
duration value for the alert at the time this modification was made, as
indicated in the TIME_STAMP column.
The alert duration
is the amount of time (in seconds) that a value must be above the specified
Warning Level or Alarm Level threshold before an alert is
executed. 0 is for immediate execution. |
|
ENABLED |
When
checked, indicates the alert was Enabled at the time this
modification was made, as indicated in the TIME_STAMP column. |
|
USEINDEX |
When
checked, indicates the alert override was Enabled at the time this
modification was made, as indicated in the TIME_STAMP column. For
details about alert overrides, see Alert
Administration. |
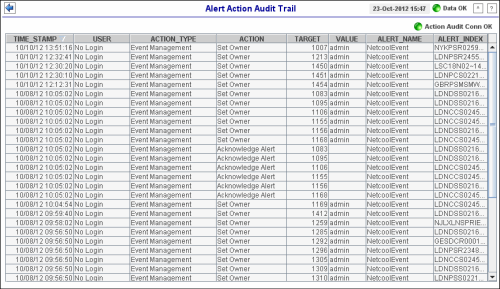
Alert Action Audit
Trail
The Alert Action Audit Trail display shows all user actions concerning
alert management, including the name of the user who performed the action, the time
the action was performed and what the action was. This display can help
managers of the RTView EM solution determine how and when user interactions have
impacted the alert system and help manage users so that best practices for alert
handling are maintained.
| Date, Time |
The
current data and time. When the time is incorrect, this might indicate that RTView
stopped running. |
| Data OK |
The data connection state. When the Date, Time
field displays the correct time and the Data OK indicator is green, this is a strong indication
that the RTView EM platform is receiving current and valid data. |
| Red |
The data source is disconnected (for example, if the Data Server is not
receiving data, or if the Display Server does not receive data from the Data
Server, this will be red). |
| |
| Green |
The data
source is connected.
|
| |
|
Action Audit Conn OK |
The Alert Action database connection availability. |
| Red |
The connection to the Alert Action database is not available. |
| |
| Green |
The connection to the Alert Action database is available.
|
| |
| Time_Stamp
|
The
time the action was performed. |
|
User |
The
log in name of the user who performed the action. |
| Action_Type
|
The
type of action which was performed. |
|
Action |
The
action which was performed. |
|
Target |
The
alert ID on which the action was performed. |
|
Value |
Any
value associated with the alert action. |
| Alert_Name |
The
name of the alert on which the action was performed. |
| Alert_Index |
The index of the alert which identifies its source. |
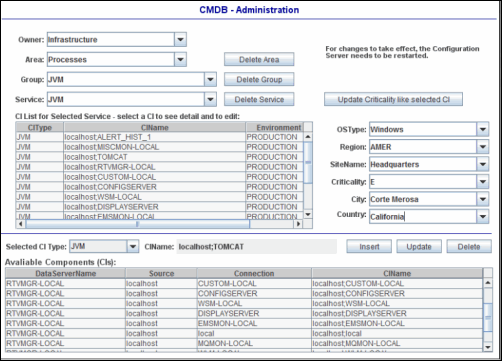
CMDB
Admin
Use this display to view or modify your Service Data Model. For details about
the
Service Data Model, see
Configure Service Data Model.
To associate a CI to
a Service using the CMDB Admin display, select a Service from the Service drop-down menu. Your selection populates the CI List
table (the upper table) with a list of all CI Types associated with the
selected Service. Select a CI Type to populate the Available
Components table. Your selection populates the Available
Components table (the lower table) with a list of all CIs associated with
the selected CI Type. Select a CI in the Available Components table, then
click Insert to associate the CI with the Service. A row is added to the CI List table and the upper
levels--Group, Area and Owner--are automatically updated.
By default, the Owner named
Infrastructure is created. Infrastructure is associated with CIs that
are automatically sent to the Central Server.
|
Owner |
Select an
Owner to
filter by. The Owner selected populates the
Area,
Group and Service drop-down menus. |
|
Area |
Select an
Area to
filter by. The
Area selected populates the
Group
and
Service drop-down menus. |
|
Delete Area |
Deletes from the CMDB database the selected
Area
and all
Groups, Services and CIs associated with it. |
|
Group |
Select a
Group to
filter by. The
Group selected populates the
Service drop-down menu. |
|
Delete Group |
Deletes from the CMDB database the selected Group
and all
Services and all CIs associated with it. |
|
Service |
Select a
Service to edit, then click
Update.
|
|
Delete Service |
Deletes from the CMDB database the selected Service
and all CIs
associated with it. |
|
CI List Table |
This table lists
all CIs associated with the selected Service. Each table
row is a different CI. Select
a CI
to see its attributes in the drop-down menus at the right of the table. Use the OSType, Region, SiteName,
Criticality, City and Country drop-down menus to edit the
selected CI. To add a CI, select a CI
from the
Available Components table, then click
Insert. |
|
CIType |
The type of CI. For example, server or application. |
|
CIName |
A unique identifier for the CI. |
|
Environment |
The
name of the Environment for the CI. |
|
Update Criticality like selected CI |
Updates the Criticality level to match the selected CI level. |
|
OSType |
Select or type the operating system for the CI
selected in the CI List Table, or
the CI
selected in the
Available Components
and Inserted into the CI List Table. |
|
Region |
Select or type the region for the CI
selected in the CI List Table, or
the CI
selected in the
Available Components
and Inserted into the CI List Table. |
|
SiteName |
Select or type the site name for the CI
selected in the CI List Table, or
the CI
selected in the
Available Components
and Inserted into the CI List Table. |
|
Criticality |
Specify the importance level of a Service or a CI for your
organization.
Select a Service or a CI
and set the
Criticality
value
from A to E, where A is the
highest Criticality and E is the lowest Criticality (with equally spaced intermediate values). This
value is used to determine the value for Alert Impact. A higher
Criticality increases the Alert Impact of alerts associated with
the
Service or a CI.
Criticality values are listed in the Component Views /
CI Service Table
display. Criticality values are also shown in
heatmaps (such as the Area Heatmap) and tables (such as the CI /
Service Table). Criticality is used to calculate Alert Impact
(maximum Alert Severity multiplied by the maximum
Criticality equals Alert Impact). |
|
Country |
Select or type the country for the CI
selected in the CI List Table, or
the CI
selected in the
Available Components
and Inserted into the CI List Table. |
| |
|
Selected CI Type |
Select
the type of CI to include in the Available Components table.
All CIs of
this type are listed. NOTE: A CI can be associated with multiple
Services. |
|
CIName |
The
name of the CI to insert or update. |
|
Insert |
Adds
(associates) the CI selected in the Available Components table, with attributes selected
from the drop-down menus (on the right), to the selected Service
in the CI List Table. To add a
CI to the currently selected Service, select a CI from Available Components
table, use the
OSType,
Region,
SiteName,
Criticality and
Country drop-down menus to modify attributes for the CI, then
click Insert. The CI appears in the CI List Table
|
|
Update |
Updates the CI selected in the CI List Table with attributes selected
from the drop-down menus (on the right).
To modify attributes for a CI, select a CI from Available Components
table, use the
OSType,
Region,
SiteName,
Criticality and
Country drop-down menus to modify attributes for the CI, then
click
Update. |
|
Delete |
Removes the selected CI from the CMDB database. |
|
Available Components |
This table lists
all CIs in the system. Each row in the table is a different CI
(for example, a server or a process). Select a CI to associate with the currently selected Service,
use the
OSType,
Region,
SiteName,
Criticality and
Country drop-down menus to modify attributes for the CI, then
click Insert. The CI appears in the CI List Table. NOTE:
Attributes are assigned to a CI when the CI is associated with a Service. |
|