Configure Central Servers
This section
describes how to configure the Central
Servers. This section
assumes you installed the full
RTView EM Platform.
When you have finished this part of the RTView EM Configuration,
the client will have access to RTView EM displays via Web browser. The
displays will contain JVM
monitoring data for RTView EM processes, gathered by the
RTVMGR Solution Package that comes with EM.
The displays will
not yet contain monitoring data for other
Solution Packages.
This
Step is required.
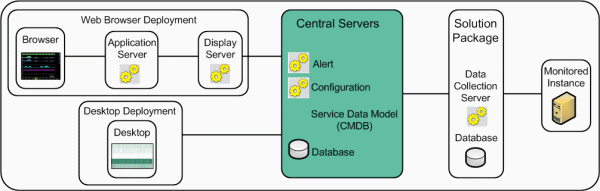
The following figure illustrates the RTView EM components
that are the subject of this section.
To
configure the Central Servers you create
project directories and deploy a Web browser EM deployment.
At this
point you have:
To configure the Central Servers:
1.
Create your project directory. NOTE: This document assumes you create the directory structure
described here.
NOTE: The contents of the rtvapm directory must not be modified as
it gets overwritten when a new version of RTView EM is installed, which would
result in a loss of work. For this reason, before making any changes to the configuration files,
we recommend that you create a copy of the EM files outside the EM installation
folder as instructed here.
| |
|
Parallel to the rtvapm
directory, create a directory named rtvapm_projects. |
| |
|
Copy the emsample folder, located in the rtvapm/projects
folder, to the rtvapm_projects
folder you just created. |
| |
|
emsample is the directory
from which EM runs. In this documentation, we refer to
emsample as your
project directory. |
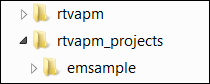
The following figure illustrates your EM directory structure:
2. Initialize a command line window or terminal
window on the host by performing the following steps:
NOTE: To start any RTView process within EM (Data Server, Display Server, Historian, Viewer
and so forth), you first initialize a command line or terminal window on the host
by
executing the rtvapm_init script and the rtvapm_user_init script.
| |
|
Windows
Go to your RTView EM installation directory (rtvapm) and type: |
| |
|
|
rtvapm_init |
| |
|
|
cd ..\rtvapm_projects |
| |
|
|
rtvapm_user_init |
| |
|
|
| |
|
UNIX
The script used to initialize a terminal window depends on whether you are
in csh or rsh (for example, Linux, Mac OS X). UNIX scripts are Bourne shell
compatible. With a Bourne shell, open a
terminal window. |
| |
|
Go to your RTView EM installation directory (rtvapm) and type: |
| |
|
|
. ./rtvapm_init.sh |
| |
|
|
cd ../rtvapm_projects |
| |
|
|
. ./rtvapm_user_init.sh |
3. Copy the .war files located in your
project directory/webapps directory
and deploy them to your Application Server.
4. Start the Application Server.
5. Remove undesired Solution Packages references from the EM navigation tree
(which resides in the left panel of the Monitor) by opening the
rtv_appmon_navtree.xml file, located in your
project directory/servers/central directory, in a text editor:
| |
Notice that each Solution Package in the navigation tree has the following
format: |
| |
|
<node label="All Management Areas" mode="" state="open" display="rtv_dir_owner_areas">
<node label="Area Heatmap" mode="" display="rtv_area_heatmap"/>
<node label="Area Table" mode="" display="rtv_area_table"/>
</node>
|
| |
|
| |
Comment out the Solution Packages you are not going to use by adding a <!--
prefix and a --> suffix to the Solution Package format. For example, we
comment out the GlassFish Solution Package as follows: |
| |
|
<!--
<node label="GlassFish Servers" mode="" display="rtv_dir_solutionpackage"
subs="$x:gfmon">
<node label="All Servers Heatmap" display="gfs_allservers_heatmap"/>
<node label="All Servers Table" display="gfs_allservers_table"/>
<node label="Server Summary" display="gfs_server_summary"/>
<node label="All Apps Heatmap" display="gfs_allapps_heatmap"/>
<node label="All Apps Summary" display="gfs_allapps_summary"/>
</node>
--> |
| |
|
| |
NOTE:
Do not comment out the following which are internal to the Enterprise Monitor: |
| |
|
All Management Areas
Multi Area Service Views
Service Summary Views
Component Views
JVM Process Views
Tomcat Servers
Host Systems
Custom Demo
Alert Views
Administration
Architecture |
| |
|
| |
Save the file. |
6.
Change directory to your
project directory/servers
directory.
Execute the following scripts to start and run EM processes locally.
| |
|
Windows |
| |
|
start_rtv all |
To start the Central Server database, Configuration Server,
Alert Server, Display Server and
Alert Historian. |
| |
|
| |
|
UNIX |
| |
|
start_rtv.sh all |
To start the Central Server database, Configuration Server,
Alert Server, Display Server and
Alert Historian. |
| |
|
|
|
| |
|
Errors and messages for the Alert Server and
Configuration Server processes are written to the alerts_dataserver.log
file and the config_dataserver.log file, located in your
project directory/servers/central/logs directory. |
| |
|
|
| |
|
NOTE: By default, the HSQLDB database for Alerts,
Alert History and Configuration is located in your
project directory/DATA
directory. When the default database scripts (rundb) are run for the
first time, the HSQLDB database reads from the Alerts, Alert History and
Configuration databases and provides the information to the Configuration Server. |
7. Access the Monitor by pointing a browser to:
The RTView EM Login dialog opens.
8.
Login using:
| |
|
User:
admin |
| |
|
Password:
admin |
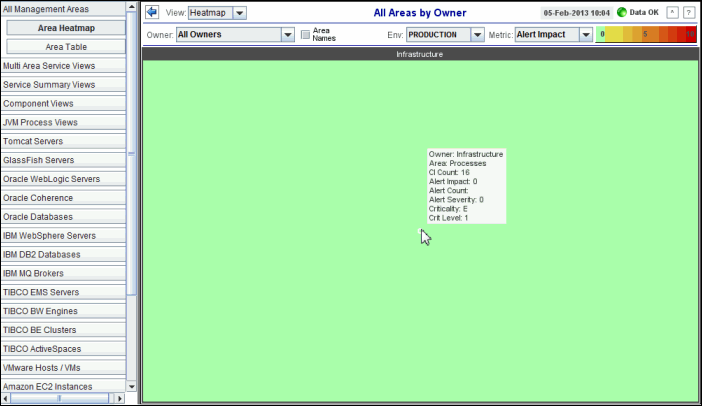
The Enterprise Monitor main display, Area Heatmap, opens.
The Area Heatmap is
populated with JVM data from the RTView EM servers (collected by the RTView
Manager Solution Package which monitors RTView applications) and the default CMDB database
structure. By default, a single Owner is in the
heatmap, Infrastructure.
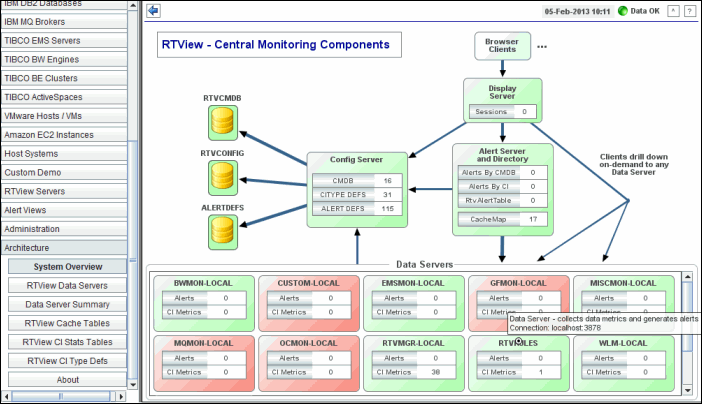
9. Verify your setup by opening the Architecture / System Overview
display using the navigation tree (in the left panel) and confirming that the following objects in the
display topology are green (indicating the process is running): the
Configuration Server, Alert Server, Display Server, as well as each
Data Server that has a corresponding Solution Package installed.
10. Remove uninstalled Solution Packages (shown in
red) from the Architecture / System Overview display: :
| |
Open the
rtvservers.dat file, located in your project directory/servers
directory, in a
text editor.
|
| |
|
|
| |
|
Comment out the line for the Solution Package. For
example, to comment out the WebLogic Solution Package Data Server, we enter # as follows: |
| |
|
|
| |
|
|
### WLM
#
#wlm ./wlm dataserver rundata
#wlm ./wlm historian runhist -ds |
| |
|
|
| |
|
Save the file. |
| |
|
|
| |
|
Open the central.properties file, located in your
project directory/servers/central directory, in a text editor. |
| |
|
|
| |
|
Comment out the line for the Solution Package. For
example, to comment out the WebLogic Solution Package Data Server, we enter # as follows: |
| |
|
|
| |
|
|
# WLM
#sl.rtview.cp=%RTVAPM_HOME%/wlm/lib/rtvapm_wlm.jar
#AllDataClient.sl.rtview.dataserver=name=WLM-LOCAL;connect=localhost:3578
#monitor.sl.rtview.jmx.jmxconn=WLM-LOCAL localhost 3568 URL:- - - false
#AlertAggregator.sl.rtview.cache.config=rtv_alerts_source.rtv
$rtvDataServer:WLM-LOCAL
#AlertAggregator.sl.rtview.cache.config=rtv_cistats_source.rtv
$rtvDataServer:WLM-LOCAL
#AlertAggregator.sl.rtview.cache.config=rtv_cimap_source.rtv
$ciType:WLS $rtvDataServer:WLM-LOCAL
#AlertAggregator.sl.rtview.cache.config=rtv_cimap_source.rtv
$ciType:WLS-APP $rtvDataServer:WLM-LOCAL
Save the file. |
To summarize
the current state of your EM deployment, the:
- RTVMGR-LOCAL Data Server is green and receiving JVM
monitoring data from RTView EM processes, as indicated by the non-zero value
in the CI Metrics field.
- Data Servers that are green indicate
they are running. However, they are not yet receiving monitoring data, as
indicated by the zero (0) value in the CI Metrics field. When
you connect these Data Servers to their respective Monitored Instances, the
CI Metrics fields will change to positive numbers.
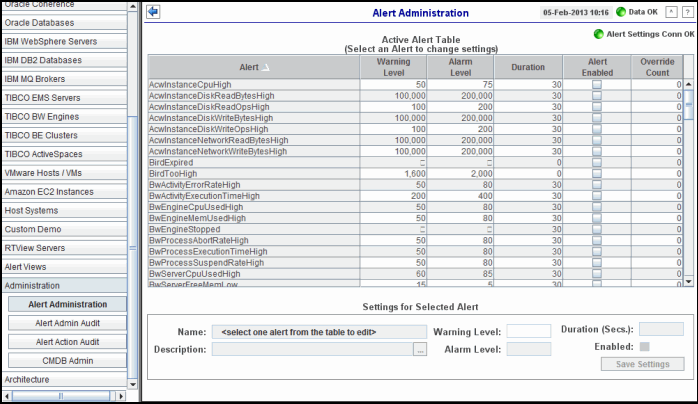
- the Administration / Alert Administration display (as shown in
the following figure) contains default alerts for all installed Solution Packages. The alerts are not yet enabled.
Alerts are activated after you connect EM to your production Data Servers and
enable the alerts.
This completes validation of your Web Deployment.
Proceed to
Configure Solution Package.
|