|
|
Oracle Coherence Monitor
User Guide |
|
|
Starting OCM
This section provides step-by-step instructions on how to start the Thin Client Browser deployment components, and includes steps for:
Windows
1. Copy the .war files, located in the rtvapm\ocmon\webapps
directory, and deploy them to your Application Server.
2. Start your Application Server.
3. In an initialized command window, perform the following steps:
|
Standalone Version Change directory (cd) to the ocmon\projects\mysample directory. |
|||
|
In the projects\mysample directory, start the OC Monitor applications by typing: |
|||
| start_rtv default | |||
| NOTE: The start_rtv default command starts all the OC Monitor applications at once. To start each OC Monitor application individually use the following commands: | |||
| start_rtv default database | Starts the HSQLDB database. | ||
| start_rtv default dataserver | Starts the Data Server. | ||
| start_rtv default historian | Starts the Historian. | ||
| start_rtv default displayserver | Starts the Display Server. | ||
| A log file is created for each application and stored in the logs subdirectory. | |||
|
|
|||
|
Solution Package Version NOTE: These instructions assume you have deployed the EM .war files and started the Central Server applications as described in the EM documentation. |
|||
| Change directory (cd) to the emsample\servers directory. | |||
| In the emsample\servers directory, start the OC Monitor applications by typing: | |||
| start_rtv ocmon | |||
| NOTE: The start_rtv ocmon command starts all the OC Monitor applications at once. To start each OC Monitor application individually use the following commands: | |||
| start_rtv ocmon dataserver | Starts the Data Server. | ||
| start_rtv ocmon historian | Starts the Historian. | ||
| A log file is created for each application and stored in the ocmon/logs subdirectory. | |||
4. Test the Thin Client Browser deployment by performing the following:
|
Standalone Version Open a Web browser and browse to the following URL: http://host:port/ocmon |
||
| Where host is the IP or host name where your Application Server is running, and port is the port used by your Application Server. The login display opens in the Web browser. | ||
| Login. The default user name and password are: | ||
| User Name:
demo Password: demo |
||
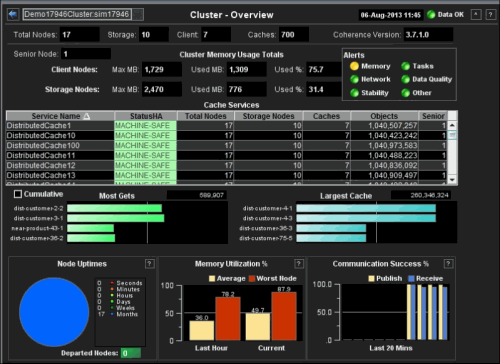
| The Cluster Overview display opens. | ||
|
|
|
Solution Package Version NOTE: In the following instructions, the OCM Solution Package is accessed by the EM Thin Client. |
|
|
Open a Web browser and
browse to the following URL: http://host:port/emsample |
||
| The login display opens in the Web browser. | ||
| Login. The default user name and password are: | ||
| User Name:
demo Password: demo |
||
| The RTView EM main display opens in the Web browser. Select Oracle Coherence (in the navigation tree) to view the Cluster Overview display and other OCM displays. | ||
 |
||
See Using the OC Monitor for details about how to use the OC Monitor.
See Additional Configurations for details about other configurations such as servlets, desktop clients and databases.
UNIX/Linux
1. Copy the .war files, located in the rtvapm/ocmon/webapps
directory, and deploy them to your Application Server.
2. Start your Application Server.
3. In an initialized command window, perform the following steps:
|
Standalone Version Change directory (cd) to the ocmon/projects/mysample directory. |
|||
| In the projects/mysample directory, start the OC Monitor applications by typing: | |||
| start_rtv.sh default | |||
| NOTE: The start_rtv.sh default command starts all the OC Monitor applications at once. To start each OC Monitor application individually use the following commands: | |||
| start_rtv.sh default database | Starts the HSQLDB database. | ||
| start_rtv.sh default dataserver | Starts the Data Server. | ||
| start_rtv.sh default historian | Starts the Historian. | ||
| start_rtv.sh default displayserver | Starts the Display Server. | ||
| A log file is created for each application and stored in the logs subdirectory. | |||
|
|
|||
|
Solution Package Version These instructions assume you have deployed the EM .war files and started the Central Server applications as described in the EM documentation. |
|||
| Change directory (cd) to the emsample/servers directory. | |||
| In the emsample/servers directory, start the OC Monitor applications by typing: | |||
| start_rtv.sh ocmon | |||
| NOTE: The start_rtv.sh ocmon command starts all the OC Monitor applications at once. To start each OC Monitor application individually use the following commands: | |||
| start_rtv.sh ocmon dataserver | Starts the Data Server. | ||
| start_rtv.sh ocmon historian | Starts the Historian. | ||
| A log file is created for each application and stored in the ocmon/logs subdirectory. | |||
4. Test the Thin Client Browser deployment by performing the following:
|
Standalone Version |
||
| Where host is the IP or host name where your Application Server is running, and port is the port used by your Application Server. The login display opens in the Web browser. | ||
| Login. The default user name and password are: | ||
| User Name:
demo Password: demo |
||
| The Cluster Overview display opens. | ||
|
|
|
|
Solution Package Version NOTE: In the following instructions, the OCM Solution Package is accessed by the EM Thin Client. |
|
|
Open a Web browser and
browse to the following URL: http://host:port/emsample |
||
| The login display opens in the Web browser. | ||
| Login. The default user name and password are: | ||
| User Name:
demo Password: demo |
||
| The RTView EM main display opens in the Web browser. Select Oracle Coherence (in the navigation tree) to view the Cluster Overview display and other OCM displays. | ||
|
|
||
See Using the OC Monitor for details about how to use the OC Monitor.
See Additional Configurations for details about other configurations such as servlets, desktop clients and databases.
|
RTView contains components licensed under the Apache
License Version 2.0. |
|
Treemap Algorithms v1.0 is used without
modifications and licensed by MPL Version 1.1. Copyright © 2001 University of
Maryland, College Park, MD |
|
Datejs is licensed under MIT. Copyright © Coolite Inc. |
|
jQuery is
licensed under MIT. Copyright © John Resig, |
|
JCalendar 1.3.2 is licensed under LGPL.
Copyright © Kai Toedter. |
|
jQuery is licensed under MIT. Copyright (c) 2009 John
Resig, http://jquery.com/ JCalendar 1.3.2 is licensed under LGPL.
Copyright © Kai Toedter. |
|
JMS, JMX and Java are trademarks or registered trademarks
of Sun Microsystems, Inc. in the United States and other countries. They are
mentioned in this document for identification purposes only. |
|
SL, SL-GMS, GMS, RTView, SL Corporation, and
the SL logo are trademarks or registered trademarks of Sherrill-Lubinski
Corporation in the United States and other countries. Copyright © 1998-2013
Sherrill-Lubinski Corporation. All Rights Reserved. |