Attach
to TIBCO EMS Administration Data
NOTE: The TIBCO EMS Administration
data
source may not be licensed in your RTView installation.
From the Object Properties
window you can access the Attach to TIBCO EMS Administration Data dialog,
which is used to connect an object property to a TIBCO
EMS Administration metric. Once a property has been attached to
a metric, it receives continuous updates.
When an object property is
attached to data, the Property Name and Value in the Object Properties
window will be displayed in green. This indicates that editing this value
from the Object Properties window is no longer possible. To remove the
data attachment, and resume editing capability in the Object Properties
window, right-click on the Property Name and select Detach from Data.
You will recognize that an object property has been detached from the data
source when the Property Name and Value are no longer green.
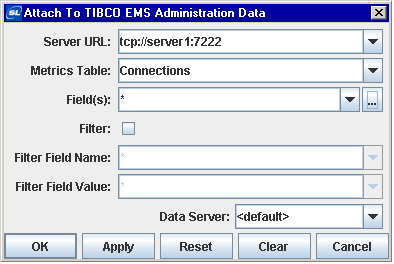
To bring up the Attach to
TIBCO
EMS Administration
Data dialog, right-click on the Property Name from the Object Properties
window and select Attach to Data>JMSADM. The Attach to TIBCO EMS
Administration Data dialog provides
drop down menus that allow you to specify information regarding the
EMS Administration metric to display.
| Server
URL |
Select
the name of a Server URL from the drop down menu of all available EMS servers. When
* is entered, the table returned will contain rows with information from
metrics tables
for for each EMS Server that is being monitored. The Server URL drop down menu lists
all available EMS servers. Drop down menus for Metrics Table, Field(s) and
Filter Name populate based on the selected EMS Server. If the item you require is not listed, type
your selection into the field. For information on adding EMS Servers, see
Application
Options. |
| Metrics Table |
Select a Metric
from the drop down menu. Pattern
- This field is only available if the Queues or Topics Metrics
Table is selected. If neither Queues or Topics is selected, all
Topics or Queues are returned. If Queues or Topics is selected,
only Topics or Queues that match the pattern are returned. The pattern may
contain the wildcards * and >. For example, a pattern of
test1.> or test1.*.test. See the TIBCO documentation for more
information how wildcards work in topic names. |
| Field(s) |
Select
a Field(s) to update the attached object. |
| Filter |
Select to filter the fields
of the selected metric. |
| Filter Field Name |
Name of the field to use
as a filter. |
| Filter Field
Value |
Value that the filter field
must equal. Single or multiple values may be listed. Enter * to display
all rows in the table. Enter "*" to use * as a literal comparative value.
To list multiple values, separate with a semicolon. For example: value1;value2;value3.
If
your value contains a semicolon, enclose it in single quotes. |
| Data Server |
Select to read data through your configured Data
Server and not directly from the TIBCO EMS
Administration data source.
Default - Select the default Data
Server you configured in Application
Options>Data Server.
None - Bypass data being redirected
through the specified data server(s) for this attachment and instead attach
directly to the data source.
Named Data Servers - Select a
Named Data Server
that you configured in Application Options>Data Server.
Multi-Server Attachment - To configure
multiple data servers, enter a semicolon (;) delimited list containing two or
more
Named Data Servers (e.g. ds101;ds102). Each name specified must
correspond with a
Named Data Server
that you configured in Application Options>Data Server. It is also possible to
specify __default and __none (e.g. __default;ds101;ds102).
NOTE: The values __default and __none begin with two
underscore characters.
Alternatively, a value of * can be
entered to specify all data servers, including __default and __none.
When multiple data servers are specified, the
data attachment will be directed to each data server in the list. For tabular
data attachments, a column named DataServerName will be added as the
first column of the table and contain the name of the server from which the
data was received.
A multi-server attachment will receive data
independently from each of the servers it specifies, so in most cases it will
be necessary to combine the tables received into a single table. This can be
accomplished in two ways:
1) The multi-server attachment can be
applied to a local cache that has the DataServerName column specified
as an index column. The current table of that cache will contain the
combination of the tables received from all servers. NOTE: It may also be
necessary to configure cache row expiration settings to remove defunct rows.
2) The multi-server attachment can be applied as the Table argument of the
RTView function named
Combine
Multi-Server Tables.
|
Substitutions
Substitutions allow you
to build open-ended displays in which data attachments depend on values
defined at the time the display is run. Generic
names, such as $server1 and $server2, are used instead of values for specific
servers, metrics tables, or fields. Later when the display is running,
these generic values are defined by the actual names.
In
this way, a single display can be reused to show data from a number of
different sources. For more information on creating displays using substitution
values, see Substitutions.
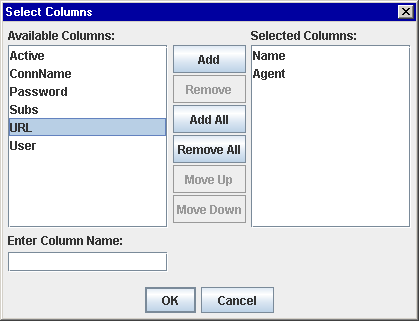
Select Table Columns
From the Attach to TIBCO EMS
Administration Data dialog you can specify which
table columns to display and in what order they will appear. In order to
populate the listing of available columns, you must first select
a valid Server URL and Metrics Table.
To bring up the Select Columns dialog,
click on the ellipse button  in the Field(s) field (or right-click in the
Field(s) field and click on Select Columns). The dialog should contain
a list of Available Columns that you can add to your table.
in the Field(s) field (or right-click in the
Field(s) field and click on Select Columns). The dialog should contain
a list of Available Columns that you can add to your table.
To add a column, select an item from
the Available Columns list and click on the Add button. If the item
you require is not listed, type your selection into the Enter Column Name
field. Click the Remove button to delete an item previously added
to the Selected Columns list. You can control the order of columns in a
table by arranging the items in the Selected Columns list with the Move
Up and Move Down buttons.
If no data is available for a table
row within a selected column, the table cell will display one the following
values: N/A, false, 0, or 0.0.
The following describes the
Attach to TIBCO
EMS Administration Data dialog commands:
| Command |
Description |
| OK |
Applies
values and closes the dialog. |
| Apply |
Applies
values without closing the dialog. |
| Reset |
Resets
all fields to last values applied. |
| Clear |
Clears
all fields. Detaches object from data source (once Apply or OK is selected). |
| Cancel |
Closes
the dialog with last values applied. |
|