Configuring Failover on
the Historian
This section describes how to
configure failover for the Historian.
You configure failover
in the Historian application.
For details about configuring
the Historian, see
Configure the Historian.
High
Availability Historians
The High Availability feature is
intended to be used with a database system that also supports redundancy
(through mirroring, clustering, or other techniques) so that any Historian in
the group can update the same virtual database.
To configure failover, you
create a Server Group and
designate backup Historians to support a failover event.
By default, no
Server Group is defined.
You can specify a primary Historian as well as one or more backup Historians. Only the primary Historian is capable of writing to the database.
Each Server Group member is assigned a
port number and a priority. Using a socket connection on the assigned ports,
each member monitors the status of the others in the group. The member with the
highest priority is elected as the primary Historian. If the primary Historian
fails, is shut down, or loses its connection to the database, the backup
Historian with the highest priority becomes the new primary. A
Historian with a priority of 2 is has higher priority than a Historian with a
priority of 1.
For example, if we have three
Historians with the following priority:
Historian A / Priority 1
Historian B / Priority 2
Historian C / Priority 3
and Historian C is the Primary. If Historian C is shut down, Historian B becomes
the Primary. In the event of a
tie in priority ranking, the Historian that was started first becomes the
primary.
NOTE: Each Historian in the group should be configured with the same
set of data configuration files, retention options, data source options, etc.
To configure failover for the Historian
1. Start the Historian application.
| |
|
| |
Windows
From the Windows Start Menu:
Select Start-->Programs-->RTView--> Historian
NOTE: When you start the Historian
from the Windows Start menu, it runs from the demos directory. The Historian
will try to read initialization (.ini) files and resolve XML sources containing
relative paths from that directory. To start the Historian
in another directory, you must run RTView from a command window.
NOTE: You can
specify a directory for your
initialization files.
The Historian application opens. |
| |
|
| |
From a Command Prompt
Window
Select Start-->Programs-->RTView-->GMS Command PromptIn
the command window type:
run_historian
The Historian application opens. |
| |
|
|
UNIX
In
an initialized terminal window
type:
run_historian
The Historian application opens. |
2. Click the Server Group tab and make the
following entries:
| |
Include in Group |
Check the box to enable. |
| |
Priority |
Choose a priority for this Historian. The default is 1. The online
Historian with the highest priority is the primary Historian,
and updates the database. |
| |
Port |
Enter a port number on which this Historian accepts
connections from other Historians in the group. The default is 3380. |
| |
Timeout |
The amount of
time, in seconds, at which a connection with a group member is considered down.
|
|
Member |
For each Historian in the group, enter the hostname
and port in the Member text field. |
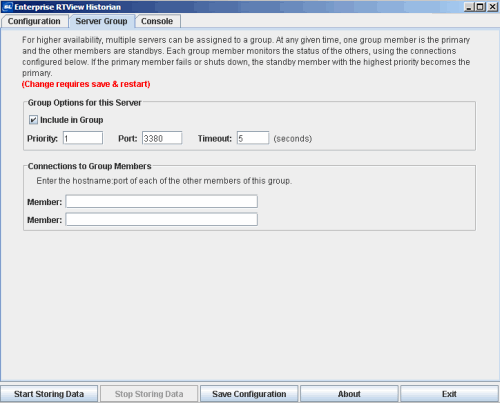
3. Click Save Configuration.
|