Alerts
RTView features a real-time alert engine
that enables management and operational personnel to monitor the health and
status of business operations. The alert
engine can monitor conditions and perform automated actions from any available
RTView data source. Alert definitions can include thresholds,
severity, notification policies and automated actions, such as email, system
commands, performing a SQL statement or sending JMS messages. RTView can load any number of
alert definitions and any number of customized dashboards can be created to
view alert status, filter alerts, use alerts as drill down navigation for
analysis and corrective action, or to interactively change alert status such as
alert acknowledgement.
The Self Service Alerts feature makes it easy to
set and persist threshold, duration and enabled settings for your alerts in a
database.
The Alert
Persistence feature stores all
fields and current state of all active alerts, as well as all cleared alerts
that have not been removed from the system in
a database using the Historian.
The Audit
Alert Action feature stores a record in a database each time
an alert command is executed.
Adding Alerts
In the Display Builder, select Tools>Alerts to open the Alerts
dialog. When you have finished adding all of
your alerts and configuring their properties, Save the
display (.rtv) file and add your
Alert Definition file to the
Alert data source
configuration.
NOTE: When creating alerts to use with Self Service Alerts, there are a few
limitations.
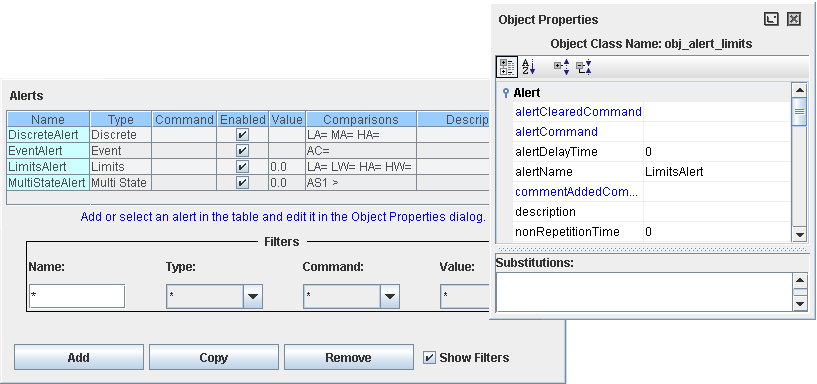
| Add |
To add a new alert,
click Add and enter an alert name and select an alert type. Once you have
added an alert, select that alert from the list and edit properties in the
Object Properties dialog. |
| Alert
Name |
Enter a
unique name for each alert listed. Alerts that do not specify a name, as well as
alerts with
a duplicate names, will not be created and an error will print to the
console. |
| Alert
Type |
Choose a type of alert
from the drop down menu (Limits,
Discrete,
Multi State or
Event). |
| Copy |
Select an alert from
the list and click Copy to create a duplicate of that alert. NOTE: You must
enter a unique name for each copy
you make. To copy an alert from your
current display to another display (.rtv) file, select an alert from the list
and click the Copy button  in the toolbar (or Ctrl-C). Then open the other display (.rtv) file and
click the Paste button
in the toolbar (or Ctrl-C). Then open the other display (.rtv) file and
click the Paste button  (or Ctrl-V). If an alert by that name already exists in that
display (.rtv) file, you will need to rename the alert.
(or Ctrl-V). If an alert by that name already exists in that
display (.rtv) file, you will need to rename the alert.
NOTE: An alert pasted into another
display (.rtv) file will have the same data attachments as the original alert. |
| Remove |
Select an
alert from the list and click Remove to delete. |
| Show Filters |
Select this checkbox to filter alerts by Name, Type, Command
or Value. NOTE: When filtering Alerts by Name, unnamed alerts will still be
included in the filter results.
|
Alert Definition Files
To create an Alert Definition file, save
the display (.rtv) file that contains the alert definition properties you set in
the Alerts dialog. When the Alert data source
reads in an Alert Definition file, it adds a line to the
Alert Variables
Table
for each alert in the file and creates a variable using the unique name
specified for each alert in the file.
See the
Alert Definitions tab in the
Application Options dialog for details on how to add an Alert Definition file to
the Alert data source configuration.
Creating a Reusable
Alert Definition File
You can create a reusable Alert
Definition file using the RTView substitution feature. When you enter
an Alert Name (alertName), include a substitution string as the suffix. Use that same
substitution string for the input value in the data attachment. When you
subsequently add the Alert Definition file to the Alert data source
configuration, you then specify a substitution value.
To give an example, let us say that your sales
data is broken down by sales regions, and you need an alert for each. Instead of
manually creating an alert for each region, you can create one and reuse it as a
template for the others. First create a display containing an alert definition
object named salesAlert.$region, where salesAlert is the alert name and
$region is the substitution string. The data attachment for the input value also
uses the $region substitution string. Save the file as alert_config.rtv.
This is your Alert Definition file. You then add this Alert Definition file to
the Alert data source configuration multiple times (in our example, four times),
with $region set to a different value for each region:
alert_config.rtv $region:North
alert_config.rtv $region:South
alert_config.rtv $region:West
alert_config.rtv $region:East
You will get four copies of salesAlert with the
following names:
salesAlert.North
salesAlert.South
salesAlert.West
salesAlert.East
Running the Alert
Engine
The alert engine resides within the
Alert data source, so there is no additional process to run the alert engine. How
RTView is deployed determines where the
alert engine specifically runs:
Thin Client Browser
with Direct Data Connection - The
alert engine runs on the Display Server. The alert engine is active as long as the Display Server is
running, regardless of whether clients are connected.
Application or Rich Client Browser with Direct Data
Connection - The alert engine runs on the client
machine. The alert engine is active as long as the client application or applet is running.
All
Deployments with Served Data -
The alert engine runs on the Data Server. The alert engine is active as long
as the Data Server is
running, regardless of whether clients are connected.
Alert Behavior
Alert Execution
Alerts are evaluated once each update
period. By default, this is every two seconds. You may reset the update period
on the General tab of the Application Options dialog. If
the current value of the input data meets an alert condition, the alert
executes. When an alert is
executed, the variables in the Alert data source are updated and the
alertCommand executes. NOTE: Multiple
asynchronous data updates between updates will be processed on the Max Redraw
Rate. By default, this is every 500 milliseconds. If asyncronous data comes
in faster than the specified Max Redraw Rate, updates will be missed. For
example, if your input data is a JMS message and you receive three messages
between Max Redraw Rate updates, only the data from the last message will
be used when evaluating the alert condition.
Cleared Alerts
Alerts are evaluated once each update period. By default, this is every two
seconds. You may reset the update period on the
General tab of the Application Options dialog. If the current value of the input data for
an alert that has been executed is no longer in an alert state, the alert will
clear. Set the time to keep cleared alerts
on
the
Alerts tab of the Application Options
dialog. When an alert is cleared, the
variables in the Alert data source are updated, the clearedCommand
executes, and the configured re-notification command (i.e. alertCommand
or reNotificationCommand) no longer executes.
NOTE: Multiple asynchronous data updates between
updates will be processed on the Max Redraw Rate. By default, this is
every 500 milliseconds. If asyncronous data comes in faster than the specified
Max Redraw Rate, updates will be missed. For example, if your input data
is a JMS message and you receive three messages between Max Redraw Rate
updates, only the data from the last message will be used when evaluating the
alert condition.
Viewing Alerts
When the Alert data source reads your Alert
Definition file, it creates a variable for each alert using the unique
alertName
specified in the Alert Definition file. See
Attach to Alert Data for more information on
how to create a display to attach to alert variables and view real-time alert
data. For alert definition objects that use
scalar input data (i.e. the useTabularDataFlag property is not
selected), this variable will be scalar. It will list the highest severity for
the alert definition. For alerts that use tabular input data, this variable will
be a table.
AlertTable
Lists all active
and cleared alerts.
By default,
individual index columns will not show up in the AlertTable. To display these
columns in the AlertTable, add a
Custom Alert Object
Property for each column and map them using the customPropertyMap
property on the alert. NOTE: Different alerts may have different index columns
and a different number of index columns, so this allows you to control of
whether, and how, index values for different alert definitions are displayed in
the AlertTable.
| Item |
Description |
| Acknowledged |
Selected if the alert has been
acknowledged. |
| Alert Name |
Value of the alertName
property. |
| Alert Index |
For tabular alerts with multiple
index columns this contains the concatenated values for all index columns in the
valueTable as specified in the indexColumnNames property on the
alert and delimited by the
Multiple Index Delimiter
(default is ~).
For alerts with a single index column this
contains the value of the index column.
NOTE: If input data is scalar (i.e. the useTabularDataFlag is
not selected) this field will be blank. |
| Alert Index
Values |
For tabular alerts with multiple index columns
this contains the alert index values concatenated by semi-colon (;). NOTE: You
can use this value to filter against multiple columns in the Filter By Row
function. For tabular alerts with a single
index column and for scalar alerts, this will contain the same value as the
Alert Index. |
| Alert Text |
Text about the alert. NOTE: Customize this text
using the value*AlertText properties. |
| Cleared |
Selected if the alert has cleared. |
| Cleared Reason |
DATA UPDATE |
Alert received a value
that did not meet the alert condition. |
| EXPIRED |
Alert expired due to
the value in the alertExpireTime property. NOTE: This property is only
supported for Event alerts. |
| DISABLED |
Alert definition was
disabled. An alert can be disabled by the enabledFlag and/or
rowEnabledFlag properties, or via the
Enable Alert Definition
command. |
| MANUAL |
Cleared by the
Clear Alert command. |
| ALERT HISTORY DEPTH EXCEEDED |
Number of
rows in the AlertTable exceeded the specified
Alert History Depth. |
| Cleared Time |
Time that the alert was cleared. |
| Comments |
This column is initially blank, but is updated
by the Add Comment and
Clear
Comments commands. NOTE: Comments can be added or cleared for any
active, cleared or acknowledged alert unless that alert has been purged from the
system. |
| Count |
When an alert is generated, this
column contains a value of 1 and increases incrementally each time the
alert receives a data update as long as the Last Update Time has also
changed. If the Last Update Time has not increased, the Count is
not incremented.
For tabular alerts, the Last Update Time and Count are only
incremented when a data update comes in for a specified index. However, when a
tabular alert is attached to a cache, the cache sends new data for all indexes
even when only one index has changed. This results in inaccurate Last Update
Time and Count values. To configure your alert to show correct
Count and Last Update Time values when it is attached to a cache,
include the cache's time_stamp column in the alert's valueTable
data attachment. Set the alert's timeColumnName property to the name of
the cache's time_stamp column. This configures the alert to use the cache
time stamp for Last Update Time and makes the Count accurate. You
can use the -ignorelutforcount:true
option to set the Count column to increase for all indexes when any row
in the table is updated, even if the value in the cache time_stamp column
only changed for a single row.
The Update
Count on Acknowledge Alerts option is selected by default and controls
whether or not the Count is incremented on acknowledged alerts.
- If selected, the count stops incrementing
only after an alert is cleared.
- If deselected, the count stops incrementing
if an alert is either cleared or acknowledged.
|
| ID |
Unique ID for the alert. |
| Last Update Time |
Date/time that the value or
valueTable on the alert last received a data
update. This column is
updated whenever new data is received for an active (i.e. not cleared) alert. |
| Owner |
Specify the Owner of an alert using the
Set Owner command. |
| Severity |
Severity of the alert. |
| Row Update Time |
Date/time that any column in
the row for the alert last received an update (as opposed to the
Last Update
Time column which is the last time the value or valueTable on the alert last
received a data update).
By default, the Last Update Time and Count columns are not tracked by the Row
Update Time. To track the updates of the two columns in the Row Update Time
column, use the -lutupdatesnewdata command line option.
When using the New Data Only
Alert Table as input to a cache, it is recommended
that you set the timestampColumnName property on the cache to the new Row
Update Time column.
NOTE:
The RtvAlertTable cache in the
Self Service Alerts
demo has been enhanced to use
the Row Update Time for the timestampColumnName property, and to limit
the columns from the Alert Table that are stored in history. |
| Time |
Time the alert was activated. |
Alert
Variables Table
Contains all of the active alert variables and their current state.
| Item |
Description |
| Alert Name |
Value of the alertName property.
NOTE: Alerts without an alertName or with duplicate
names will not be added to the Alert
Variables Table and an error will print to the
console. |
| Alert State |
Highest current severity for the
alert. For tabular alerts, it is the highest severity of all alerts in the
valueTable. NOTE: If an alert is disabled, the Alert State will be -1. |
| Enabled |
Enabled state of the alert: true if
enabled, false if disabled. |
| Description |
Description of the alert. This is the value from
the description property on the alert. |
| Alert Type |
Type of alert: Limits, Discrete, Multi State or
Event. |
| Tabular Alert |
Value is true if
alert is tabular (i.e.
useTabularDataFlag property is selected on
the alert). |
| Index Column Names |
Index column name(s) for this alert.
If you have specified indexColumnNames on
the alert, this will contain that string. Otherwise, after the alert receives
its first data update it will fill in the value with the name of the index
column in the valueTable.
If the alert is scalar (i.e. the
useTabularDataFlag is not selected) or if it is an unindexed Event
alert, this field will be blank. |
| Index Types |
A semi-colon (;) delimited list of available
index types for this alert. If a tabular alert does not have any index types, as
defined by the indexTypes property on the alert, the value will be All.
If
the alert is scalar (i.e. the useTabularDataFlag is not selected),
this field will be blank. |
Per-Tabular Alert Table
When the Alert data source reads your Alert Definition file, it creates a
variable for each alert using the unique alertName
specified in the Alert Definition file. For alerts that use tabular input data
(i.e. the useTabularData property is selected), this variable will be a
table. It contains one row for each alert index with the following columns:
| Item |
Description |
| Alert Index |
Name from the first column of the input data for
the alert definition.
For multiple index alerts, this is the
concatenation of all index columns in the valueTable as specified in the
indexColumnNames property on the alert and delimited by the
Multiple Index Delimiter
(default is ~). The specified indexColumnNames
will also be
included in this table. |
| Alert State |
Highest current alert severity for this alert
index. If this alert or alert index is disabled, the value of Alert State will
become -1. |
| Enabled |
Enabled state of the alert index: true if
enabled, false if disabled. |
Alert Index Types Table
Information about the available index
types for your alert. This table only contains rows (one row for each index
type) for alerts that have at
least one index type specified on the alert's indexTypes property.
| Item |
Description |
| Alert Name |
Name of the alert. |
| Index Type |
Name of the index type. |
| Column Names |
Semi-colon (;) delimited list of column names
that define the index type. |
Alerting Enabled Table
Indicates
whether the alert engine is enabled to the Alert data source.
| Item |
Description |
| AlertingEnabled |
Enabled state of the alert engine: true if
enabled, false if disabled. |
| AlertTableValid |
Validity of AlertTable: false at startup,
true after one update pass if the following two conditions have been met:
1) The alert engine has completed intiailzation.
- If self service is configured, alert
intiailzation does not complete until the alert engine has attached to the
self service alerts database.
- If persistence is configured, alert
intialization does not complete until after the alert engine has read the
persisted alerts and added them to the alert table or the Persistence
Connection Timeout has expired.
2) The specified
Initial Delay time
has expired.
NOTE: If you are running displays that have
scalar data attachments to the AlertingEnabled table that do not specify a
Column Name, then you must modify the data attachment to specify the
AlertingEnabled column. RTView does not support scalar properties attached to
multi-column tables. |
Managing Alerts
In addition to being able to manage your
alerts while developing your display using the
Application Options dialog, you
can also manage them from your deployed display.
Use the following alert commands to manage your alerts
from a deployed display.
- Add Alert Definition File
- Remove Alert Definition File
- Enable Alert Definition
- Enable Alerts
- Acknowledge Alert
See Define Alert
Command for more information.
NOTE: Executing these commands from your display
in the Display Builder does not cause the Application Options dialog to update. For example, if
you add an Alert Definition file by using the command, it does not show up in the
Application Options dialog until you either close and re-open it, or click Apply.
|