Define
TIBCO Rendezvous Command
NOTE: The TIBCO Rendezvous data
source may not be licensed in your RTView installation.
From the Object Properties
window you can access the Define TIBCO Rendezvous Command dialog. This
dialog is used to assign a TIBCO Rendezvous message to an object's
command property, giving you the ability
to send messages from within an RTView
display. If you execute
a TIBCO Rendezvous command from a Thin Client with Direct Data Connection or any
Served Data deployment, the command will execute on the server. To open the Define TIBCO
Rendezvous Command dialog, right-click on the appropriate command property
in the Object Properties window and select Define Command>RV. The
information supplied assigns a message to the command property. See the
Object
Commands section for information on how to execute a command.
|
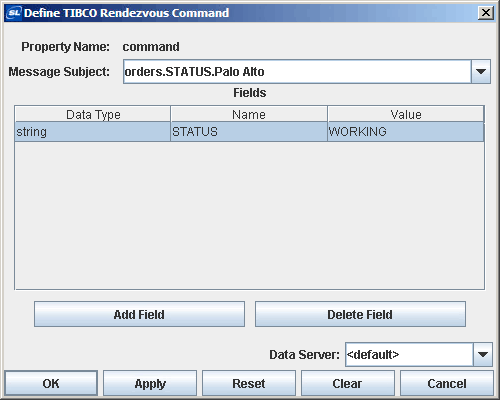 |
| Message
Subject |
Enter
a Message Subject name. To attach the Message
Subject to data, right-click and choose Attach to Data or double-click in
the field. |
| Fields |
Data Type - Select a data type
for this field.
Data types are converted to TibrvMsg data types as follows:
string - TibrvMsg.STRING
integer - TibrvMsg.I32
long - TibrvMsg.I64
float - TibrvMsg.F32
double - TibrvMsg.F64
boolean - TibrvMsg.BOOL
Name - Specify a name for this
field.
Value - Specify a value for this
field. To attach the Value to data,
right-click and choose Attach to Data or double-click in the field. |
| Add Field |
Add a field. |
| Delete Field |
Delete the selected field. |
| Data Server |
Select to read data through your configured Data
Server and not directly from the TIBCO Rendezvous data source.
Default - Select the default Data
Server you configured in Application
Options>Data Server.
None - Bypass data being redirected
through the specified data server(s) for this attachment and instead attach
directly to the data source.
Named Data Servers - Select a
Named Data Server
that you configured in Application Options>Data Server.
Multi-Server Command - When multiple
data servers are specified, the command will be executed on each data server
in the list.
To configure multiple data servers, enter a
semicolon (;) delimited list containing two or more
Named Data Servers (e.g. ds101;ds102). Each name specified must
correspond with a
Named Data Server
that you configured in Application Options>Data Server. It is also possible to
specify __default and __none (e.g. __default;ds101;ds102).
NOTE: The values __default and __none begin with two
underscore characters.
Alternatively, a value of * can be
entered to specify all data servers, including __default and __none.
|
A Message Repository file can be used
to populate the initial values of drop down menus for all fields. See
Application
Options for information on how to create a Message Repository file.
Otherwise, drop down menus populate based on message subjects added from
the Application Options dialog or those typed directly into the Attach
to Data dialog. Message subjects will not be added to drop down menus until
at least one TIBCO Rendezvous message with that subject has been received
by RTView.
Validation Colors
Fields in the dialog change colors
according to the information entered. These colors indicate whether or
not information is valid. Information is validated against the Message
Repository file, message subjects added from Application Options dialog,
or those typed directly into the Attach to Data dialog. Message subjects
will not be validated until at least one TIBCO Rendezvous message with
that subject has been received by RTView. NOTE: Some subjects
using wild card characters are not validated at this time.
The following describes the significance
of validation colors:
| |
Blue |
Unknown |
Entry is not
recognized. When a Subject is unknown, the Message Field, Filter Field
Name, and Filter Field Value are also unknown. |
| |
White |
Valid state |
Entry is valid
and was found. |
| |
Red |
Invalid state |
Entry is not
valid. |
Once all of the required
fields are complete, click OK to close the dialog and set a value for the
object's command property.
Substitutions
The Substitutions feature
allows you to build open-ended displays in which commands depend on values
defined at the time the display is run. A generic Message Subject such
as $subject is used instead of a specific message. Later when the display
is running, this generic value is defined by the actual name of a specific
message, such as orders.STATUS.London. In this way, a single display can
be reused to send a number of different messages. For more information
on creating displays using substitution values, see
Substitutions.
Special Values
| $value |
When an actionCommand
is executed $value is replaced with the value from the control. This value
may be used in any field in the Define TIBCO Rendezvous Command dialog.
NOTE: This value may only only be used for
Action
Commands. |
The following describes Define
TIBCO Rendezvous Command dialog commands:
| Command |
Description |
| OK |
Applies values
and closes the dialog. |
| Apply |
Applies values
without closing the dialog. |
| Reset |
Resets all fields
to last values applied. |
| Clear |
Clears all fields.
Detaches object from assigned message subject (once Apply or OK is selected). |
| Cancel |
Closes the dialog
with last values applied. |
|