Create
TIBCO Rendezvous Message Alias
NOTE: The TIBCO Rendezvous data
source may not be licensed in your RTView installation.
In the RVALIAS.ini file, you
can create aliases for (top level or nested) messages, message fields and
XML data embedded in TIBCO Rendezvous messages. Once RVALIAS.ini
is
saved and RTView is restarted, you will be able to access these
aliases from the
Message
Subject drop down menu in the Attach to TIBCO
Rendezvous Data dialog.
It is possible to
specify a directory for your initialization files. If
no directory has been specified for initialization files
and RVALIAS.ini is not found in the directory where you started the
application, then RTView will search under lib in your
installation directory. NOTE: When you start an RTView application
from the Windows Start menu, it runs from the demos directory. To define an alias in RVALIAS.ini
use
the following syntax:
aliasName subject
partialUpdatesOK fieldNameList
| aliasName |
Create
a name to use when selecting this alias from the Attach to TIBCO Rendezvous
Data dialog. NOTE: Alias names cannot contain spaces. |
| subject |
TIBCO Rendezvous message
subject. It is possible to use * as a wild card
character (e.g.: orders.STATUS.* or *.*.*). NOTE:
If
a message subject contains a space or a colon, then the subject
must be enclosed in single quotes. |
| partialUpdatesOK |
This keyword is optional.
If present, new row data will be merged into existing row data when a new
message comes in with the same subject. For example, if a message comes
in which contains fields FieldA, FieldB and FieldC,
then another message with the same subject comes in which contains fields
FieldC,
FieldD and FieldE, the new row will contain fields FieldA
and FieldB from the previous message and FieldC,
FieldD
and FieldE from the current message. |
| fieldNameList |
Message field names listed
in hierarchical order separated by a :: (e.g., fieldName1::fieldName2::fieldName3
... etc.) ending in the name of the field that contains the data to display.
If no fieldNameList is specified, top level message fields will
be displayed.
If a message field in this list contains
XML data, then add the $xml: prefix to the field name that contains
the XML data. (e.g., fieldName1::$xml:fieldName2::fieldName3
... etc.) The name of the message field containing
XML data may be followed by a list of XML tags in hierarchical order that
ends in an XML tag with the specific data you would like to display. If
the last fieldName listed contains more than one level of XML tags,
then all subsequent tags will be converted to column names using the _
symbol.
NOTE: If
a field name contains a space or a colon, then the entire fieldNameList
must be enclosed in single quotes. |
Nested Message Field Aliases
In the alias defined below named allOrders,
a message with the subject orders.STATUS.* contains the customer_info
message field, which is nested within the sales message field.
allOrders orders.STATUS.*
sales::customer_info
A table attached to allOrders will
contain a column for each field in the customer_info message field.
It is also possible to create an alias
for a specific field in the customer_info message field.
allNames orders.STATUS.*
sales::customer_info::NAME
A table attached to allNames would
contain one column for the NAME field.
If the message that the alias resolves to
contains multiple fields with the same name, a row will be displayed for each
field. NOTE: Hierarchical message field names are converted to column
names using the _ symbol (e.g.: Customer_Name, Customer_CID,
etc.).
Embedded XML Data Aliases
To display XML data embedded within
a TIBCO Rendezvous message, add the $xml: prefix to the field name
that contains the XML data. In the alias defined below named OrderInfo,
the OrderData message field (containing XML data) is nested within
the Production message field.
OrderInfo orders.STATUS.*
Production::$xml:OrderDatab
There are several ways that the following
XML values and attributes (contained in the message field named OrderData)
can be defined in an alias.
<Orders>
<Order Date="March 1, 2004" Time="12:00:00">
<OID>12345</OID>
<Customer>
<Name>John Smith</Name>
<CID>6789</CID>
</Customer>
</Order>
<Order Date="March 1, 2004" Time="12:00:00">
<OID>67891</OID>
<Customer>
<Name>Alice Chen</Name>
<CID>1001</CID>
</Customer>
</Order>
</Orders>
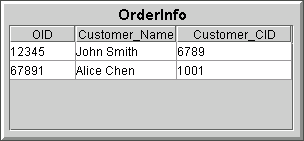
Displaying XML Values
To display all XML values contained
within Order tags of the OrderData message field, you would
use the following alias. Since the Orders tag contains two Order
tags, 2 rows will be displayed in the table. NOTE: Hierarchical XML tags are converted to column
names using the _ symbol (e.g.: Customer_Name, Customer_CID,
etc.).
OrderInfo orders.STATUS.*
$xml:OrderData::Orders::Order
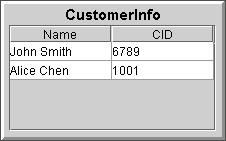
You can display specific information contained
within Customer tags of the OrderData message field using
the following alias:
CustomerInfo orders.STATUS.*
$xml:OrderData::Orders::Order::Customer
Displaying XML Values and Attributes
To display all XML values and attributes
contained within Order tags of the OrderData message field,
you would use the following alias. NOTE: Hierarchical XML tags are converted
to column names using the _ symbol (e.g.: Customer_Name,
Customer_CID, etc.).
OrderInfoAllValuesAndAttribs
orders.STATUS.* $xml:OrderData::Orders::Order:$attrib=**

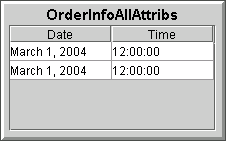
Displaying XML Attributes Only
You can display all of the XML attributes
contained within Order tags of the OrderData message field
using the following alias:
OrderInfoAllAttribs orders.STATUS.*
$xml:OrderData::Orders::Order:$attrib=*
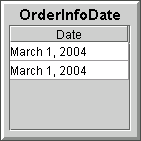
It is also possible to display only a
particular attribute (Date) contained within the Order tags.
OrderInfoDate orders.STATUS.*
$xml:OrderData::Orders::Order:$attrib=Date
|