Self Service Alert Demo
Self Service Alerts makes
it easy to set and persist threshold, duration and enabled settings for your
alerts in a database. For details, see
Alerts>Self Service Alerts.
The Self Service Alerts demo can be
modified and used stand-alone or
integrated into your RTView application in order
to view and administrate alerts. The demo is located under demos\selfservicealerts
in your RTView installation directory and
contains three displays (Alert Detail Table, Alert Administration and Alert
Audit) and a pre-configured hsqldb database to store your alert settings. NOTE:
For other database types, the demos\selfservicealerts\dbconfig directory
contains .sql files with the correct table schemas and a README.txt that
explains how to use them.
Running the Demo
In an
initialized command window, navigate to the demos/selfservicealerts
directory:
1. Start the XML simulator:
2. Start the hsqldb database:
3. View the demo:
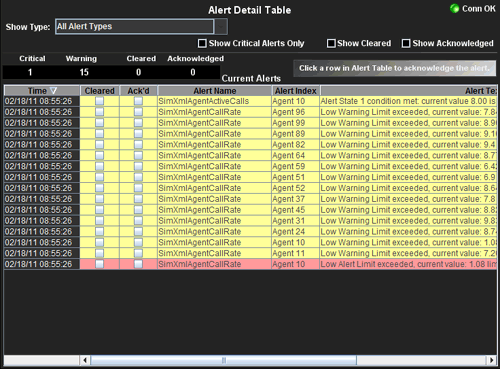
Alert Detail Table
This display
shows all of your current alerts:
| ConnOK |
Indicates the connection status of the Alert
Settings table. |
| Show Type |
Select a type of alert from the list to
filter the table by the Alert Name column or select All Alert Types. |
| Show Critical Alerts Only |
Select to only
show alerts with a severity of 2. |
| Show Cleared |
Select to show cleared alerts. |
| Show Acknowledged |
Select
to show acknowledged alerts.
|
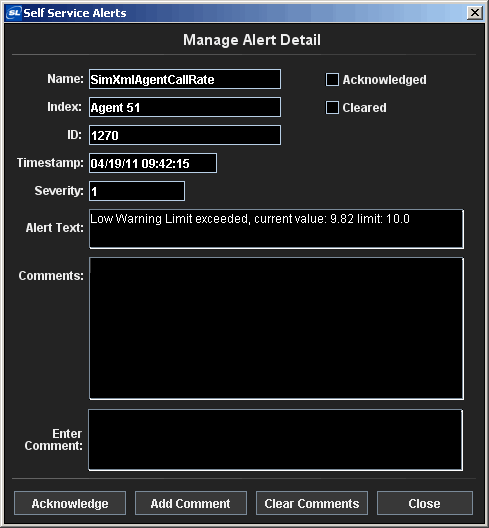
To view more information about an alert or to acknowledge an alert, double-click
on an alert in the table to open the Manage Alert Detail dialog. You may
also add a comment to the alert or clear all existing comments.
Alert Administration
This display
shows you the current values in the Alert Settings Table in the Self Service
Alerts database.
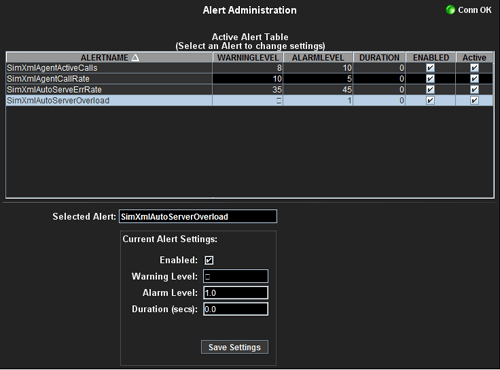
| ConnOK |
Indicates the connection status of the Alert
Settings Table. |
| Selected Alert |
Double-click to select and modify settings
for an alert from the Active Alert table. |
| Enabled |
Reflects value of enabledFlag property. |
| Warning Level |
Values WARNINGLEVEL will be set from
different properties depending of the alert type. See
Alerts>Self Service
Alerts for details. |
| Alarm Level |
Values for ALARMLEVEL will be set from
different properties depending of the alert type. See
Alerts>Self Service
Alerts for details. |
| Duration (secs) |
Reflects value of alertDelayTime
property. |
NOTE: The Save Settings button is only enabled if an alert is selected and the
connection to the Alert Settings Table is good.
Administration Audit
This display
shows the changes made to the Alert Settings Table if an Audit Table was
specified on the Self
Service Alerts tab of the
Application Options dialog.
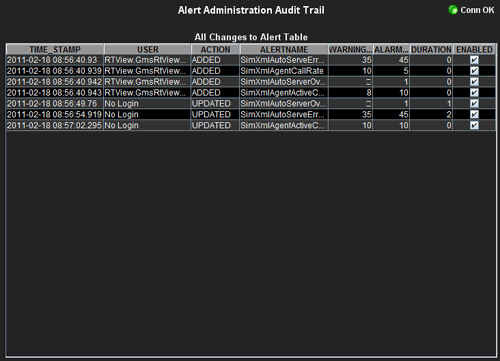
| ConnOK |
Indicates the connection status of the Audit
Table. |
Modify the Stand-Alone Demo
Replace Demo Alerts
To use the Self Service Alerts demo to
monitor your own alerts, you must first replace the demo alerts with your own. There are 2 ways to do this:
Save
your alert definitions in a file named rtv_alertdefs.rtv and replace the
existing file, located in demos/selfservicealerts, with your own.
OR
Save
your alert definitions in one or more .rtv files in the demos/selfservicealerts
directory.
-
Run the Display Builder from the selfservicealerts
directory.
-
In the Display Builder, select Tools>Options.
-
In the Application Options dialog, select
Alerts>Alert Definitions and remove
rtv_alertdefs.rtv
and add your own alert definition files.
-
Save and exit the Display Builder.
Replace Demo (hsqldb) Database
To use a different database to store
your alert settings, modify the ALERTDB SQL Database Definition.
-
Run the
Display Builder from the selfservicealerts directory.
-
In the Display Builder, select Tools>Options.
-
In the Application Options dialog, select SQL.
-
Edit the ALERTDB database connection to
point to your database.
-
If necessary,
change the Settings Table Name and Audit Table Name entries. In the Application
Options dialog, select Alerts>Self Service Alerts.
-
Save and exit the Display Builder.
The selfservicealerts/dbconfig directorycontains SQL schema files for several databases.
You can use these files to create the necessary tables in your database. See
the README.txt file in that directory for instructions.
Clear Demo (hsqldb) Database
You can also clear the included hsqldb
by running the DATA\reset_alerts script while the database is not running. This
will remove all entries from the alert settings table and the audit table.
Modify Alert
Options
It is possible to limit the number of active alerts in
the Alert Detail table and set the rate at which cleared alerts are removed.
Currently in this demo, the Alert History Depth (i.e. number of active
alerts) is set to 2000 and the Rate to Remove Cleared Alerts is 300
milliseconds (5 minutes).
If
you will have a larger number of active alerts in the Alert Table at one time,
you will need to increase the Alert History Depth value on the
Alerts tab of the Application Options
dialog.
Integrate the Demo into an RTView
Application
Before
integrating this demo into your RTView application, you must configure it as described
above to monitor your alerts and store the settings in the
database of your
choice.
Once you have
done this, proceed with the following instructions:
-
Copy
all of the .rtv files from the demos/selfservicealerts directory to your
RTView application directory.
-
Copy ALERTOPTIONS.ini and CACHEOPTIONS.ini
files to the directory where you will be
running the alerts. This might be your application directory or it might be
the directory where you are running the Data Server if you want the alerts to
run in the Data Server. NOTE: If this
directory is not your application directory, move your alert configuration
files (rtv_alertdefs.rtv and/or your other alert configuration files) and rt_alerts_cache.rtv
to the same directory as ALERTOPTIONS.ini and CACHEOPTIONS.ini.
-
Add the ALERTDB option to the options file
in the directory where you put the ALERTOPTIONS.ini and CACHEOPTIONS.ini:
a. If the directory where you put
ALERTOPTIONS.ini and CACHEOPTIONS.ini already contains an OPTIONS.ini file,
then add the lines that start with sqldb ALERTDB and dbretry from demos/selfservicealerts/OPTIONS.ini
file to that file.
b. If the directory where you put
ALERTOPTIONS.ini and CACHEOPTIONS.ini does not contain an OPTIONS.ini file,
copy the OPTIONS.ini file from demos/selfservicealerts to there.
-
In your application directory, add the following
display (.rtv) files to your panel configuration file:
rtv_alerts_table.rtv (Alert Detail View)
rtv_admin_alerts.rtv (Alert Administration)
rtv_alerts_audit.rtv (Administration Audit)
-
The demo uses the style sheets rtv_darkstyles.rts
and rtv_flat.rtv to set the look and feel of the displays. If your
application already uses these stylesheets or if you do not want to apply a
style sheet, you are finished.
a. If you want to apply the style sheets to your
whole application:
In the Display Builder select Tools>Options.
In the Application Options dialog, select General>Style Sheet.
Click Add Built-in Styles and select rtv_darkstyles.rts and
rtv_flat.rts. If you do not want these style sheets applied to the
main Display Builder window, deselect Apply Style Sheets to Main
Builder Window. Save your options and exit the Display Builder.
b. If you only want to apply the style sheets to
the Self Service Alerts display files (i.e. rtv_alerts_table.rtv,
rtv_admin_alerts.rtv, and rtv_alerts_audit.rtv):
Open each of these files in the Display
Builder and in each display, select Tools>Style Sheets. Click
Add Built-in Styles and select rtv_darkstyles.rts and
rtv_flat.rts. Click OK and Save each display.
|