Table
Edits
In the Standard Table (class name:
obj_table02), it is possible to add or remove rows and columns or edit
the value of existing cells. To utilize table editing features, a Custom
Message Handler must be implemented. Once
the Custom Message Handler has been created, anyone can use Enterprise
RTView to easily update data throughout the enterprise.
Enable Editing
To enable editing, you must set a
variable and attach the table to data.
The editDataEnabledFlag
allows
you to control whether a table can be edited. In the Object Properties
window when you select the editDataEnabledFlag, the editDataLocalVarName
property will appear. In the Property Value field of editDataLocalVarName
enter the name of the variable you would like to update with changes
made to the editable table. This will allow you to identify the table in
the
Custom Message Handler
as well as attach other objects in this display to your edited data. NOTE:
The property editDataLocalVarName cannot be changed while the table
is in Edit mode.
Attach data to the valueTable property to populate the table with initial data in order to enable editing.
The table will not display data updates while in Edit mode, however once
you save or cancel table edits current data for the valueTable attachment
will be displayed.
Edit Table
To put the table in Edit mode, right-click
on the table and select Edit Table from the popup menu. If the
Edit
Table option is not listed, the editDataAllowFlag has not been
selected. If Edit Table is listed in the menu but is not active,
the valueTable property is not attached to data.
To indicate your table is in Edit mode,
the background rectangle of the table as well as the column headers will
switch foreground and background colors.
To edit an existing cell value, double-click
within a cell and enter a new value. When you are finished editing within
a cell, you must press <Enter> or click on another cell before
saving your edits. If the data entered is not the correct type (int, double,
etc.) for that cell, the cell border will turn red and you will not be
able to continue editing until the correct type of value is entered.
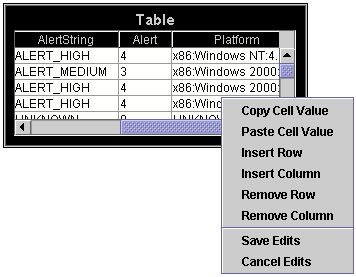
Right-click to access the following
menu options:
| Copy Cell Value |
Select a cell and right-click
to Copy Cell Value. |
| Paste Cell Value |
Select a cell and right-click to Paste
Cell Value. |
| Insert Row |
Select a cell in the row that is immediately
above or below where you want to insert a new row and right-click to Insert
Row. A dialog will appear asking you to enter a row name and specify whether
to insert the new row above or below the selected row. Click OK to exit
the dialog and add the new row. NOTE: If the Property Value of
rowLabelMode
is 0, row names will not appear in the table. |
| Insert Column |
Select a cell in the column that is
immediately to the right or left of where you want to insert a new column
and right-click to Insert Column. A dialog will appear asking you to enter
a column name, column type, and specify whether to insert the new column
to the right or left of the selected column. Click OK to exit the dialog
and add the new column. |
| Remove Row(s) |
Select one or more cells and right-click
to Remove Row(s) containing the selected cell(s). |
| Remove Column(s) |
Select one or more cells
and right-click to Remove Column(s) containing the selected cell(s). NOTE:
The column that contains row names cannot be deleted. The table will only
contain a column with row names if the Property Value of rowLabelMode
is greater than 0. |
| Save/Cancel Edits |
Right-click on the table to Save or
Cancel Edits. |
Save or Cancel Edits
If you exit a display while tables
are in Edit mode without saving or cancelling changes, a dialog will appear
(for each table with unsaved changes) asking if you would like to save
your table edits.
Once you save or cancel your changes,
the table will display current values for the valueTable data attachment and return to its original color scheme to indicate you
are out of Edit mode.
If you edit a table within an applet
and do not save your changes, you will not be prompted to save when exiting.
|