Enterprise RTView® 
User Guide


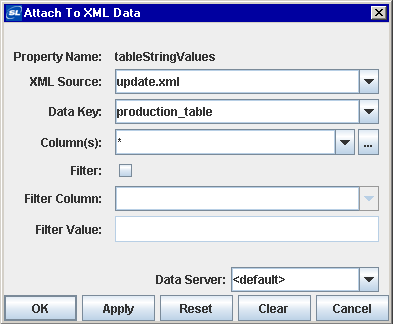
Attach to XML Data

From the Object Properties window you can access the Attach to XML Data dialog, which is used to connect an object property to an element in your XML data. Once a property has been attached to an XML element, it receives continuous updates.

When an object property is attached to data, the Property Name and Value in the Object Properties window will be displayed in green. This indicates that editing this value from the Object Properties window is no longer possible. To remove the data attachment, and resume editing capability in the Object Properties window, right-click on the Property Name and select Detach from Data. You will recognize that an object property has been detached from the data source when the Property Name and Value are no longer green.
 

To bring up the Attach to XML Data dialog, right-click on the Property Name from the Object Properties window and select Attach to Data>XML. The Attach to XML Data dialog provides three drop down menus that allow you to specify information regarding an XML element. See Creating XML Sources for technical details on creating and formatting an XML source.
 
XML Source Name of XML source containing XML element.
Data Key Key corresponding to XML element.
Column(s) If XML element is tabular, you can select which column(s) to display.
Filter Check box to indicate whether or not to filter the XML element. Filters can only be used for tabular data.
Filter Column Name of the column to use as a filter.
Filter Value Value that the filter column must equal. Single or multiple values may be listed. Enter * to display all rows in the table. Enter "*" to use * as a literal comparative value. To list multiple values, separate with a semicolon. For example: value1;value2;value3. If your value contains a semicolon, enclose it in single quotes.
Data Server Select to read data through your configured Data Server and not directly from the XML data source.

Default - Select the default Data Server you configured in Application Options>Data Server.

None - Bypass data being redirected through the specified data server(s) for this attachment and instead attach directly to the data source.

Named Data Servers - Select a Named Data Server that you configured in Application Options>Data Server.

The XML Source drop down menu lists all available XML sources. Drop down menus for Data Key, Column(s) and Filter Column populate based on the selected XML source. The XML Source field automatically displays the name of the default XML source. The Column(s) and Filter Column drop down menus will only contain options if the selected Data Key is a tabular element that has been included in an XML update. If the item you require is not listed, type your selection into the field. For information on adding XML sources or selecting a default XML source, see Application Options.


Validation Colors
Fields in the dialog change colors according to the information entered. These colors indicate whether or not information is valid. Information entered into the dialog is validated against elements included in an XML update.

The following describes the significance of the Attach to XML Data validation colors:
 
  Blue Unknown Entry does not match any known XML source*.
  White Valid state Entry is valid.
  Red Invalid state XML source is valid, but Data Key, Column(s) or Filter Column selected are not.
  Gray Not Required Field does not require a value. This applies to the Column(s), Filter Column or Filter Value field for data keys that are not tabular elements.

*If an XML source is validated as Unknown, Enterprise RTView will attempt to read it when you click OK or Apply.


Substitutions
Substitutions allow you to build open-ended displays in which data attachments depend on values defined at the time the display is run. Generic names, such as $data1 and $data2, are used instead of values for specific data keys. Later when the display is running, these generic values are defined by the actual names of specific keys, such as element1_data and element2_data. In this way, a single display can be reused to show data from a number of different sources. For more information on creating displays using substitution values, see Substitutions.


Select Table Columns
From the Attach to XML Data dialog you can specify which table columns to display and in what order they will appear. In order to populate the listing of available columns, you must first select a valid XML source and data key.

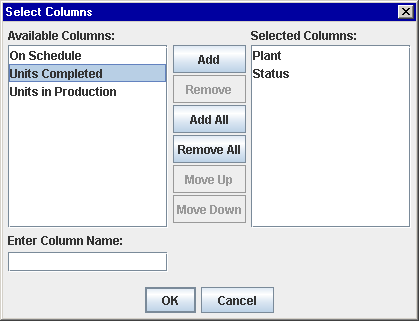
To bring up the Select Columns dialog, click on the ellipse button in the Column(s) field (or right-click in the Column(s) field and choose Select Columns). The dialog should contain a list of Available Columns that you can add to your table.

To add a column, select an item from the Available Columns list and click on the Add button. If the item you require is not listed, type your selection into the Enter Column Name field. Click the Remove button to delete an item previously added to the Selected Columns list. You can control the order of columns in a table by arranging the items in the Selected Columns list with the Move Up and Move Down buttons.

Validation colors indicate whether selected columns are valid. However, if even one column selected is invalid, the Column(s) field in the Attach to XML Data dialog will register as an invalid entry. NOTE: Invalid columns will not update.

If no data is available for a table row within a selected column, the table cell will display one the following values: N/A, false, 0, or 0.0.


The following describes the Attach to XML Data dialog commands:
 
Command Description
OK Applies values and closes the dialog.
Apply Applies values without closing the dialog.
Reset Resets all fields to last values applied.
Clear Clears all fields. Detaches object from data source (once Apply or OK is selected).
Cancel Closes the dialog with last values applied.


JMS, JMX and Java are trademarks and/or registered trademarks of Sun Microsystems, Inc. in the United States and other countries. They are mentioned in this document for identification purposes only. 

 
SL, SL-GMS, GMS, Enterprise RTView, SL Corporation, and the SL logo are trademarks or registered trademarks of Sherrill-Lubinski Corporation in the United States and other countries. Copyright © 1998-2008 Sherrill-Lubinski Corporation. All Rights Reserved.