Home > Configuration and Deployment > Configure Databases of the Central Servers
The Central Servers require the following databases: ALERTDEFS, RTVCMDB, RTVCONFIG and RTVHISTORY, each of which contain several tables. RTView Enterprise Monitor is delivered with a default memory resident HSQLDB database, which is suitable for evaluation purposes. However in production deployments, it is recommended that a supported database engine be used that is accessible via JDBC. This section describes how to setup an alternate database and, if needed, how to manually create the database tables (which requires table-creation permission in your database engine).
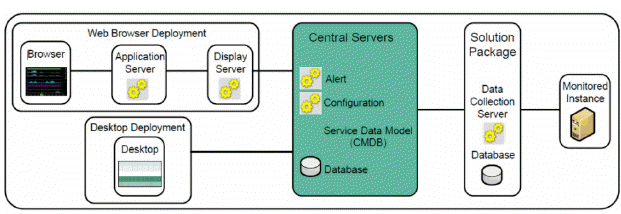
The following figure illustrates the RTView Enterprise Monitor components that are the subject of this section.
Verified System Requirements
Completed instructions in Installation for the full RTView Enterprise Monitor platform
Completed instructions in Configure Central Servers
Completed instructions in Configure Solution Package. You have configured a local RTView Enterprise Monitor deployment and Web Browser RTView Enterprise Monitor deployment. That is, displays such as the All Management Areas - Area Heatmap are populated with JVM data from RTView Enterprise Monitor servers and the CMDB database (which has only the default Owner, Infrastructure).
Have Solution Package-specific displays showing monitoring data from your environment. You do not yet see Solution Package data in displays such as the All Management Areas - Area Heatmap.
Completed instructions in Configure Service Data Model.
Note: Use the templates provided in the database.properties file, located in the your rtvapm/common/dbconfig directory, to make edits described in the following steps.
Choose and install a database of your choice. Supported databases are Oracle, Sybase, DB2, Microsoft SQL Server and MySQL.
Open the central.properties file (located in your project directory/servers/central directory) in a text editor and make the following edits:
a. Under the ConfigCollector properties section there is a subsection for each database connection (the subsections are Define the ALERTDEFS Database, Define the RTVCONFIG Database, and Define the CMDB Database). Comment out the existing (default) entries and add the required connection information. For example, for an Oracle database you make the following edits:
# --------------------------
# ConfigCollector properties
# Define the ALERTDEFS Database
# Contains all Alert Threshold settings and overrides
#ConfigCollector.sl.rtview.sql.sqldb=ALERTDEFS sa - jdbc:hsqldb:hsql://localhost:9099/alertdefs org.hsqldb.jdbcDriver - false false
ConfigCollector.sl.rtview.sql.sqldb=ALERTDEFS myusername mypassword jdbc:oracle:thin:@myhost:9099:myinstance oracle.jdbc.driver.OracleDriver - false false
…
# Define the RTVCONFIG Database
# Contains all CI Type definitions
#ConfigCollector.sl.rtview.sql.sqldb=RTVCONFIG sa - jdbc:hsqldb:hsql://localhost:9099/rtvconfig org.hsqldb.jdbcDriver - false false
ConfigCollector.sl.rtview.sql.sqldb=RTVCONFIG myusername mypassword jdbc:oracle:thin:@myhost:9099:myinstance oracle.jdbc.driver.OracleDriver - false false
…
# Define the Default CMDB Database
# This is the database that is accessed and modified by the EM CMDB Admin page
#ConfigCollector.sl.rtview.sql.sqldb=RTVCMDB sa - jdbc:hsqldb:hsql://localhost:9099/rtvcmdb org.hsqldb.jdbcDriver - false true
ConfigCollector.sl.rtview.sql.sqldb=RTVCMDB myusername mypassword jdbc:oracle:thin:@myhost:9099:myinstance oracle.jdbc.driver.OracleDriver - false false
…
b. In the RTVHISTORY Database Connection subsection under the ALERT MODULE PROPERTIES section, make the same edits as in the previous step. Using our prior example:
# Historian
#AlertHistorian.sl.rtview.historian.driver=org.hsqldb.jdbcDriver
#AlertHistorian.sl.rtview.historian.url=jdbc:hsqldb:hsql://localhost:9099/rtvhistory
#AlertHistorian.sl.rtview.historian.username=sa
#AlertHistorian.sl.rtview.historian.password=
AlertHistorian.sl.rtview.historian.driver=oracle.jdbc.driver.OracleDriver
AlertHistorian.sl.rtview.historian.url=jdbc:oracle:thin:@myhost:9099:myinstance
AlertHistorian.sl.rtview.historian.username=myusername
AlertHistorian.sl.rtview.historian.password=mypassword
# RTVHISTORY Database Connection
#collector.sl.rtview.sql.sqldb=RTVHISTORY sa - jdbc:hsqldb:hsql://localhost:9099/rtvhistory org.hsqldb.jdbcDriver - false true
collector.sl.rtview.sql.sqldb=RTVHISTORY myusername mypassword jdbc:oracle:thin:@myhost:9099:myinstance oracle.jdbc.driver.OracleDriver - false false
c. Add a section for MX with the following property and make the same edits as the previous steps. Using our prior example:
# MX
# Database for saved metric explorer views
# ConfigCollector.sl.rtview.sql.sqldb=RTVMX sa - jdbc:hsqldb:hsql://localhost:9099/rtvmx org.hsqldb.jdbcDriver - false true
ConfigCollector.sl.rtview.sql.sqldb=RTVMX myusername mypassword jdbc:oracle:thin:@myhost:9099:myinstance oracle.jdbc.driver.OracleDriver - false false
d. Edit the properties relative to each of the database connections you just edited in the previous steps by replacing the following as appropriate:
|
myusername |
User name to enter into this database when making a connection. |
|
myhost |
Full URL to use when connecting to this database using the specified JDBC driver. |
|
myinstance |
Instance name of your database. |
|
mypassword |
Password to enter into this database when making a connection. If there is no password, use “-“. If you need to use an encrypted password, rather than expose server passwords, use the “encode_string” utility as follows: In an initialized command window, execute the following script where mypassword is your plain text password. For example: encode_string sql mypassword. You then receive an encrypted password for copying and pasting into the password field. For example: encrypted value: 013430135501346013310134901353013450134801334 |
Save the file.
Manually create the tables needed for each database connection. To create tables for your database, use the .sql template files provided for each supported database platform, located in your project directory/dbconfig directory:
ALERTDEFS
create_common_alertdefs_tables_<db>.sql
RTVCONFIG, RTVCMDB, RTVHISTORY
create_<rtvcmbd|rtvconfig|rtvhistory>_tables_<db>.sql
RTVMX
Templates for RTVMX tables are located in the RTVAPM_HOME/mx/dbconfig directory:
create_rtvmx_tables_<db>.sql
where <db> ={db2, mysql, oracle, sqlserver, sybase}
Note: The standard SQL syntax is provided for each database, but requirements can vary depending on database configuration. If you require assistance, consult with your database administrator.
The most effective method to load the .sql files to create the database tables depends on your database and how the database is configured. Some possible mechanisms are:
Interactive SQL Tool: Some database applications provide an interface where you can directly type SQL commands. Copy/paste the contents of the appropriate .sql file into this tool.
Import Interface: Some database applications allow you to specify a .sql file containing SQL commands. You can use the .sql file for this purpose.
NOTE: Before loading the .sql file, create the database and declare the database name in the command line of your SQL client. For example, on MySQL 5.5 Command Line Client, to create the tables for the Alert Settings you should first create the database:
create database myDBName;
before loading the .sql file:
mysql -u myusername -pmypassword myDBName < create_common_alertdefs_tables_mysql.sql;
In some cases it might also be necessary to split each of the table creation statements in the .sql file into individual files.
Third Party Application: If your database does not have either of the above two capabilities, a third party tool can be used to enter SQL commands or import .sql files. Third party tools are available for connecting to a variety of databases (RazorSQL, SQLMaestro, Toad, for example).
You have finished configuring the databases on the Central Servers.